WINDOW / GLASS BACK DOOR GLASS INSTALLATION
CAUTION / NOTICE / HINT
- NOTICE:
-
Make sure to use Toyota Genuine Windshield Glass Adhesive (High Modulus Type) or an equivalent high modulus adhesive.
PROCEDURE

 62785Q
1.INSTALL NO. 2 QUARTER WINDOW GLASS SPACER
62785Q
1.INSTALL NO. 2 QUARTER WINDOW GLASS SPACER
Using a brush or sponge, coat the installation area of a new No. 2 quarter window glass spacer with glass primer.
- NOTICE:
- ·
Do not apply too much glass primer.
·Allow the glass primer to dry for 3 minutes or more.
·Throw away any leftover glass primer.
- HINT:
-
If an area other than specified is coated by accident, wipe off the glass primer with a clean piece of cloth before it dries.
Install the 4 No. 2 quarter window glass spacers to the back door glass as shown in the illustration.
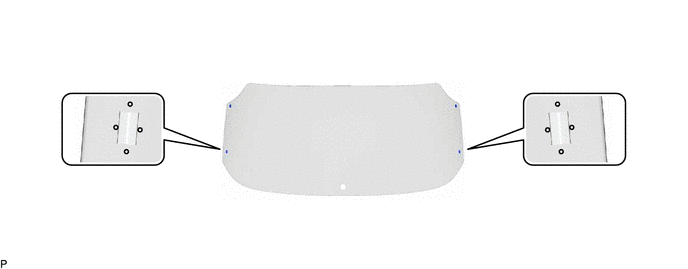
| *A | Back Side | - | - |
| *a | Ceramic Notch | - | - |
62785F
2.INSTALL BACK DOOR GLASS SPACER
Using a brush or sponge, coat the installation area of a new back door glass spacer with glass primer.
- NOTICE:
- ·
Do not apply too much glass primer.
·Allow the glass primer to dry for 3 minutes or more.
·Throw away any leftover glass primer.
- HINT:
-
If an area other than specified is coated by accident, wipe off the glass primer with a clean piece of cloth before it dries.
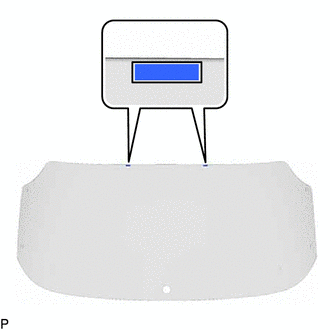
| *A | Back Side |
| *a | Matchmark |
Install the 2 back door glass spacers to the back door glass as shown in the illustration.
64818C
3.INSTALL NO. 1 BACK WINDOW GLASS SPACER
Using a brush or sponge, coat the installation area of a new No. 1 back window glass spacer with glass primer.
- NOTICE:
- ·
Do not apply too much glass primer.
·Allow the glass primer to dry for 3 minutes or more.
·Throw away any leftover glass primer.
- HINT:
-
If an area other than specified is coated by accident, wipe off the glass primer with a clean piece of cloth before it dries.
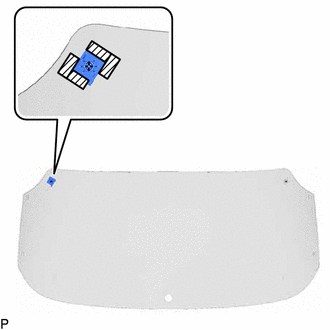
| *A | Back Side |

|
Adhesive Tape |
Install the No. 1 back window glass spacer to the back door glass as shown in the illustration.
64819B
4.INSTALL NO. 2 BACK WINDOW GLASS SPACER
- HINT:
-
Use the same procedure as for the No. 1 back window glass spacer.
75575D
5.INSTALL BACK WINDOW LOWER MOULDING
Using a brush or sponge, coat the installation area of a new back window lower moulding with glass primer.
- NOTICE:
- ·
Do not apply too much glass primer.
·Allow the glass primer to dry for 3 minutes or more.
·Throw away any leftover glass primer.
- HINT:
-
If an area other than specified is coated by accident, wipe off the glass primer with a clean piece of cloth before it dries.
Install the back window lower moulding to the back door glass as shown in the illustration.
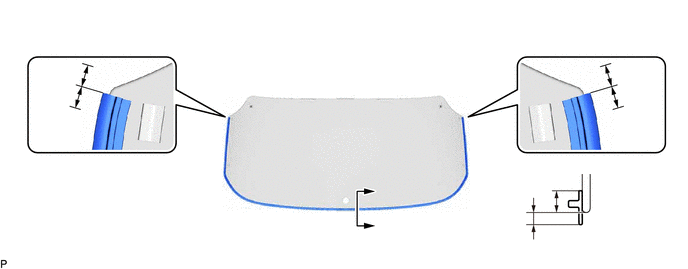
| *A | Back Side | - | - |
| *a | Alignment Position (Edge Of Curved Surface) | - | - |
- Standard Dimension:
Area Dimension Area Dimension a 0 to 5.0 mm (0 to 0.197 in.) b 8.5 mm (0.335 in.) c 5.8 mm (0.228 in.) - -
68131
6.INSTALL BACK DOOR GLASS

| *a | Matchmark |
Position the back door glass.
Using suction cups, place a new back door glass in the correct position.
Check that the whole contact surface of the back door glass rim is perfectly even.
Align the matchmarks on the back door glass and back door panel.
- NOTICE:
-
Check that the back window glass clips are engaged to the back door panel correctly.
Remove the back door glass.
Using a brush, coat the installation surfaces on the back door panel with body primer.
- NOTICE:
- ·
Do not coat the adhesive with body primer.
·Do not apply too much body primer.
·Allow the body primer to dry for 3 minutes or more.
·Throw away any leftover body primer.
- HINT:
-
If an area other than specified is coated by accident, wipe off the body primer with a clean piece of cloth before it dries.
Using a brush or sponge, coat the adhesive application area with glass primer.
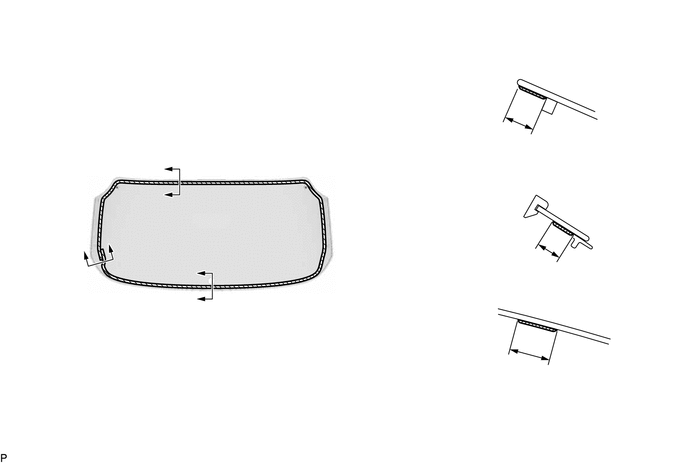
| *A | Back Side | - | - |
| *1 | Back Door Glass Spacer | *2 | Rear Wiper Motor Grommet |
|
|
Glass Primer | - | - |
- Standard Dimension:
Area Dimension Area Dimension a 13.9 mm (0.547 in.) or more b 9.0 mm (0.354 in.) or more c 22 mm (0.866 in.) or more - -
- NOTICE:
- ·
Do not apply too much glass primer.
·Allow the glass primer to dry for 3 minutes or more.
·Throw away any leftover glass primer.
- HINT:
- ·
Apply glass primer to the ceramic notches.
·If an area other than specified is coated by accident, wipe off the glass primer with a clean piece of cloth before it dries.
Apply adhesive to the back door.
- Adhesive:
Toyota Genuine Windshield Glass Adhesive (High modulus type) or equivalent
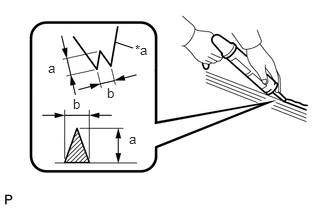
| *a | Nozzle |
Cut off the tip of the cartridge nozzle as shown in the illustration.
- Standard Dimension:
Area Dimension a 12.0 to 15.0 mm (0.472 to 0.591 in.) b 8.0 to 11.0 mm (0.315 to 0.433 in.)
Load the sealer gun with the cartridge.
Apply adhesive to the back door as shown in the illustration.
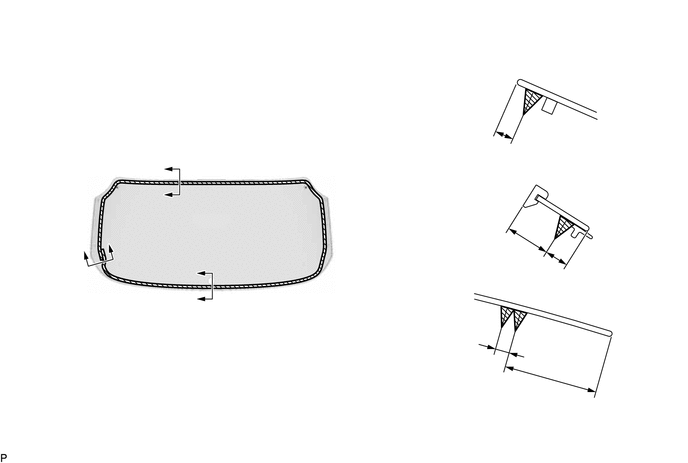
| *A | Back Side | - | - |
| *1 | Back Door Glass Spacer | *2 | Rear Wiper Motor Grommet |
|
|
Adhesive | - | - |
- Standard Dimension:
Area Dimension Area Dimension a 8.8 mm (0.346 in.) b 21.9 mm (0.862 in.) c 10.5 mm (0.413 in.) d 8.0 mm (0.315 in.) e 48.8 mm (1.92 in.) - -
Install the back door glass.
| *a | Matchmark |
Using suction cups, position the back door glass so that the matchmarks are aligned, and press it in gently along the rim.
- NOTICE:
- ·
Check that the No. 1 back window glass spacer and No. 2 back window glass spacer are engaged to the back door panel correctly.
·Check the clearance between the back door panel and back door glass.
Lightly press the front surface of the back door glass to ensure a close fit.
- HINT:
-
Press the glass with force of 98 N (10 kgf, 22.0 lbf) or more.
Using a scraper, remove any excess or protruding adhesive.
Hold the back door glass using protective tape until the applied adhesive becomes hard.
- HINT:
-
Follow the instructions supplied by the adhesive manufacturer or in the corresponding instruction manual for the minimum amount of time necessary to wait before driving the vehicle.
Connect each connector.
76085
7.INSTALL REAR SPOILER SUB-ASSEMBLY
867C0B
8.INSTALL REAR INNER MIRROR CAMERA ASSEMBLY (w/ Digital Inner Mirror)
9.INSTALL BACK DOOR OUTSIDE GARNISH
10.INSPECT FOR LEAK
After the adhesive has hardened, apply water from the outside of the vehicle. Check that no water leaks into the cabin.
If water leaks into the cabin, allow the water to dry and add adhesive.
Remove the protective tape.