HYBRID / BATTERY CONTROL HYBRID CONTROL SYSTEM P312387 Lost Communication with Drive Motor Control Module "A" from Hybrid/EV Control Module Missing Message
DESCRIPTION
Refer to the description for P0D2D16.
The MG ECU, which is built into in the inverter with converter assembly, controls motor (MG2) based on commands from the hybrid vehicle control ECU assembly.
The hybrid vehicle control ECU assembly monitors communication data and detects malfunctions.
A communication error between the MG ECU and the hybrid vehicle control ECU assembly.
| DTC No. | Detection Item | DTC Detection Condition | Trouble Area | MIL | Warning Indicate | Note |
|---|---|---|---|---|---|---|
| P312387 | Lost Communication with Drive Motor Control Module "A" from Hybrid/EV Control Module Missing Message | Error in reception from inverter with converter assembly (MG ECU) via serial communication (out of communication standard)
(1 trip detection logic) |
·
Wire harness or connector ·
Inverter with converter assembly ·
Hybrid vehicle control ECU assembly ·
PCU fuse |
Comes on | Master Warning:
Comes on |
SAE Code:
P3123 |
CONFIRMATION DRIVING PATTERN
- HINT:
- ·
After repair has been completed, clear the DTCs and then check that the vehicle has returned to normal by performing the following All Readiness check procedure.
·When clearing the permanent DTCs, refer to the "CLEAR PERMANENT DTC" procedure.
Connect the GTS to the DLC3.
Turn the power switch on (IG) and turn the GTS on.
Clear the DTCs (even if no DTCs are stored, perform the clear DTC procedure).
Turn the power switch off and wait for 2 minutes or more.
Turn the power switch on (IG) and turn the GTS on.
With power switch on (IG) and wait for 2 minutes or more. [*1]
- HINT:
-
[*1]: Normal judgment procedure.
-
The normal judgment procedure is used to complete DTC judgment and also used when clearing permanent DTCs.
Enter the following menus: Powertrain / Hybrid Control / Utility / All Readiness.
Check the DTC judgment result.
- HINT:
- ·
If the judgment result shows NORMAL, the system is normal.
·If the judgment result shows ABNORMAL, the system has a malfunction.
·If the judgment result shows INCOMPLETE, perform the normal judgment procedure again.
WIRING DIAGRAM
Refer to the wiring diagram for the inverter low-voltage circuit.
CAUTION / NOTICE / HINT
- CAUTION:
-
Refer to the precautions before inspecting high voltage circuit.
PROCEDURE
Remove the PCU fuse from the No. 3 relay block and junction block assembly.
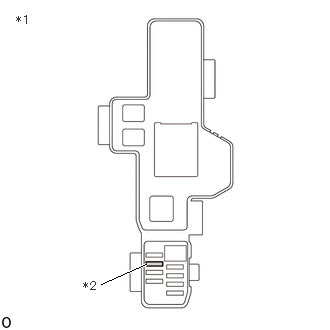
| *1 | No. 3 Relay Block and Junction Block Assembly |
| *2 | PCU Fuse |
Measure the resistance according to the value(s) in the table below.
- Standard Resistance:
Tester Connection Condition Specified Condition PCU fuse Always Below 1 Ω
Install the PCU fuse.
- Result:
Proceed to OK NG
OK
NG
- Result:
Proceed to NEXT
NEXT
Connect the GTS to the DLC3.
Turn the power switch on (IG) and wait for 2 minutes or more.
Enter the following menus: Powertrain / Hybrid Control / Utility / Diagnosis Related Information.
- Powertrain > Hybrid Control > Utility
-
Tester Display Diagnosis Related Information - 50005 397 56
Enter the following menus: Powertrain / Hybrid Control / Trouble Codes.
- Powertrain > Hybrid Control > Trouble Codes
- 50001 397
Check for DTCs.
- Result:
Result Proceed to P312387 is listed in Diagnosis Related Information or DTC P312387 is output. A P312387 is not listed in Diagnosis Information and DTC P312387 is not output. B
Turn the power switch off.
A
B
- Result:
Proceed to OK NG
OK
NG
- CAUTION:
-
Be sure to wear insulated gloves.
Check that the service plug grip is not installed.
- NOTICE:
-
After removing the service plug grip, do not turn the power switch on (READY), unless instructed by the repair manual because this may cause a malfunction.
Check the connection condition of the low voltage connectors of the inverter with converter assembly and the contact pressure of each terminal. Check the terminals for deformation, and the connector for water and foreign matter.
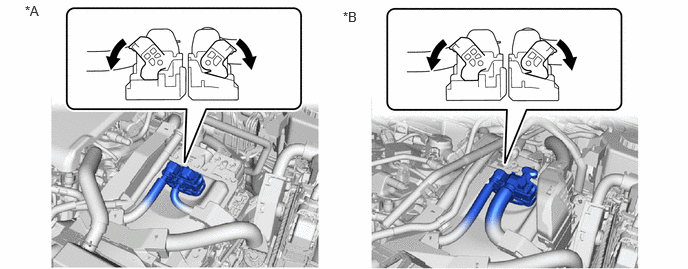
| *A | for 2WD | *B | for AWD |
- NOTICE:
-
Before disconnecting the connector, confirm that it is properly connected by checking that the claws of the lock levers are engaged and that the connector cannot be pulled off.
- OK:
- The connector is connected securely.
- The terminals are not deformed and are connected securely.
- No water or foreign matter in the connector.
- Result:
Result Proceed to OK A NG (The connector is not connected securely.) B NG (The terminals are not making secure contact or are deformed, or water or foreign matter exists in the connector.) C
- HINT:
-
When connecting the connector, connect it with the lock levers raised. Rotate each lock lever downward and make sure that the connector is securely connected. When a lock lever is fully lowered, a click will be heard as its claw engages. After the click is heard, pull up on the connector to confirm that it is securely connected.
A
B
C
- CAUTION:
-
Be sure to wear insulated gloves.
Check that the service plug grip is not installed.
- NOTICE:
-
After removing the service plug grip, do not turn the power switch on (READY), unless instructed by the repair manual because this may cause a malfunction.
Disconnect the A51*1 or A87*2 inverter with converter assembly connector.
for 2WD: Click hereEngine / Hybrid System>HYBRID / BATTERY CONTROL>INVERTER WITH CONVERTER (for 2WD)>REMOVAL202409,999999,_51,_083048,_0400693,RM100000002NE9H,
for AWD: Click hereEngine / Hybrid System>HYBRID / BATTERY CONTROL>INVERTER WITH CONVERTER (for AWD)>REMOVAL202409,999999,_51,_083048,_0586671,RM100000002NE9J,
*1: for 2WD
*2: for AWD
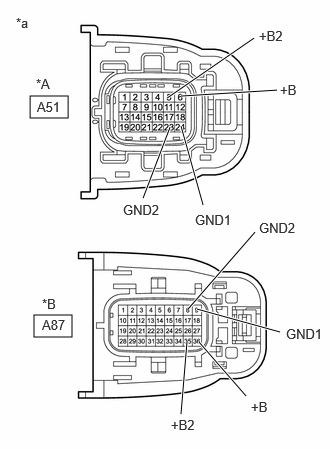
| *A | for 2WD |
| *B | for AWD |
| *a | Front view of wire harness connector
(to Inverter with Converter Assembly) |
Measure the resistance according to the value(s) in the table below.
- Standard Resistance:
for 2WD: Tester Connection Condition Specified Condition A51-24 (GND1) - Body ground Power switch off Below 1 Ω A51-23 (GND2) - Body ground Power switch off Below 1 Ω
for AWD: Tester Connection Condition Specified Condition A87-9 (GND1) - Body ground Power switch off Below 1 Ω A87-8 (GND2) - Body ground Power switch off Below 1 Ω
Connect the cable to the negative (-) auxiliary battery terminal.
Turn the power switch on (IG).
Measure the voltage according to the value(s) in the table below.
- Standard Voltage:
for 2WD: Tester Connection Condition Specified Condition A51-6 (+B) - Body ground Power switch on (IG) 11 to 14 V A51-5 (+B2) - Body ground Power switch on (IG) 11 to 14 V
for AWD: Tester Connection Condition Specified Condition A87-36 (+B) - Body ground Power switch on (IG) 11 to 14 V A87-35 (+B2) - Body ground Power switch on (IG) 11 to 14 V
- NOTICE:
-
Turning the power switch on (IG) with the inverter with converter assembly disconnected causes other DTCs to be stored. Clear the DTCs after performing this inspection.
Turn the power switch off.
Disconnect the cable from the negative (-) auxiliary battery terminal.
Reconnect the A51*1 or A87*2 inverter with converter assembly connector.
*1: for 2WD
*2: for AWD
- Result:
Proceed to OK NG
OK
NG
- CAUTION:
-
Be sure to wear insulated gloves.
Check that the service plug grip is not installed.
- NOTICE:
-
After removing the service plug grip, do not turn the power switch on (READY), unless instructed by the repair manual because this may cause a malfunction.
Disconnect the A51*1 or A87*2 inverter with converter assembly connector.
*1: for 2WD
*2: for AWD
Disconnect the A31 hybrid vehicle control ECU assembly connector.
Connect the cable to the negative (-) auxiliary battery terminal.
Turn the power switch on (IG).
Measure the voltage according to the value(s) in the table below.
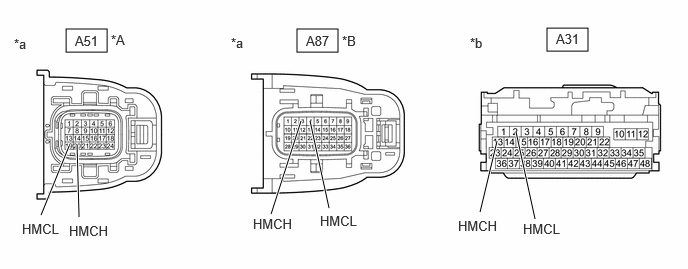
| *A | for 2WD | *B | for AWD |
| *a | Front view of wire harness connector
(to Inverter with Converter Assembly) |
*b | Front view of wire harness connector
(to Hybrid Vehicle Control ECU Assembly) |
- Standard Voltage:
Tester Connection Condition Specified Condition A31-2 (HMCL) - Body ground Power switch on (IG) Below 1 V A31-13 (HMCH) - Body ground Power switch on (IG) Below 1 V
- NOTICE:
-
Turning the power switch on (IG) with the hybrid vehicle control ECU assembly connector and the inverter with converter assembly disconnected causes other DTCs to be stored. Clear the DTCs after performing this inspection.
Turn the power switch off.
Disconnect the cable from the negative (-) auxiliary battery terminal.
Measure the resistance according to the value(s) in the table below.
- Standard Resistance (Check for Open):
for 2WD: Tester Connection Condition Specified Condition A51-19 (HMCL) - A31-2 (HMCL) Power switch off Below 1 Ω A51-20 (HMCH) - A31-13 (HMCH) Power switch off Below 1 Ω
for AWD: Tester Connection Condition Specified Condition A87-4 (HMCL) - A31-2 (HMCL) Power switch off Below 1 Ω A87-3 (HMCH) - A31-13 (HMCH) Power switch off Below 1 Ω
- Standard Resistance (Check for Short):
for 2WD: Tester Connection Condition Specified Condition A51-19 (HMCL) or A31-2 (HMCL) - Body ground and other terminals Power switch off 10 kΩ or higher A51-20 (HMCH) or A31-13 (HMCH) - Body ground and other terminals Power switch off 10 kΩ or higher
for AWD: Tester Connection Condition Specified Condition A87-4 (HMCL) or A31-2 (HMCL) - Body ground and other terminals Power switch off 10 kΩ or higher A87-3 (HMCH) or A31-13 (HMCH) - Body ground and other terminals Power switch off 10 kΩ or higher
Reconnect the A31 hybrid vehicle control ECU assembly connector.
Reconnect the A51*1 or A87*2 inverter with converter assembly connector.
*1: for 2WD
*2: for AWD
- Result:
Proceed to OK NG
OK
NG
- CAUTION:
-
Be sure to wear insulated gloves.
Check that the service plug grip is not installed.
- NOTICE:
-
After removing the service plug grip, do not turn the power switch on (READY), unless instructed by the repair manual because this may cause a malfunction.
Disconnect the A51*1 or A87*2 inverter with converter assembly connector.
*1: for 2WD
*2: for AWD
Measure the resistance according to the value(s) in the table below.
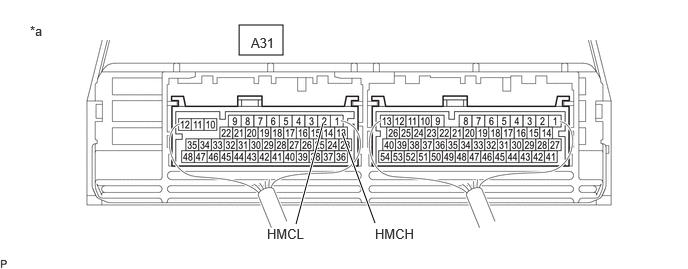
| *a | Component with harness connected
(Hybrid Vehicle Control ECU Assembly) |
- | - |
- Standard Resistance:
Tester Connection Condition Specified Condition A31-2 (HMCL) - A31-13 (HMCH) Power switch off 110 to 130 Ω
Reconnect the A51*1 or A87*2 inverter with converter assembly connector.
*1: for 2WD
*2: for AWD
- Result:
Proceed to OK NG
OK
for 2WD:
for AWD:
NG
| *1 | No. 3 Relay Block and Junction Block Assembly |
| *2 | PCU Fuse |
Replace the PCU fuse.
Turn the power switch on (READY).
Check if there is an open circuit in the PCU fuse in the No. 3 relay block and junction block assembly.
- OK:
There is no open circuit in the PCU fuse.
- HINT:
-
If the fuse does not become open again after turning the power switch on (READY), it can be assumed that the previous fuse failed due to age.
Turn the power switch off.
- Result:
Proceed to OK NG
OK
NG
- CAUTION:
-
Be sure to wear insulated gloves.
Check that the service plug grip is not installed.
- NOTICE:
-
After removing the service plug grip, do not turn the power switch on (READY), unless instructed by the repair manual because this may cause a malfunction.
Remove the PCU fuse from the No. 3 relay block and junction block assembly.
Disconnect the A51*1 or A87*2 inverter with converter assembly connector.
*1: for 2WD
*2: for AWD
Measure the resistance according to the value(s) in the table below.
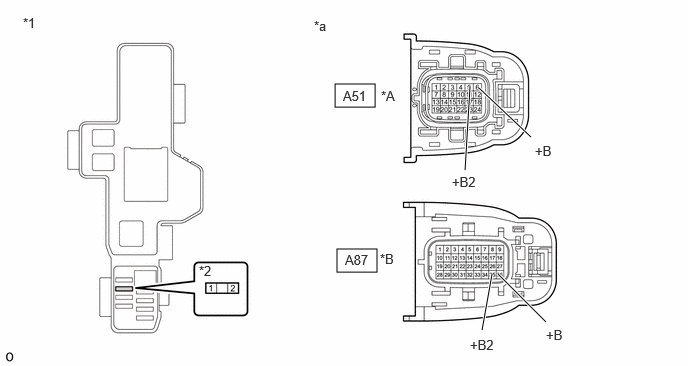
| *A | for 2WD | *B | for AWD |
| *1 | No. 3 Relay Block and Junction Block Assembly | *2 | PCU Fuse Terminal |
| *a | Front view of wire harness connector
(to Inverter with Converter Assembly) |
- | - |
- Standard Resistance (Check for Short):
for 2WD: Tester Connection Condition Specified Condition A51-6 (+B), A51-5 (+B2) or 2 (PCU fuse terminal) - Body ground and other terminals Power switch off 10 kΩ or higher
for AWD: Tester Connection Condition Specified Condition A87-36 (+B), A87-35 (+B2) or 2 (PCU fuse terminal) - Body ground and other terminals Power switch off 10 kΩ or higher
Reconnect the A51*1 or A87*2 inverter with converter assembly connector.
*1: for 2WD
*2: for AWD
Install the PCU fuse.
- Result:
Proceed to OK NG
OK
NG
for 2WD:
for AWD:
- Result:
Proceed to NEXT
NEXT
- Result:
Proceed to NEXT
NEXT