EXTERIOR PANELS / TRIM FRONT DOOR WINDOW FRAME MOULDING INSTALLATION
CAUTION / NOTICE / HINT
- HINT:
- ·
Use the same procedure for the RH and LH sides.
·The procedure listed below is for the LH side.
PROCEDURE

 75754A
1.INSTALL FRONT DOOR UPPER WINDOW FRAME MOULDING LH
75754A
1.INSTALL FRONT DOOR UPPER WINDOW FRAME MOULDING LH
Attach the guide to temporarily install the front door upper window frame moulding LH to the front door frame.
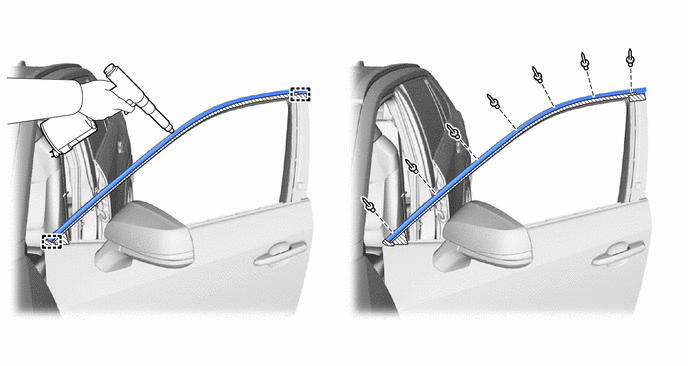
Using an air riveter or hand riveter with a nose piece, install the front door upper window frame moulding LH with 7 new φ4.0 mm (0.157 in.) waterproof rivets.
- NOTICE:
- ·
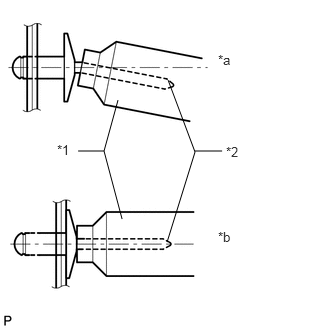 1.229,1.042 1.083,1.573 1.083,1.573 1.271,2.281 false 1.083,1.573 0.813,1.573 false 1.75,0.833 2.031,1.583 2.031,1.583 1.74,2.521 false 2.031,1.573 2.313,1.573 false 2.271,0.542 2.469,0.74 0.198,0.198 10 false *a 2.271,2.385 2.49,2.583 0.219,0.198 10 false *b 0.594,1.479 0.781,1.677 0.188,0.198 10 false *1 2.354,1.5 2.542,1.677 0.188,0.177 10 false *2
*1 Riveter *2 Mandrel *a INCORRECT *b CORRECT
Do not pry the rivet with the riveter as this will cause damage to the riveter and mandrel.
·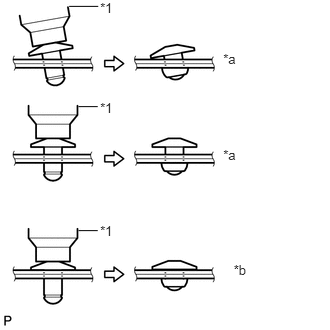 2.325,0.536 2.513,0.713 0.189,0.177 10 *a 2.325,1.527 2.5,1.705 0.175,0.177 10 *a 2.434,2.73 2.634,2.907 0.2,0.177 10 *b 0.72,0.066 1.023,0.066 false 0.818,1.11 1.018,1.11 false 1.043,2.324 1.223,2.477 0.181,0.153 10 *1 1.043,1.044 1.223,1.196 0.181,0.153 10 *1 1.043,0.0040 1.223,0.157 0.181,0.153 10 *1 0.818,2.402 1.018,2.402 false
*1 Riveter *a INCORRECT *b CORRECT
Confirm that the rivets are seated properly against the front door upper window frame moulding LH.
·Do not tilt the riveter when installing the rivet to the front door upper window frame moulding LH.
·Do not leave any space between the rivet head and front door upper window frame moulding LH.
·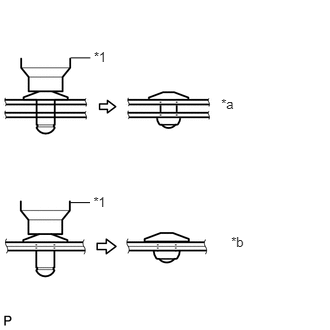 2.304,0.996 2.504,1.173 0.2,0.177 10 *a 2.408,2.434 2.62,2.612 0.211,0.177 10 *b 0.978,0.515 1.173,0.686 0.195,0.171 10 *1 0.735,0.603 0.941,0.603 false 0.973,2.023 1.182,2.194 0.209,0.171 10 *1 0.731,2.111 0.937,2.111 false
*1 Riveter *a INCORRECT *b CORRECT
Do not leave any space between the front door upper window frame moulding LH and front door panel. Firmly hold together the 2 items while installing the rivet.
- HINT:
-
If the mandrel of the rivet does not come off on the first operation of the rivet gun, slide the rivet gun forward on the mandrel and operate it again.
67856D
2.INSTALL FRONT DOOR PANEL PROTECTOR LH
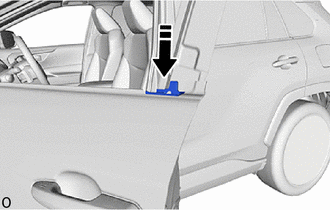

|
Install in this Direction |
Install the front door panel protector LH.
75756D
3.INSTALL FRONT DOOR WINDOW FRAME MOULDING LH (CENTER PILLAR SIDE)
- HINT:
-
When installing the front door window frame moulding LH (center pillar side), heat the front door panel and front door window frame moulding LH (center pillar side) using a heat light.
| Item | Temperature |
|---|---|
| Front Door Panel | 40 to 60°C (104 to 140°F) |
| Front Door Window Frame Moulding LH (Center Pillar Side) | 20 to 30°C (68 to 86°F) |
- CAUTION:
-
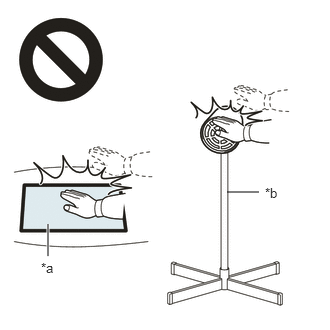 2.365,2 2.698,2 false 0.5,2.333 0.5,2.667 true 0.427,2.708 0.74,2.865 0.313,0.156 10 false *a 2.76,1.927 3.073,2.083 0.313,0.156 10 false *b
*a Heated Part *b Heat Light
- ·
Do not touch the heat light and heated parts.
·Touching the heat light may result in burns.
·Touching heated parts for a long time may result in burns.
- NOTICE:
-
Do not heat the front door panel and front door window frame moulding LH (center pillar side) excessively.
Clean the front door panel surface.
Using a heat light, heat the front door panel surface.
Remove any double-sided tape from the front door panel.
Wipe off any tape adhesive residue with cleaner.
- NOTICE:
- ·
Installing the front door window frame moulding LH (center pillar side) with any double-sided tape remaining may cause poor adhesion. Perform this procedure until the tape is sufficiently removed.
·Make sure to use a cloth when removing. Using a screwdriver, etc., may cause damage and poor adhesion.
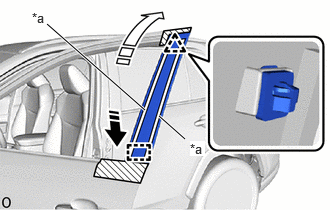
| *a | Double-sided Tape |
|
|
Install in this Direction (1) |

|
Install in this Direction (2) |
Install a new front door window frame moulding LH (center pillar side).
Using a heat light, heat the front door panel and front door window frame moulding LH (center pillar side).
Remove the release paper from the front door window frame moulding LH (center pillar side).
- HINT:
-
After removing the release paper, keep the exposed adhesive free from foreign matter.
Attach the guide and clip and double-sided tape to install the front door window frame moulding LH (center pillar side).
- HINT:
-
Press the front door window frame moulding LH (center pillar side) firmly to install it.
Remove the protective tape.
67862
4.INSTALL FRONT DOOR WEATHERSTRIP LH
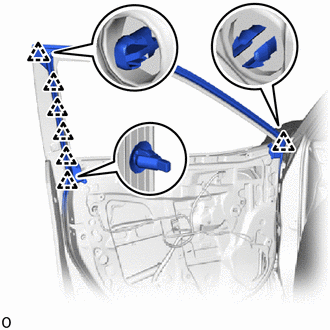
Attach the clip and install the front door weatherstrip LH.
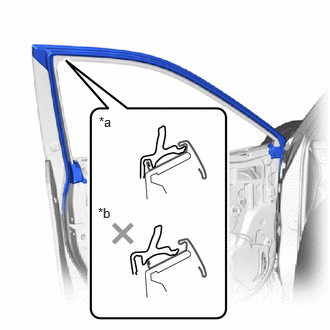
| *a | Correct |
| *b | Incorrect |
Check that the front door weatherstrip LH is securely installed to the rail of the front door outside moulding sub-assembly LH as shown in the illustration.
- NOTICE:
-
If the front door weatherstrip LH is not securely installed, water may leak into the vehicle.
68126
5.INSTALL FRONT DOOR FIX WINDOW GLASS LH
67402F
6.INSTALL FRONT DOOR FRONT LOWER FRAME SUB-ASSEMBLY LH
68151E
7.INSTALL FRONT DOOR GLASS RUN LH
67664C
8.INSTALL DOOR FRAME GARNISH LH
68102
9.INSTALL FRONT DOOR GLASS SUB-ASSEMBLY LH
75720
10.INSTALL FRONT DOOR BELT MOULDING ASSEMBLY LH
67832
11.INSTALL FRONT DOOR SERVICE HOLE COVER LH
68193C
12.INSTALL FRONT DOOR FRONT BELT SEAL LH
68172A
13.INSTALL FRONT DOOR INNER GLASS WEATHERSTRIP LH
67602
14.INSTALL FRONT DOOR TRIM BOARD SUB-ASSEMBLY LH
15.INSTALL MULTIPLEX NETWORK MASTER SWITCH ASSEMBLY WITH FRONT DOOR ARMREST BASE PANEL (for Driver Side)
16.INSTALL POWER WINDOW REGULATOR SWITCH ASSEMBLY WITH FRONT DOOR ARMREST BASE PANEL (for Front Passenger Side)
74640C
17.INSTALL DOOR ASSIST GRIP ASSEMBLY LH
69278B
18.INSTALL FRONT DOOR INSIDE HANDLE BEZEL LH
19.CONNECT CABLE TO NEGATIVE AUXILIARY BATTERY TERMINAL
20. INITIALIZATION AFTER RECONNECTING BATTERY TERMINAL
- HINT:
-
When disconnecting and reconnecting the battery, there is an automatic learning function that completes learning when the respective system is used.
21. INITIALIZE POWER WINDOW CONTROL SYSTEM
22. CHECK POWER WINDOW CONTROL SYSTEM
23. CHECK POWER DOOR LOCK CONTROL SYSTEM
24.INSPECT OUTER REAR VIEW MIRROR OPERATION