SEAT BELT REAR SEAT OUTER BELT ASSEMBLY INSTALLATION
PROCEDURE

 1.INSPECT REAR SEAT OUTER BELT ASSEMBLY
73370E
2.INSTALL REAR SEAT OUTER BELT ASSEMBLY LH (for SFTM Made)
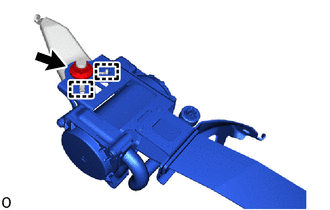
Attach the guide and install the rear seat outer belt assembly LH to the outer belt anchor bracket sub-assembly LH.
Temporarily install the nut.
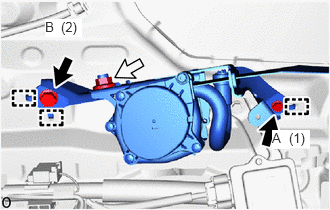

|
Bolt |

|
Nut |
Attach the guide and temporarily install the rear seat outer belt assembly LH with bracket.
Temporarily install the 2 bolts.
Tighten the 2 bolts in the order shown in the illustration.
- Torque:
- Bolt A : 12.5 N*m (127 kgf*cm, 9 ft.*lbf)
- Bolt B : 42 N*m (428 kgf*cm, 31 ft.*lbf)
Tighten the nut.
- Torque:
- 42 N*m (428 kgf*cm, 31 ft.*lbf)
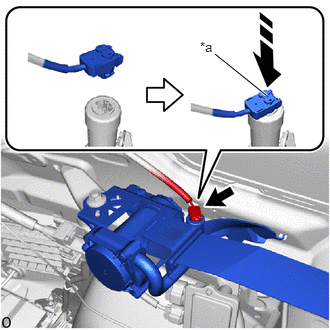
| *a | Locking Button |

|
Install in this Direction |
Connect the pretensioner connector and lock the locking button as shown in the illustration.
- NOTICE:
- ·
When handling the pretensioner connector, take care not to damage the pretensioner wire harness.
·Securely lock the locking button.
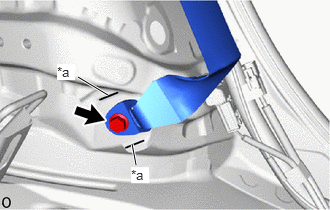
| *a | Protruding Part |
Install the floor anchor of the rear seat outer belt assembly LH with the bolt.
- Torque:
- 42 N*m (428 kgf*cm, 31 ft.*lbf)
- NOTICE:
-
Be sure to install the floor anchor of the rear seat outer belt assembly LH in parallel with upper and lower protruding part.
Check that the ELR locks.
With the rear seat outer belt assembly LH installed to the vehicle, check that the belt locks when it is pulled out quickly.
73370E
3.INSTALL REAR SEAT OUTER BELT ASSEMBLY LH (for GTMC Made)
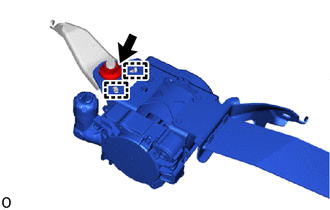
Attach the guide and install the rear seat outer belt assembly LH to the outer belt anchor bracket sub-assembly LH.
Temporarily install the nut.
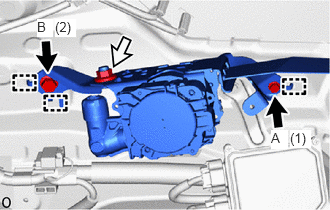
|
|
Bolt |
|
|
Nut |
Attach the guide and temporarily install the rear seat outer belt assembly LH with bracket.
Temporarily install the 2 bolts.
Tighten the 2 bolts in the order shown in the illustration.
- Torque:
- Bolt A : 12.5 N*m (127 kgf*cm, 9 ft.*lbf)
- Bolt B : 42 N*m (428 kgf*cm, 31 ft.*lbf)
Tighten the nut.
- Torque:
- 42 N*m (428 kgf*cm, 31 ft.*lbf)
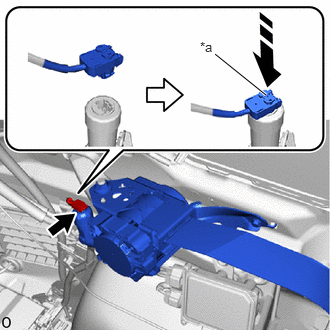
| *a | Locking Button |
|
|
Install in this Direction |
Connect the pretensioner connector and lock the locking button as shown in the illustration.
- NOTICE:
- ·
When handling the pretensioner connector, take care not to damage the pretensioner wire harness.
·Securely lock the locking button.
| *a | Protruding Part |
Install the floor anchor of the rear seat outer belt assembly LH with the bolt.
- Torque:
- 42 N*m (428 kgf*cm, 31 ft.*lbf)
- NOTICE:
-
Be sure to install the floor anchor of the rear seat outer belt assembly LH in parallel with upper and lower protruding part.
Check that the ELR locks.
With the rear seat outer belt assembly LH installed to the vehicle, check that the belt locks when it is pulled out quickly.
73360D
4.INSTALL REAR SEAT OUTER BELT ASSEMBLY RH (for SFTM Made)
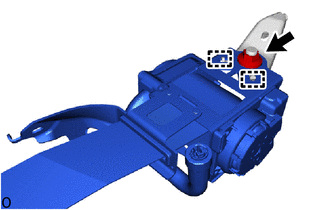
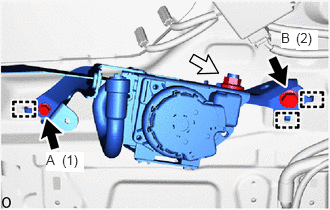
Attach the guide and install the rear seat outer belt assembly RH to the outer belt anchor bracket sub-assembly RH.
Temporarily install the nut.
|
|
Bolt |
|
|
Nut |
Attach the guide and temporarily install the rear seat outer belt assembly RH with bracket.
Temporarily install the 2 bolts.
Tighten the 2 bolts in the order shown in the illustration.
- Torque:
- Bolt A : 12.5 N*m (127 kgf*cm, 9 ft.*lbf)
- Bolt B : 42 N*m (428 kgf*cm, 31 ft.*lbf)
Tighten the nut.
- Torque:
- 42 N*m (428 kgf*cm, 31 ft.*lbf)
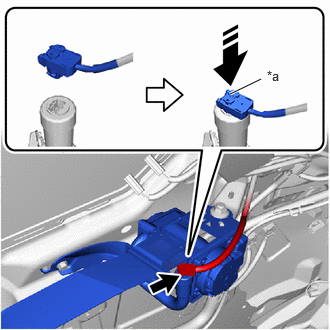
| *a | Locking Button |
|
|
Install in this Direction |
Connect the pretensioner connector and lock the locking button as shown in the illustration.
- NOTICE:
- ·
When handling the pretensioner connector, take care not to damage the pretensioner wire harness.
·Securely lock the locking button.
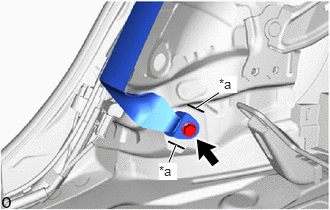
| *a | Protruding Part |
Install the floor anchor of the rear seat outer belt assembly RH with the bolt.
- Torque:
- 42 N*m (428 kgf*cm, 31 ft.*lbf)
- NOTICE:
-
Be sure to install the floor anchor of the rear seat outer belt assembly RH in parallel with upper and lower protruding part.
Check that the ELR locks.
With the rear seat outer belt assembly RH installed to the vehicle, check that the belt locks when it is pulled out quickly.
73360D
5.INSTALL REAR SEAT OUTER BELT ASSEMBLY RH (for GTMC Made)
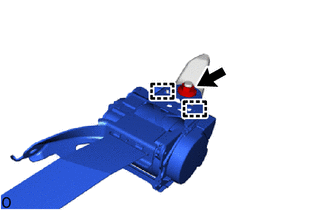
Attach the guide and install the rear seat outer belt assembly RH to the outer belt anchor bracket sub-assembly RH.
Temporarily install the nut.
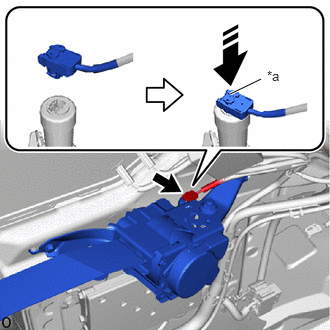
| *a | Locking Button |
|
|
Install in this Direction |
Connect the pretensioner connector and lock the locking button as shown in the illustration.
- NOTICE:
- ·
When handling the pretensioner connector, take care not to damage the pretensioner wire harness.
·Securely lock the locking button.
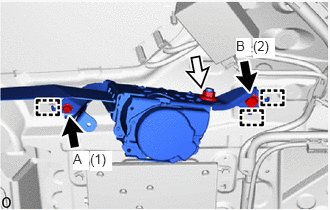
|
|
Bolt |
|
|
Nut |
Attach the guide and temporarily install the rear seat outer belt assembly RH with bracket.
Temporarily install the 2 bolts.
Tighten the 2 bolts in the order shown in the illustration.
- Torque:
- Bolt A : 12.5 N*m (127 kgf*cm, 9 ft.*lbf)
- Bolt B : 42 N*m (428 kgf*cm, 31 ft.*lbf)
Tighten the nut.
- Torque:
- 42 N*m (428 kgf*cm, 31 ft.*lbf)
| *a | Protruding Part |
Install the floor anchor of the rear seat outer belt assembly RH with the bolt.
- Torque:
- 42 N*m (428 kgf*cm, 31 ft.*lbf)
- NOTICE:
-
Be sure to install the floor anchor of the rear seat outer belt assembly RH in parallel with upper and lower protruding part.
Check that the ELR locks.
With the rear seat outer belt assembly RH installed to the vehicle, check that the belt locks when it is pulled out quickly.
62480A
6.INSTALL INNER ROOF SIDE GARNISH ASSEMBLY LH
62470A
7.INSTALL INNER ROOF SIDE GARNISH ASSEMBLY RH
- HINT:
-
Use the same procedure described for the LH side.
64740E
8.INSTALL DECK TRIM SIDE PANEL ASSEMBLY LH
64730J
9.INSTALL DECK TRIM SIDE PANEL ASSEMBLY RH
58460D
10.INSTALL LUGGAGE HOLD BELT STRIKER ASSEMBLY
73708A
11.INSTALL TETHER ANCHOR BRACKET SET
62552F
12.INSTALL REAR SEAT SIDE GARNISH LH
62551F
13.INSTALL REAR SEAT SIDE GARNISH RH
- HINT:
-
Use the same procedure described for the LH side.
62332C
14.INSTALL REAR DOOR OPENING TRIM WEATHERSTRIP LH
62331C
15.INSTALL REAR DOOR OPENING TRIM WEATHERSTRIP RH
- HINT:
-
Use the same procedure described for the LH side.
58577E
16.INSTALL REAR NO. 1 FLOOR MAT SUPPORT SIDE PLATE
58464D
17.INSTALL BATTERY SERVICE COVER BOARD (for HV Model)
58466J
18.INSTALL NO. 2 BATTERY SERVICE COVER BOARD (for HV Model)
58467H
19.INSTALL NO. 3 BATTERY SERVICE COVER BOARD (for HV Model)
67918E
20.INSTALL REAR DOOR SCUFF PLATE LH
67917C
21.INSTALL REAR DOOR SCUFF PLATE RH
- HINT:
-
Use the same procedure described for the LH side.
73706
22.INSTALL CHILD RESTRAINT SEAT ANCHOR BRACKET SUB-ASSEMBLY LH
73705
23.INSTALL CHILD RESTRAINT SEAT ANCHOR BRACKET SUB-ASSEMBLY RH
- HINT:
-
Use the same procedure described for the LH side.
71304C
24.INSTALL REAR SEATBACK HINGE SUB-ASSEMBLY LH
71303C
25.INSTALL REAR SEATBACK HINGE SUB-ASSEMBLY RH
- HINT:
-
Use the same procedure described for the LH side.
26.INSTALL REAR SEATBACK ASSEMBLY RH
73350C
27.INSTALL REAR CENTER SEAT OUTER BELT ASSEMBLY (FLOOR ANCHOR)
28.INSTALL REAR SEATBACK ASSEMBLY LH
72693
29.INSTALL REAR SEAT CUSHION LOCK HOOK
30.INSTALL BENCH TYPE REAR SEAT CUSHION ASSEMBLY
71960B
31.INSTALL REAR CENTER SEAT HEADREST ASSEMBLY
Install the rear center seat headrest assembly.
71940A
32.INSTALL REAR SEAT HEADREST ASSEMBLY
Install the 2 rear seat headrest assemblies.
33.CONNECT CABLE TO NEGATIVE AUXILIARY BATTERY TERMINAL
34. INITIALIZATION AFTER RECONNECTING AUXILIARY BATTERY TERMINAL
- HINT:
-
When disconnecting and reconnecting the auxiliary battery, there is an automatic learning function that completes learning when the respective system is used.
65351A
35.INSTALL BATTERY HOLE COVER (for HV Model)
58386
36.INSTALL REAR FLOOR FINISH PLATE
58417H
37.INSTALL REAR NO. 3 FLOOR BOARD
58416K
38.INSTALL REAR NO. 2 FLOOR BOARD
58410B
39.INSTALL DECK BOARD ASSEMBLY
40. PERFORM DIAGNOSTIC SYSTEM CHECK
41.CHECK SRS WARNING LIGHT
42.INSPECT SEAT BELT WARNING SYSTEM