M20D-FKS COOLING RADIATOR REMOVAL
CAUTION / NOTICE / HINT
The necessary procedures (adjustment, calibration, initialization or registration) that must be performed after parts are removed and installed, or replaced during radiator assembly removal/installation are shown below.
| Replaced Part or Performed Procedure | Necessary Procedure | Effect/Inoperative Function when Necessary Procedure not Performed | Link |
|---|---|---|---|
| Front bumper assembly (Including removal and installation) | Front television camera view adjustment | Panoramic view monitor system | ( 202304,999999,_56,_083082,_0586733,RM1000000029R9F,) 202304,999999,_56,_083082,_0586733,RM1000000029R9F,)
|
PROCEDURE

 53895B
1.REMOVE FRONT FENDER FRONT SPLASH SHIELD RH
53895B
1.REMOVE FRONT FENDER FRONT SPLASH SHIELD RH
53896B
2.REMOVE FRONT FENDER FRONT SPLASH SHIELD LH
51441
3.REMOVE NO. 1 ENGINE UNDER COVER
51420
4.REMOVE NO. 2 ENGINE UNDER COVER ASSEMBLY
5.DRAIN ENGINE COOLANT
52119A
6.REMOVE FRONT BUMPER COVER
52614
7.REMOVE FRONT BUMPER NO. 2 ENERGY ABSORBER
52021
8.REMOVE FRONT BUMPER REINFORCEMENT SUB-ASSEMBLY
17751
9.REMOVE NO. 1 INLET AIR CLEANER
16681A
10.REMOVE UPPER RADIATOR AIR GUIDE PLATE
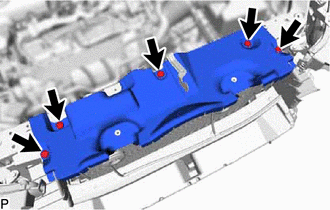
Remove the 5 clips and radiator upper air guide plate.
88790B
11.REMOVE THERMISTOR ASSEMBLY
16595B
12.REMOVE NO. 1 RADIATOR AIR GUIDE LH
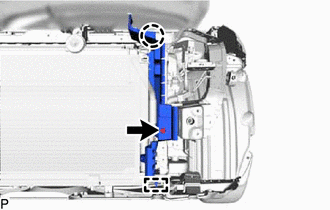
Remove the clip.
Detach the claw and guide and remove the No. 1 radiator air guide LH.
16593B
13.REMOVE NO. 1 RADIATOR AIR GUIDE RH
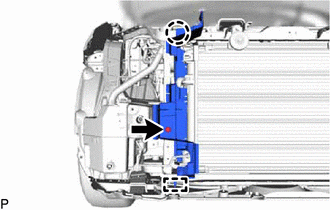
Remove the clip.
Detach the claw and guide and remove the No. 1 radiator air guide RH.
53510
14.REMOVE HOOD LOCK ASSEMBLY
53205
15.REMOVE UPPER RADIATOR SUPPORT SUB-ASSEMBLY
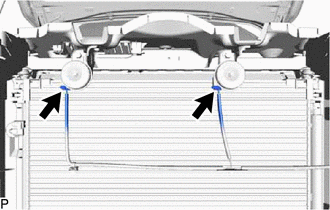
Disconnect the 2 horn connectors.
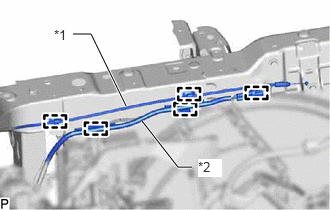
| *1 | Hood Lock Control Cable Assembly |
| *2 | Wire Harness |
Detach the 2 clamps and disconnect the hood lock control cable assembly from the upper radiator support sub-assembly.
Detach the 3 clamps and disconnect the wire harness from the upper radiator support sub-assembly.
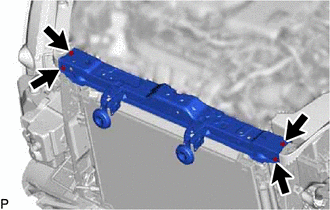
Remove the 4 bolts and upper radiator support sub-assembly.
16282
16.DISCONNECT NO. 5 WATER BY-PASS HOSE
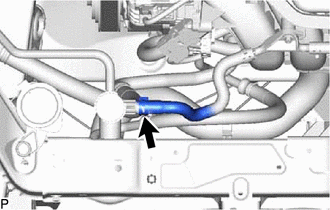
Slide the clip and disconnect the No. 5 water by-pass hose from the radiator assembly.
16283
17.DISCONNECT NO. 6 WATER BY-PASS HOSE
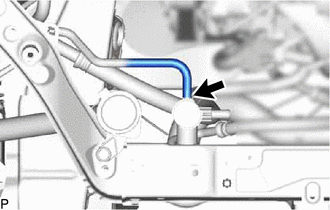
Disconnect the No. 6 water by-pass hose from the radiator assembly.
16571C
18.DISCONNECT NO. 1 RADIATOR HOSE
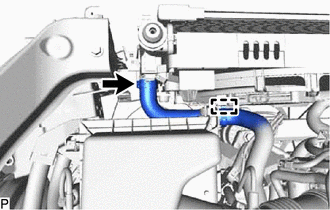
Detach the clamp and disconnect the No. 1 radiator hose from the fan with motor assembly.
Slide the clip and disconnect the No. 1 radiator hose from the radiator assembly.
16572D
19.DISCONNECT NO. 2 RADIATOR HOSE
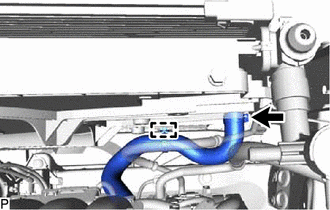
Detach the clamp and disconnect the No. 2 radiator hose from the fan with motor assembly.
Slide the clip and disconnect the No. 2 radiator hose from the radiator assembly.
16400
20.REMOVE RADIATOR ASSEMBLY
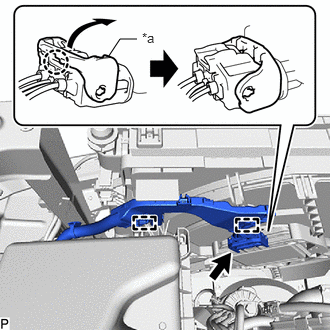
| *a | Lock Lever |
Detach the claw and raise the lock lever to disconnect the cooling fan motor connector as shown in the illustration.
- NOTICE:
-
After disconnecting the cooling fan motor connector, make sure that dirt, water or other foreign matter does not contact the connecting parts of the cooling fan motor connector.
Detach the 2 wire harness clamps.

Detach the 2 claws.
Detach the 2 guides and disconnect the cooler condenser assembly from the radiator assembly.
- NOTICE:
-
Make sure not to damage the cooler condenser assembly when disconnecting the cooler condenser assembly.
Remove the radiator assembly with the fan with motor assembly from the vehicle body.
- NOTICE:
-
Do not apply excessive force to the cooler condenser assembly or pipe when removing the radiator assembly with the fan with motor assembly.
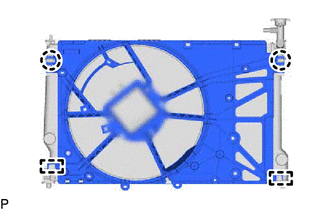
Detach the 2 claws.
Detach the 2 guides and remove the fan with motor assembly from the radiator assembly.
- NOTICE:
-
Do not damage the radiator assembly when removing the fan with motor assembly.
16523A
21.REMOVE RADIATOR SUPPORT CUSHION
Remove the 2 radiator support cushions from the radiator assembly.
16535
22.REMOVE LOWER RADIATOR SUPPORT
Remove the 2 lower radiator supports from the radiator assembly.
16897A
23.REMOVE FILLER NECK
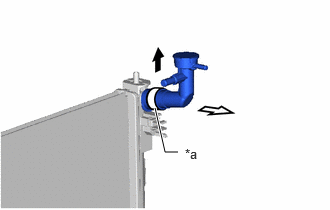
| *a | Retainer |

|
Pulling in this Direction |

|
Remove in this Direction |
Pull out the retainer to disengage the lock claws and pull off the filler neck.
- NOTICE:
-
If the filler neck O-ring is damaged, replace it with a new one.