WINDOW / GLASS POWER WINDOW REGULATOR MOTOR(for Front Door) INSPECTION
PROCEDURE

 69802
1.INSPECT FRONT DOOR WINDOW REGULATOR SUB-ASSEMBLY LH
69802
1.INSPECT FRONT DOOR WINDOW REGULATOR SUB-ASSEMBLY LH
- NOTICE:
- ·
Do not apply positive (+) auxiliary battery voltage to any terminals, except terminal 2 (B), to avoid damaging the pulse sensor inside the motor.
·Perform initialization of the power window system after removing, inspecting or replacing the power window regulator motor assembly LH.
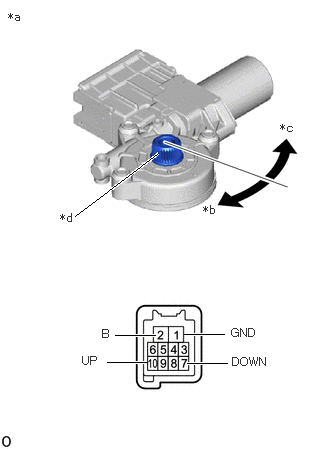
| *a | Component without harness connected
(Power Window Regulator Motor Assembly LH) |
| *b | Clockwise |
| *c | Counterclockwise |
| *d | Motor Gear |
Check that the motor gear rotates smoothly as follows.
- OK:
Tester Connection Specified Condition 1.Connect the positive (+) lead of the auxiliary battery to terminal 2 (B) and the negative (-) lead to terminal 1 (GND), and hold for 3 seconds or more.
2.While terminals 2 (B) and 1 (GND) are connected, connect the negative (-) lead of the auxiliary battery to terminal 10 (UP).
3.After disconnecting the negative (-) lead of the auxiliary battery from terminal 10 (UP), connect terminal 10 (UP) to the negative (-) lead of the auxiliary battery again within 1 second.
Motor gear rotates counterclockwise (UP) 1.Connect the positive (+) lead of the auxiliary battery to terminal 2 (B) and the negative (-) lead to terminal 1 (GND), and hold for 3 seconds or more.
2.While terminals 2 (B) and 1 (GND) are connected, connect the negative (-) lead of the auxiliary battery to terminal 7 (DOWN).
3.After disconnecting the negative (-) lead of the auxiliary battery from terminal 7 (DOWN), connect terminal 7 (DOWN) to the negative (-) lead of the auxiliary battery again within 1 second.
Motor gear rotates clockwise (DOWN)
If the result is not as specified, replace the power window regulator motor assembly LH.
69801
2.INSPECT FRONT DOOR WINDOW REGULATOR SUB-ASSEMBLY RH
- NOTICE:
- ·
Do not apply positive (+) auxiliary battery voltage to any terminals, except terminal 2 (B), to avoid damaging the pulse sensor inside the motor.
·Perform initialization of the power window system after removing, inspecting or replacing the power window regulator motor assembly RH.
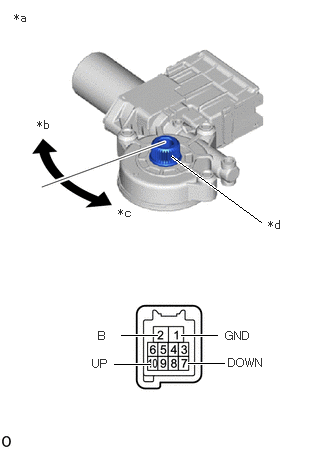
| *a | Component without harness connected
(Power Window Regulator Motor Assembly RH) |
| *b | Clockwise |
| *c | Counterclockwise |
| *d | Motor Gear |
Check that the motor gear rotates smoothly as follows.
- OK:
Tester Connection Specified Condition 1.Connect the positive (+) lead of the auxiliary battery to terminal 2 (B) and the negative (-) lead to terminal 1 (GND), and hold for 3 seconds or more.
2.While terminals 2 (B) and 1 (GND) are connected, connect the negative (-) lead of the auxiliary battery to terminal 10 (UP).
3.After disconnecting the negative (-) lead of the auxiliary battery from terminal 10 (UP), connect terminal 10 (UP) to the negative (-) lead of the auxiliary battery again within 1 second.
Motor gear rotates clockwise (UP) 1.Connect the positive (+) lead of the auxiliary battery to terminal 2 (B) and the negative (-) lead to terminal 1 (GND), and hold for 3 seconds or more.
2.While terminals 2 (B) and 1 (GND) are connected, connect the negative (-) lead of the auxiliary battery to terminal 7 (DOWN).
3.After disconnecting the negative (-) lead of the auxiliary battery from terminal 7 (DOWN), connect terminal 7 (DOWN) to the negative (-) lead of the auxiliary battery again within 1 second.
Motor gear rotates counterclockwise (DOWN)
If the result is not as specified, replace the power window regulator motor assembly RH.