DOOR LOCK FRONT DOOR LOCK INSTALLATION
CAUTION / NOTICE / HINT
- HINT:
- ·
Use the same procedure for the RH side and LH side.
·The following procedure is for the LH side.
PROCEDURE

 1. PRECAUTION
- NOTICE:
-
After turning the ignition switch (for Gasoline Model) or power switch (for HV Model) off, waiting time may be required before disconnecting the cable from the negative (-) auxiliary battery terminal. Therefore, make sure to read the disconnecting the cable from the negative (-) auxiliary battery terminal notices before proceeding with work.
69760B
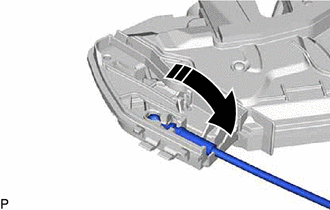
2.INSTALL FRONT DOOR INSIDE LOCK/UNLOCK KNOB LOCKING CABLE

|
Install in this Direction |
Install the front door inside lock/unlock knob locking cable as shown in the illustration.
69720D
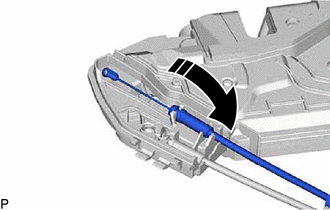
3.INSTALL FRONT DOOR LOCK OPEN LEVER REMOTE CONTROL CABLE
|
|
Install in this Direction |
Install the front door lock open lever remote control cable as shown in the illustration.
69036A
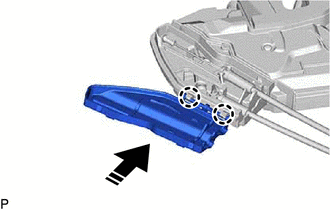
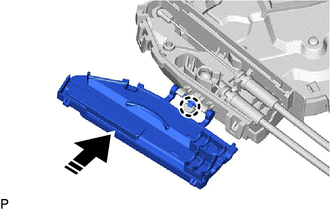
4.INSTALL FRONT DOOR LOCK COVER SUB-ASSEMBLY
for GTMC Made NR Series Engine:
|
|
Install in this Direction |
Engage the 2 claws as shown in the illustration.
except GTMC Made NR Series Engine:
|
|
Install in this Direction |
Engage the claw as shown in the illustration.
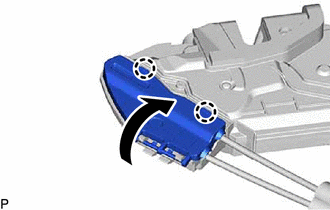
Engage the 2 claws to install the front door lock cover sub-assembly as shown in the illustration.
69040A
5.INSTALL FRONT DOOR LOCK WITH MOTOR ASSEMBLY
- NOTICE:
- ·
When reusing a removed front door lock with motor assembly, replace the door lock wiring harness seal with a new one.
·Do not allow grease or dust to adhere to the door lock wiring harness seal installation surface.
·Reusing a door lock wiring harness seal or using a damaged door lock wiring harness seal may cause water ingress. This may result in a malfunction of the front door lock with motor assembly.
Apply MP grease to the sliding parts of the front door lock with motor assembly.
When reusing the front door lock with motor assembly:
Install a new door lock wiring harness seal to the front door lock with motor assembly.
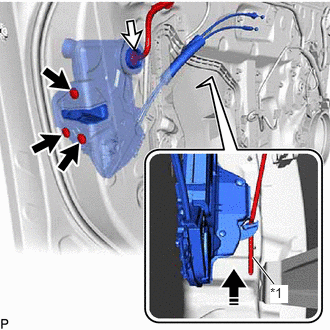
| *1 | Front Door Lock Open Rod |
|
|
Install in this Direction |
Connect the front door lock open rod to the front door lock with motor assembly as shown in the illustration.
- HINT:
-
Make sure that the front door lock open rod is securely connected to the front door lock with motor assembly.
Using a T30 "TORX" socket wrench, install the front door lock with motor assembly with the 3 screws.
- Torque:
- 5.5 N*m (56 kgf*cm, 49 in.*lbf)
Connect the connector.
6.INSTALL FRONT DOOR LOCK CYLINDER ASSEMBLY (for Driver Side)
69220
7.INSTALL FRONT DOOR OUTSIDE HANDLE ASSEMBLY (for Driver Side)
67404F
8.INSTALL FRONT DOOR REAR LOWER FRAME SUB-ASSEMBLY
68151D
9.INSTALL FRONT DOOR GLASS RUN
68102
10.INSTALL FRONT DOOR GLASS SUB-ASSEMBLY
67832
11.INSTALL FRONT DOOR SERVICE HOLE COVER
67838D
12.INSTALL FRONT DOOR VENT SEAL
67664C
13.INSTALL DOOR UPPER FRAME GARNISH
67602
14.INSTALL FRONT DOOR TRIM BOARD SUB-ASSEMBLY
15.INSTALL MULTIPLEX NETWORK MASTER SWITCH ASSEMBLY WITH FRONT DOOR UPPER ARMREST BASE PANEL (for Driver Side)
16.INSTALL POWER WINDOW REGULATOR SWITCH ASSEMBLY WITH FRONT DOOR UPPER ARMREST BASE PANEL (for Front Passenger Side)
74640E
17.INSTALL FRONT DOOR ASSIST GRIP ASSEMBLY
69284F
18.INSTALL FRONT DOOR INSIDE HANDLE BEZEL PLUG
19.CONNECT CABLE TO NEGATIVE AUXILIARY BATTERY TERMINAL
for NR Series: Click hereGeneral>MAINTENANCE>NR Series BATTERY>INSTALLATION202304,999999,_V1,_080956,_0392375,RM100000002BCCN_03_0002,
for 8ZR-FXE: Click hereGeneral>MAINTENANCE>8ZR-FXE AUXILIARY BATTERY>INSTALLATION202304,999999,_V1,_080956,_0392376,RM100000002ACL8_01_0029,
for M15B-FKS: Click hereGeneral>MAINTENANCE>M15B-FKS BATTERY>INSTALLATION202304,999999,_V1,_080956,_0453685,RM100000002BCCF_03_0002,
for M15C-FKS: Click hereGeneral>MAINTENANCE>M15C-FKS BATTERY>INSTALLATION202304,999999,_V1,_080956,_0453686,RM100000002BCCG_03_0002,
for M20A-FKS: Click hereGeneral>MAINTENANCE>M20A-FKS BATTERY>INSTALLATION202304,999999,_V1,_080956,_0470107,RM100000002BCCI_03_0002,
for M20E-FKS: Click hereGeneral>MAINTENANCE>M20E-FKS BATTERY>INSTALLATION202304,999999,_V1,_080956,_0474497,RM100000002BCCK_03_0002,
for M20C-FKS: Click hereGeneral>MAINTENANCE>M20C-FKS BATTERY>INSTALLATION202304,999999,_V1,_080956,_0484846,RM100000002BCCJ_03_0002,
for M20F-FXS, M20G-FXS: Click hereGeneral>MAINTENANCE>M20F-FXS, M20G-FXS AUXILIARY BATTERY>INSTALLATION202307,999999,_V1,_080956,_0611807,RM100000002CK9L_01_0015,
64490
20.INSTALL LUGGAGE COMPARTMENT SIDE TRAY ASSEMBLY (for M20F-FXS, M20G-FXS)
21.INITIALIZE POWER WINDOW CONTROL SYSTEM
for NR Series Engine:
except NR Series Engine:
22.INSPECT POWER WINDOW OPERATION
for NR Series Engine:
except NR Series Engine: