DOOR LOCK WIRELESS DOOR LOCK CONTROL SYSTEM(for NR Series Engine) TERMINALS OF ECU
CHECK DRIVER SIDE JUNCTION BLOCK ASSEMBLY AND MAIN BODY ECU (MULTIPLEX NETWORK BODY ECU)
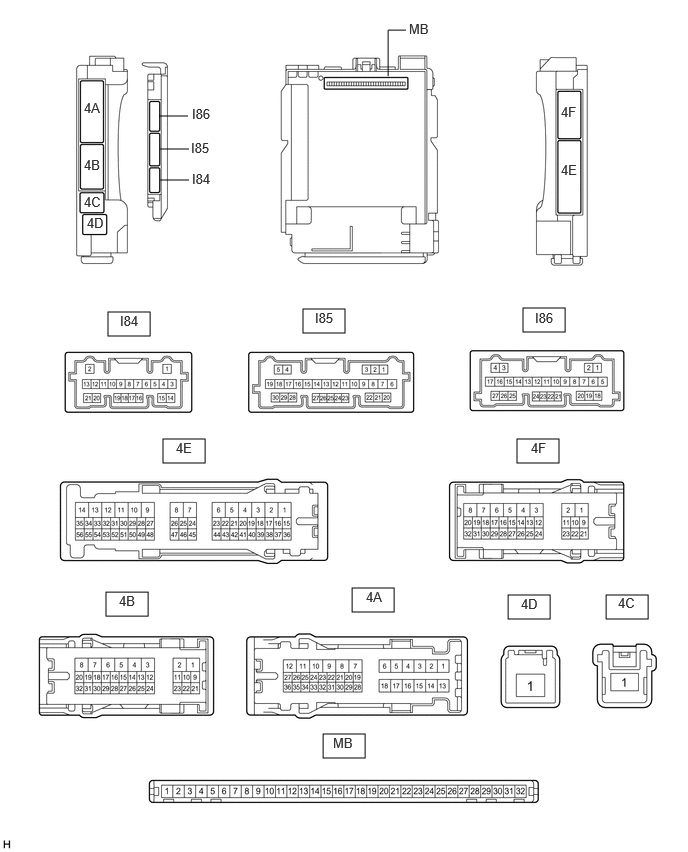
Remove the main body ECU (multiplex network body ECU) from the driver side junction block assembly.
Measure the resistance according to the value(s) in the table below.
| Terminal No. (Symbol) | Input/Output | Terminal Description | Condition | Specified Condition | Related Data List Item |
|---|---|---|---|---|---|
| I86-19 (GND2) - Body ground | - | Ground | Always | Below 1 Ω | - |
Reconnect the driver side junction block assembly connectors.
Measure the voltage and resistance according to the value(s) in the table below.
| Terminal No. (Symbol) | Input/Output | Terminal Description | Condition | Specified Condition | Related Data List Item |
|---|---|---|---|---|---|
| MB-11 (GND1) - Body ground | - | Ground | Always | Below 1 Ω | - |
| MB-30 (ACC) - Body ground | Input | ACC power supply | Engine switch on (ACC) | 11 to 14 V | ACC SW |
| Engine switch off | Below 1 V | ||||
| MB-31 (BECU) - Body ground | Input | Battery power supply | Always | 11 to 14 V | - |
| MB-32 (IG) - Body ground | Input | IG power supply | Engine switch on (IG) | 11 to 14 V | IG SW |
| Engine switch off | Below 1 V |
Install the main body ECU (multiplex network body ECU) to the driver side junction block assembly.
CHECK CERTIFICATION ECU (SMART KEY ECU ASSEMBLY)
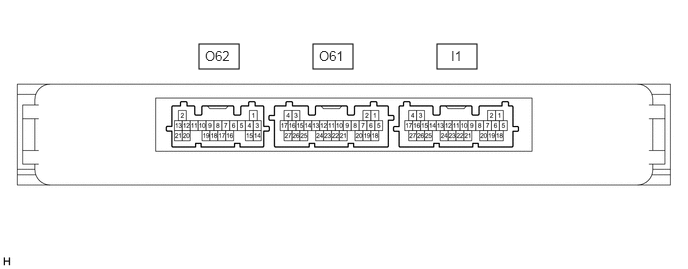
Disconnect the I1 certification ECU (smart key ECU assembly) connector.
Measure the voltage and resistance according to the value(s) in the table below.
| Terminal No. (Symbol) | Input/Output | Terminal Description | Condition | Specified Condition | Related Data List Item |
|---|---|---|---|---|---|
| I1-3 (+B) - Body ground | Input | Battery power supply | Always | 11 to 14 V | - |
| I1-16 (ACCD) - Body ground* | Input | ACC power supply | Engine switch on (ACC) | 11 to 14 V | - |
| Always | Below 1 V | ||||
| I1-15 (IG1D) - Body ground* | Input | IG power supply | Engine switch on (IG) | 11 to 14 V | - |
| Always | Below 1 V | ||||
| I1-18 (E) - Body ground | - | Ground | Always | Below 1 Ω | - |
*: w/o Entry Function
Reconnect the I1 certification ECU (smart key ECU assembly) connector.
Check for pulses according to the value(s) in the table below.
| Terminal No. (Symbol) | Wiring Color | Input/Output | Terminal Description | Condition | Specified Condition | Related Data List Item |
|---|---|---|---|---|---|---|
| O61-18 (RCO) - I1-18 (E) | LG - W-B | Output | Output to electrical key and tire pressure monitoring system receiver assembly
(Power supply for electrical key and tire pressure monitoring system receiver assembly. Certification ECU (smart key ECU assembly) outputs 5 V when receiver starts operating.) |
Procedure:
1.
Turn engine switch off 2.
Bring electrical key transmitter sub-assembly outside detection area but within wireless function operational area*1 3.
Bring electrical key transmitter sub-assembly wireless function operational area*2 4.
Press lock or unlock switch of electrical key transmitter sub-assembly |
Plus generation (See waveform 1) | - |
| O61-21 (RDAM) - I1-18 (E) | GR - W-B | Input | Electrical key and tire pressure monitoring system receiver assembly communication circuit | Procedure:
1.
Turn engine switch off 2.
Lock all doors 3.
Bring electrical key transmitter sub-assembly outside detection area but within wireless function operational area*1 4.
Bring electrical key transmitter sub-assembly wireless function operational area*2 5.
Press lock or unlock switch of electrical key transmitter sub-assembly |
Plus generation (See waveform 2) | - |
| O61-19 (CSEL) - I1-18 (E) | V - W-B | Output | Communication channel switching circuit | Procedure:
1.
Turn engine switch off 2.
Close all doors |
No pulse generation → Pulse generation | - |
*1: w/ Entry Function
*2: w/o Entry Function
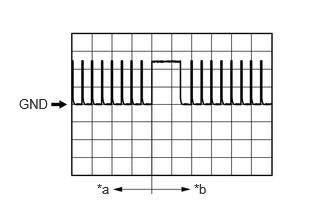
| *a | Before lock or unlock switch of electrical key transmitter sub-assembly pressed |
| *b | After lock or unlock switch of electrical key transmitter sub-assembly pressed |
Using an oscilloscope, check waveform 1.
- HINT:
-
The oscilloscope waveform shown in the illustration is an example for reference only. Noise, chattering, etc. are not shown.
| Item | Content |
|---|---|
| Tester connection | O61-18 (RCO) - I1-18 (E) |
| Tool setting | 2 V/DIV., 500 ms/DIV. |
| Condition | Procedure:
1.
Turn engine switch off 2.
Bring electrical key transmitter sub-assembly outside detection area but within wireless function operational area*1 3.
Bring electrical key transmitter sub-assembly wireless function operational area*2 4.
Press lock or unlock switch of electrical key transmitter sub-assembly |
*1: w/ Entry Function
*2: w/o Entry Function
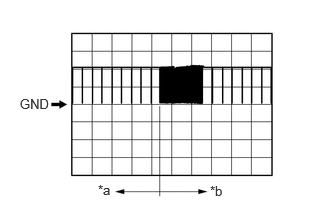
| *a | Before lock or unlock switch of electrical key transmitter sub-assembly pressed |
| *b | After lock or unlock switch of electrical key transmitter sub-assembly pressed |
Using an oscilloscope, check waveform 2.
- HINT:
-
The oscilloscope waveform shown in the illustration is an example for reference only. Noise, chattering, etc. are not shown.
| Item | Content |
|---|---|
| Tester connection | O61-21 (RDAM) - I1-18 (E) |
| Tool setting | 5 V/DIV., 500 ms/DIV. |
| Condition | Procedure:
1.
Turn engine switch off 2.
Lock all doors 3.
Bring electrical key transmitter sub-assembly outside detection area but within wireless function operational area*1 4.
Bring electrical key transmitter sub-assembly wireless function operational area*2 5.
Press lock or unlock switch of electrical key transmitter sub-assembly |
*1: w/ Entry Function
*2: w/o Entry Function