TELEMATICS TELEMATICS TRANSCEIVER INSTALLATION
PROCEDURE

 86741A
1.INSTALL TELEMATICS TRANSCEIVER
86741A
1.INSTALL TELEMATICS TRANSCEIVER
86719B
2.INSTALL NO. 2 TELEPHONE BRACKET
Install the No. 2 telephone bracket with the 2 screws.
86719A
3.INSTALL NO. 1 TELEPHONE BRACKET
Install the No. 1 telephone bracket with the 2 screws.
4.INSTALL TELEMATICS TRANSCEIVER WITH BRACKET
Install the telematics transceiver with bracket with the 2 nuts.
Connect each connector.
82141
5.CONNECT INSTRUMENT PANEL WIRE
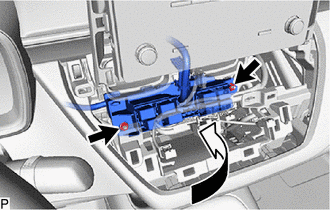
Connect the instrument panel wire with the 2 nuts as shown in the illustration.
- Torque:
- 8.0 N*m (82 kgf*cm, 71 in.*lbf)
Engage the clamp.
55670A
6.INSTALL CENTER INSTRUMENT PANEL REGISTER ASSEMBLY (for TFTM Made)
55470
7.INSTALL INSTRUMENT CLUSTER FINISH PANEL GARNISH ASSEMBLY (for TFTM Made)
55318F
8.INSTALL NO. 2 INSTRUMENT SIDE PANEL (for TFTM Made)
55670A
9.INSTALL CENTER INSTRUMENT PANEL REGISTER ASSEMBLY (for GTMC Made)
10.INSTALL CENTER INSTRUMENT PANEL SAFETY PAD RETAINER WITH HEATER CONTROL (for Mechanical Control Type)
11.INSTALL LOWER CENTER INSTRUMENT CLUSTER FINISH PANEL SUB-ASSEMBLY (for Mechanical Control Type)
55900
12.INSTALL AIR CONDITIONING CONTROL ASSEMBLY (for Electrical Control Type)
55405B
13.INSTALL CENTER INSTRUMENT CLUSTER FINISH PANEL SUB-ASSEMBLY (except 10.25 Inch Display)
55405B
14.INSTALL CENTER INSTRUMENT CLUSTER FINISH PANEL SUB-ASSEMBLY (for 10.25 Inch Display)
58831A
15.INSTALL FRONT CONSOLE UPPER PANEL GARNISH
55434F
16.INSTALL LOWER CENTER INSTRUMENT PANEL FINISH PANEL
55606
17.INSTALL NO. 1 INSTRUMENT PANEL UNDER COVER SUB-ASSEMBLY
18. REGISTER VEHICLE INFORMATION
for HV Model: Click hereAudio / Visual / Telematics>TELEMATICS>TELEMATICS SYSTEM (for HV Model)>REGISTRATION201906,999999,_56,_080753,_0391552,RM100000001HKXN,
for Gasoline Model: Click hereAudio / Visual / Telematics>TELEMATICS>TELEMATICS SYSTEM (for Gasoline Model)>REGISTRATION201906,999999,_56,_080753,_0397006,RM100000001IM9O,
19.PERFORM REGISTRATION
- HINT:
-
After replacing the telematics transceiver, make sure to perform code registration.
-
See Service Bulletin for the registration method