CELLULAR COMMUNICATION TOLL COLLECTION ECU INSTALLATION
PROCEDURE

 1. PRECAUTION
When installing the toll collection ECU assembly and toll collection ECU seal tape:
- HINT:
-
When installing the toll collection ECU assembly or toll collection ECU seal tape, heat the toll collection ECU assembly, toll collection ECU seal tape or windshield glass using a hair dryer.
Using a hair dryer, heat the installation area.
- CAUTION:
- ·
Do not touch the hair dryer or the heated portions of the components.
·Touching the hair dryer could result in burns.
·Touching the heated portions of the components and remaining in contact for a long time could result in burns.
- NOTICE:
- ·
The most appropriate temperature for installing the toll collection ECU seal tape is 15 °C (59 °F).
·When the ambient temperature is below 15°C (59°F), perform the installation procedure after warming the toll collection ECU assembly surface (installation surface of the toll collection ECU assembly) and tape to between 20 and 30°C (68 and 86°F) using a hair dryer.
·When the temperature is low, the tape turns stiff and falls off easily. When the temperature is high, the tape loses elasticity.
·Do not heat the toll collection ECU assembly excessively.
2.INSTALL TOLL COLLECTION ECU SEAL TAPE (except NR Series Engine)
When reusing the toll collection ECU assembly:
Clean the toll collection ECU assembly with a piece of cloth.
Remove one side of the release paper of new toll collection ECU seal tape.
- HINT:
-
Do not touch the toll collection ECU seal tape surfaces.
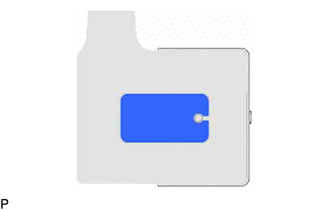
Install the toll collection ECU seal tape to the toll collection ECU assembly as shown in the illustration.
- NOTICE:
-
Attach securely so that the toll collection ECU seal tape will not shift or peel off.
86980
3.INSTALL TOLL COLLECTION ECU ASSEMBLY (except NR Series Engine)
Clean the windshield glass with a piece of cloth.
- HINT:
-
Make sure that there is no toll collection ECU seal tape residue remaining on the windshield glass. If there is, remove the residue.
- NOTICE:
- ·
Installing the toll collection ECU assembly with some double-sided tape remaining may cause poor adhesion. Perform this procedure until sufficiently removed it.
·Make sure to use a cloth when removing. Using a screwdriver, etc., may cause damage and poor adhesion.
Remove the release paper.
- HINT:
-
Do not touch the toll collection ECU seal tape surfaces.
for TFTM made:
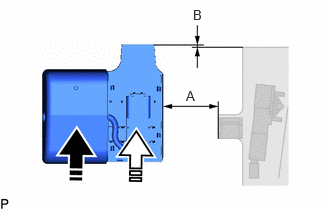

|
Press the ECU Part |

|
Press the Connector Part |
Install the toll collection ECU assembly as shown in the illustration.
- Standard Clearance:
Area Measurement A 38.5 mm (1.52 in.) +/- 3 mm (0.12 in.) B 0.8 mm (0.03 in.) +/- 3 mm (0.12 in.)
for GTMC made with Camera:
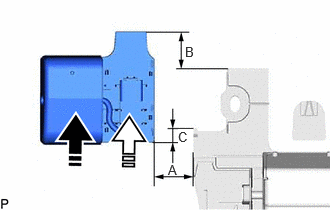
|
|
Press the ECU Part |
|
|
Press the Connector Part |
Install the toll collection ECU assembly as shown in the illustration.
- Standard Clearance:
Area Measurement A 28.3 mm (1.11 in.) +/- 3 mm (0.12 in.) B 27 mm (1.06 in.) +/- 3 mm (0.12 in.) C 11 mm (0.43 in.) +/- 3 mm (0.12 in.)
for GTMC made without Camera:
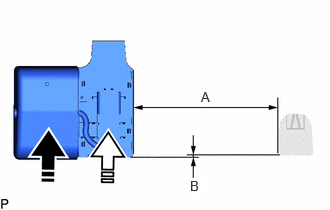
|
|
Press the ECU Part |
|
|
Press the Connector Part |
Install the toll collection ECU assembly as shown in the illustration.
- Standard Clearance:
Area Measurement A 100.4 mm (3.95 in.) +/- 3 mm (0.12 in.) B 1.7 mm (0.07 in.) +/- 3 mm (0.12 in.)
Press the ECU part of the toll collection ECU assembly with a force of 40 N (4.0 kgf) for 5 seconds to securely install it to the windshield glass.
Press the connector part of the toll collection ECU assembly with a force of 40 N (4.0 kgf) for 3 seconds to securely install it to the windshield glass.
Connect the connector.
Engage the 4 claws to install the cover.
86466D
4.INSTALL NO. 1 FORWARD RECOGNITION COVER (except NR Series Engine)
86466E
5.INSTALL NO. 2 FORWARD RECOGNITION COVER (except NR Series Engine)
F1969B
6.INSTALL TOLL COLLECTION ECU SEAL TAPE (for NR Series Engine)
When reusing the toll collection ECU assembly:
Clean the toll collection ECU assembly with a piece of cloth.
Remove one side of the release paper of new toll collection ECU seal tape.
- HINT:
-
Do not touch the toll collection ECU seal tape surfaces.
Install the toll collection ECU seal tape to the toll collection ECU assembly.
- NOTICE:
-
Attach securely so that the toll collection ECU seal tape will not shift or peel off.
7.INSTALL TOLL COLLECTION ECU ASSEMBLY (for NR Series Engine)
Connect the connector.
Install the toll collection ECU assembly to the roof headlining assembly as shown in the illustration.
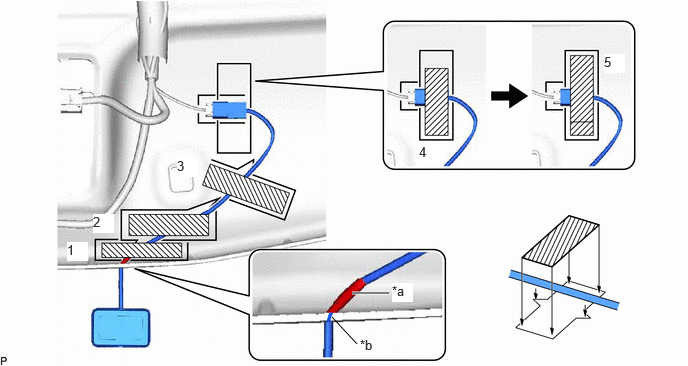
| *a | Marking Tape | *b | Notch |

|
Adhesive Tape | - | - |
- HINT:
-
Attach the adhesive tape in the order shown in the illustration.
8.INSTALL ROOF HEADLINING ASSEMBLY (for NR Series Engine)
9.CONNECT TOLL COLLECTION ECU ASSEMBLY (for NR Series Engine)
Clean the windshield glass with a piece of cloth.
- HINT:
-
Make sure that there is no toll collection ECU seal tape residue remaining on the windshield glass. If there is, remove the residue.
- NOTICE:
- ·
Installing the toll collection ECU assembly with some double-sided tape remaining may cause poor adhesion. Perform this procedure until sufficiently removed it.
·Make sure to use a cloth when removing. Using a screwdriver, etc., may cause damage and poor adhesion.
Remove the release paper.
- HINT:
-
Do not touch the toll collection ECU seal tape surfaces.
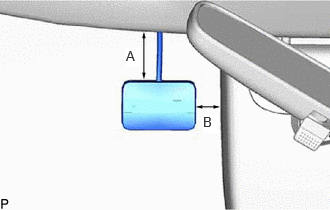
Install the toll collection ECU assembly as shown in the illustration.
- Standard Clearance:
Area Measurement A 30 to 50 mm (1.18 to 1.97 in.) B 10 to 30 mm (0.394 to 1.18 in.)
- HINT:
-
Press the toll collection ECU assembly with a force of 40 N (4.0 kgf) for 5 seconds to securely install it to the windshield glass.