8ZR-FXE ENGINE MECHANICAL ENGINE ASSEMBLY REMOVAL
CAUTION / NOTICE / HINT
The necessary procedures (adjustment, calibration, initialization, or registration) that must be performed after parts are removed and installed, or replaced during engine assembly removal/installation are shown below.
| Replaced Part or Performed Procedure | Necessary Procedure | Effect/Inoperative Function when Necessary Procedure not Performed | Link |
|---|---|---|---|
|
*: The vehicle height changes because of tire replacement. |
|||
| Replacement of ECM | Vehicle Identification Number (VIN) or frame number registration | DTC stored | ( 202304,999999,_51,_080778,_0393982,RM100000002BDLH,) 202304,999999,_51,_080778,_0393982,RM100000002BDLH,)
|
| ECU configuration | - | (202304,999999,_V1,_143216,_0598316,RM100000002B3MK,)
|
|
| Update ECU security key | Vehicle Control History (RoB) are stored | (202304,999999,_V1,_143216,_0598316,RM100000002B3ML,)
|
|
| Perform Total Short Trip Estimate Registration | - | (202304,999999,_51,_080778,_0393982,RM100000002BDLH,)
|
|
| Replacement of inverter with converter assembly | ECU configuration | - | (202304,999999,_V1,_143216,_0598316,RM100000002B3MK,)
|
| Resolver learning | ·
DTCs are stored ·
Slight vibration at a vehicle speed of 5 km/h (3 mph) or less ·
Shock or vibration during acceleration |
(202304,999999,_51,_080773,_0600292,RM100000002BBW3,)
|
|
·
Replacement of throttle body assembly ·
Replacement of engine assembly ·
Gas leak from exhaust system is repaired |
Inspection after repair | ·
Poor idle, etc. ·
Engine start function, etc. |
(202304,999999,_51,_080778,_0393982,RM100000002BDLI,)
|
| Replacement of hybrid vehicle transaxle assembly | ·
Resolver learning ·
Initialize resolver |
·
DTCs are stored ·
Slight vibration at a vehicle speed of 5 km/h (3 mph) or less |
(202304,999999,_51,_080773,_0600292,RM100000002BBW3,)
|
·
Tires ·
Suspension parts |
Rear television camera assembly optical axis (Back camera position setting)* | Parking Assist Monitor System | (202304,999999,_56,_080754,_0596561,RM100000002AX0C,)
|
| Parking assist ECU initialization | Panoramic View Monitor System | (202307,999999,_56,_080754,_0612151,RM100000002CL9H,)
|
|
| Front wheel alignment adjustment | 1.
Perform "Reset Memory" 2.
Perform "Calibration" |
·
DTCs are stored ·
ABS warning light illuminates ·
Brake system warning light (yellow indicator) illuminates ·
Slip indicator light illuminates ·
Electronically controlled brake system disabled or malfunctions |
(202304,999999,_54,_080770,_0392591,RM100000002B671,)
|
- CAUTION:
- ·
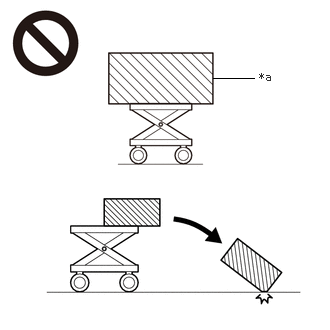 2.219,0.813 2.646,0.813 false 2.698,0.729 3.01,0.927 0.313,0.198 10 false *a
*a An Object Exceeding Weight Limit of Engine Lifter
The engine assembly with transaxle is very heavy. Be sure to follow the procedure described in the repair manual, or the engine lifter may suddenly drop or the engine assembly with transaxle may fall off the engine lifter.
·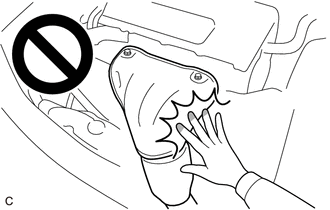
To prevent burns, do not touch the engine, exhaust manifold or other high temperature components while the engine is hot.
- HINT:
-
When the cable is disconnected / reconnected to the auxiliary battery terminal, systems temporarily stop operating. However, each system has a function that completes learning the first time the system is used.
Learning completes when vehicle is driven Effect/Inoperative Function when Necessary Procedure not Performed Necessary Procedure Link Front Camera System Drive the vehicle straight ahead at 15 km/h (9 mph) or more for 1 second or more. ( 202304,999999,_95,_139716,_0584193,RM1000000029F4C,)
PROCEDURE

 1. PRECAUTION
2.RECOVER REFRIGERANT FROM REFRIGERATION SYSTEM
3. DISCHARGE FUEL SYSTEM PRESSURE
4. ALIGN FRONT WHEELS FACING STRAIGHT AHEAD
5.SECURE STEERING WHEEL
6.REMOVE FRONT WHEELS
51410
7.REMOVE NO. 1 ENGINE UNDER COVER ASSEMBLY
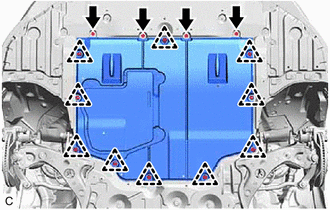
Remove the 4 bolts.
Remove the 10 clips and No. 1 engine under cover assembly from the vehicle.
51444A
8.REMOVE REAR ENGINE UNDER COVER LH
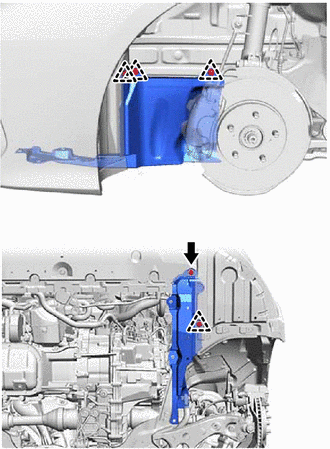
Remove the screw.
Remove the 4 clips and rear engine under cover LH from the vehicle.
51443C
9.REMOVE REAR ENGINE UNDER COVER RH
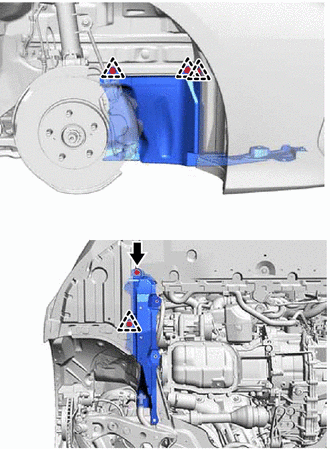
Remove the screw.
Remove the 4 clips and rear engine under cover RH from the vehicle.
10.DRAIN ENGINE OIL
11.DRAIN ENGINE COOLANT (for Engine)
12.DRAIN HYBRID TRANSAXLE FLUID
16296
13.DISCONNECT NO. 8 WATER BY-PASS HOSE
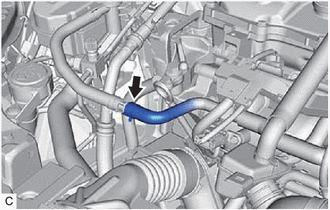
Slide the clip and disconnect the No. 8 water by-pass hose from the No. 4 water by-pass hose.
53289A
14.REMOVE RADIATOR SUPPORT OPENING COVER
17752
15.REMOVE INLET NO. 2 AIR CLEANER
22210
16.REMOVE THROTTLE BODY ASSEMBLY
17801
17.REMOVE AIR CLEANER FILTER ELEMENT SUB-ASSEMBLY
17701
18.REMOVE AIR CLEANER CASE SUB-ASSEMBLY
17771A
19.REMOVE AIR CLEANER BRACKET
17751
20.REMOVE INLET NO. 1 AIR CLEANER
G9200
21.REMOVE INVERTER WITH CONVERTER ASSEMBLY
33820B
22.DISCONNECT TRANSMISSION CONTROL CABLE ASSEMBLY
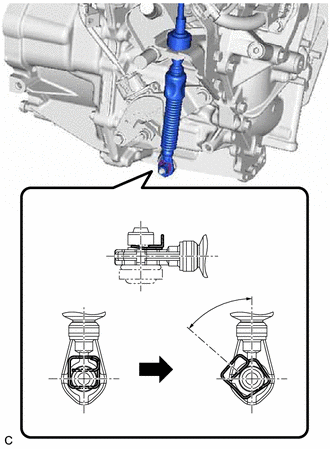
| *a | Clip |
| *b | 45° to 60° |
While disengaging the clip as shown in the illustration, disconnect the transmission control cable assembly from the transmission control shaft lever together with the clip.
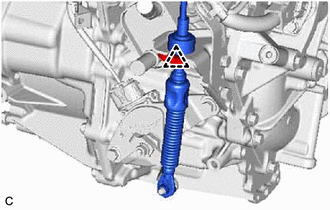
Remove the clip and disconnect the transmission control cable assembly from the No. 1 transmission control cable bracket.
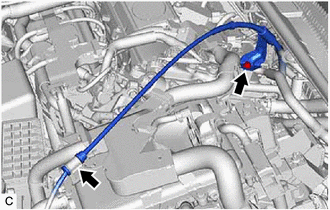
Disconnect the transmission control cable assembly from the transmission control cable support.
Remove the bolt and disconnect the transmission control cable assembly from the engine assembly.
16571C
23.DISCONNECT NO. 1 RADIATOR HOSE
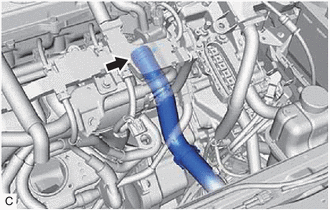
Slide the clip and disconnect the No. 1 radiator hose from the water outlet.
16572D
24.DISCONNECT NO. 2 RADIATOR HOSE
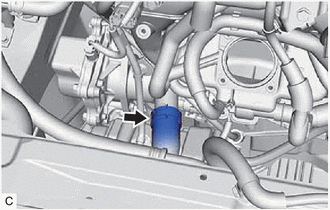
Slide the clip and disconnect the No. 2 radiator hose from the water inlet sub-assembly.
87245
25.DISCONNECT INLET HEATER WATER HOSE
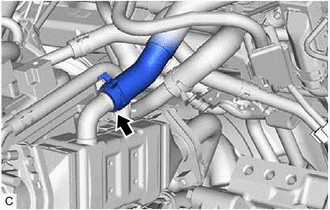
Slide the clip and disconnect the inlet heater water hose.
87246
26.DISCONNECT OUTLET HEATER WATER HOSE
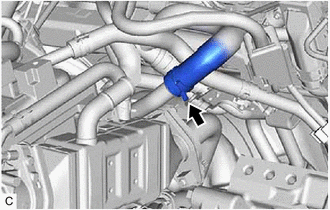
Slide the clip and disconnect the outlet heater water hose.
23829A
27.DISCONNECT FUEL VAPOR FEED HOSE
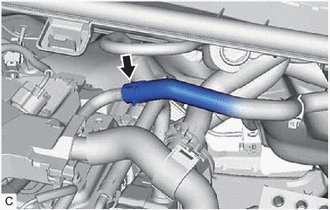
Slide the clip and disconnect the fuel vapor feed hose from the fuel vapor feed pipe.
23901
28.DISCONNECT FUEL TUBE SUB-ASSEMBLY
88703
29.DISCONNECT DISCHARGE HOSE SUB-ASSEMBLY
88704
30.DISCONNECT SUCTION HOSE SUB-ASSEMBLY
82127D
31.DISCONNECT NO. 7 ENGINE WIRE
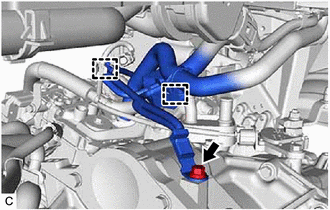
Remove the bolt.
Disengage the 2 clamps and disconnect the No. 7 engine wire from the hybrid vehicle transaxle assembly.
45259A
32.REMOVE COLUMN HOLE COVER SILENCER SHEET
45260
33.SEPARATE NO. 2 STEERING INTERMEDIATE SHAFT ASSEMBLY
45025D
34.SEPARATE NO. 1 STEERING COLUMN HOLE COVER SUB-ASSEMBLY
58166A
35.REMOVE FRONT FLOOR COVER LH
58165C
36.REMOVE FRONT FLOOR COVER RH
- HINT:
-
Use the same procedure as for the LH side.
57533B
37.REMOVE FRONT FLOOR CENTER BRACE
17410
38.REMOVE FRONT EXHAUST PIPE ASSEMBLY
39.REMOVE FRONT DRIVE SHAFT ASSEMBLY
51108A
40.REMOVE REAR SIDE RAIL REINFORCEMENT SUB-ASSEMBLY LH
51107A
41.REMOVE REAR SIDE RAIL REINFORCEMENT SUB-ASSEMBLY RH
- HINT:
-
Use the same procedure as for the LH side.
42.REMOVE ENGINE ASSEMBLY WITH TRANSAXLE
Set the engine assembly with transaxle on an engine lifter.
- NOTICE:
- ·
Using height adjustment attachments and plate lift attachments, keep the engine assembly with transaxle and front suspension crossmember sub-assembly level.
·Do not perform any procedures while the engine assembly is suspended because doing so may cause the engine assembly to drop, resulting in injury. However, the engine assembly needs to be suspended when it is installed to or removed from an engine stand.
·To prevent the engine assembly from unexpectedly moving, securely support the engine assembly until it is secured to an engine stand.
·To prevent the oil pan sub-assembly from deforming, do not place any attachments under the oil pan sub-assembly of the engine assembly with transaxle.
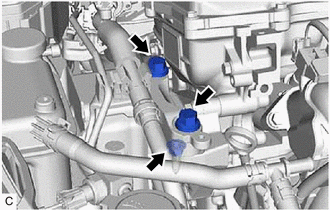
Remove the 2 bolts and nut and separate the engine mounting insulator sub-assembly RH from the engine mounting bracket RH.
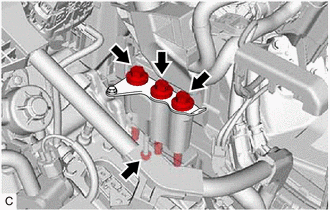
Remove the 3 bolts and nut and separate the engine mounting insulator LH from the hybrid vehicle transaxle assembly.
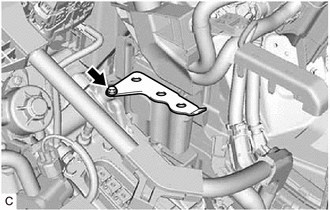
Remove the bolt and No. 2 engine mounting stay LH.
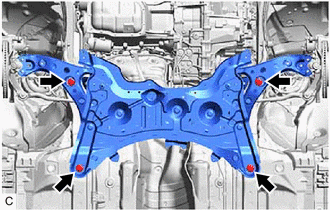
Remove the 4 bolts to separate the front suspension crossmember sub-assembly from the vehicle.
Operate the engine lifter and remove the engine assembly with transaxle from the vehicle.
- NOTICE:
- ·
Make sure that the engine assembly with transaxle is clear of all wiring and hoses.
·While lowering the engine assembly with transaxle from the vehicle, do not allow it to contact the vehicle.
43.REMOVE WIRE HARNESS CLAMP BRACKET
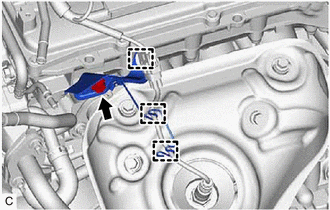
Disengage the 3 clamps.
Remove the bolt and wire harness clamp bracket from the cylinder head sub-assembly.
44.INSTALL ENGINE HANGERS
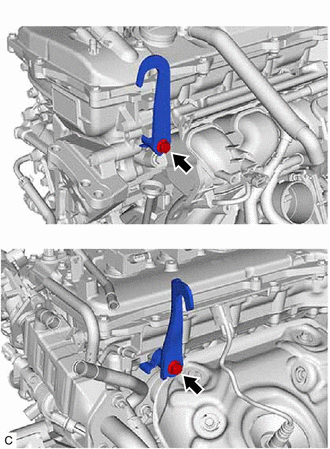
| *1 | No. 1 Engine Hanger |
| *2 | No. 2 Engine Hanger |
| *a | Bolt |
Install the No. 1 engine hanger and No. 2 engine hanger with the 2 bolts.
- Torque:
- 43 N*m (438 kgf*cm, 32 ft.*lbf)
- HINT:
No. 1 Engine Hanger 12281-0T020 No. 2 Engine Hanger 12282-0T020 Bolt 90105-C0097
Using an engine sling device and engine lifter, secure the engine assembly with transaxle.
- NOTICE:
- ·
Adjust the angle of the sling device carefully to prevent damage or deformation to the engine hangers or engine assembly.
·Do not perform any procedures while the engine assembly is suspended because doing so may cause the engine assembly to drop, resulting in injury. However, the engine assembly needs to be suspended when it is installed to or removed from an engine stand.
12372A
45.REMOVE ENGINE MOUNTING INSULATOR LH
- HINT:
-
Perform this procedure only when replacement of the engine mounting insulator LH is necessary.
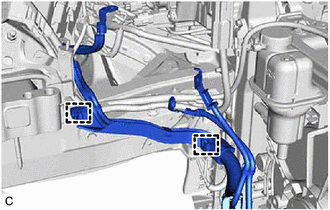
Disengage the 2 clamps.
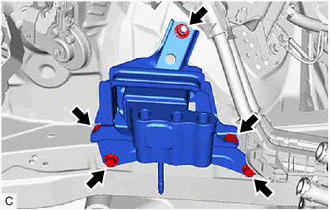
Remove the 4 bolts, nut and engine mounting insulator LH from the vehicle.
12305
46.REMOVE ENGINE MOUNTING INSULATOR SUB-ASSEMBLY RH
- HINT:
-
Perform this procedure only when replacement of the engine mounting insulator sub-assembly RH is necessary.
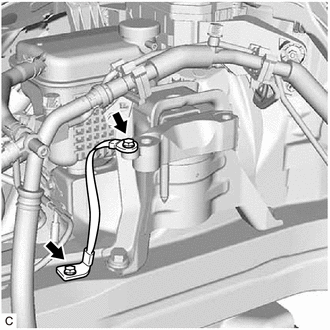
Remove the 2 bolts and No. 2 earth wire from the engine mounting insulator sub-assembly RH and vehicle.

Remove the bolt, nut and disconnect the air conditioner tube and accessory assembly.
Remove the 2 bolts, nut and engine mounting insulator sub-assembly RH from the vehicle.
88370
47.REMOVE COMPRESSOR WITH MOTOR ASSEMBLY
28193
48.REMOVE STARTER HOLE INSULATOR
11363A
49.REMOVE FLYWHEEL HOUSING SIDE COVER
82121
50.REMOVE ENGINE WIRE
Disconnect all the clamps and connectors and remove the engine wire from the engine assembly with transaxle.
51.REMOVE ENGINE ASSEMBLY
31270
52.REMOVE TRANSMISSION INPUT DAMPER ASSEMBLY
13405
53.REMOVE FLYWHEEL SUB-ASSEMBLY
54.INSTALL ENGINE ASSEMBLY TO ENGINE STAND
Install the engine assembly to an engine stand.
55.REMOVE ENGINE HANGERS
Remove the 2 bolts, No. 1 engine hanger and No. 2 engine hanger.