8ZR-FXE ENGINE MECHANICAL REAR CRANKSHAFT OIL SEAL REMOVAL
CAUTION / NOTICE / HINT
The necessary procedures (adjustment, calibration, initialization, or registration) that must be performed after parts are removed and installed, or replaced during rear crankshaft oil seal removal/installation are shown below.
| Replaced Part or Performed Procedure | Necessary Procedure | Effect/Inoperative Function when Necessary Procedure not Performed | Link |
|---|---|---|---|
|
*: The vehicle height changes because of tire replacement. |
|||
| Replacement of ECM | Vehicle Identification Number (VIN) or frame number registration | DTC stored | ( 202304,999999,_51,_080778,_0393982,RM100000002BDLH,) 202304,999999,_51,_080778,_0393982,RM100000002BDLH,)
|
| ECU configuration | - | (202304,999999,_V1,_143216,_0598316,RM100000002B3MK,)
|
|
| Update ECU security key | Vehicle Control History (RoB) are stored | (202304,999999,_V1,_143216,_0598316,RM100000002B3ML,)
|
|
| Perform Total Short Trip Estimate Registration | - | (202304,999999,_51,_080778,_0393982,RM100000002BDLH,)
|
|
| Replacement of inverter with converter assembly | ECU configuration | - | (202304,999999,_V1,_143216,_0598316,RM100000002B3MK,)
|
| Resolver learning | ·
DTCs are stored ·
Slight vibration at a vehicle speed of 5 km/h (3 mph) or less ·
Shock or vibration during acceleration |
(202304,999999,_51,_080773,_0600292,RM100000002BBW3,)
|
|
·
Replacement of throttle body assembly ·
Replacement of engine assembly ·
Gas leak from exhaust system is repaired |
Inspection after repair | ·
Poor idle, etc. ·
Engine start function, etc. |
(202304,999999,_51,_080778,_0393982,RM100000002BDLI,)
|
| Replacement of hybrid vehicle transaxle assembly | ·
Resolver learning ·
Initialize resolver |
·
DTCs are stored ·
Slight vibration at a vehicle speed of 5 km/h (3 mph) or less |
(202304,999999,_51,_080773,_0600292,RM100000002BBW3,)
|
·
Tires ·
Suspension parts |
Rear television camera assembly optical axis (Back camera position setting)* | Parking Assist Monitor System | (202304,999999,_56,_080754,_0596561,RM100000002AX0C,)
|
| Parking assist ECU initialization | Panoramic View Monitor System | (202307,999999,_56,_080754,_0612151,RM100000002CL9H,)
|
|
| Front wheel alignment adjustment | 1.
Perform "Reset Memory" 2.
Perform "Calibration" |
·
DTCs are stored ·
ABS warning light illuminates ·
Brake system warning light (yellow indicator) illuminates ·
Slip indicator light illuminates ·
Electronically controlled brake system disabled or malfunctions |
(202304,999999,_54,_080770,_0392591,RM100000002B671,)
|
- HINT:
-
When the cable is disconnected / reconnected to the auxiliary battery terminal, systems temporarily stop operating. However, each system has a function that completes learning the first time the system is used.
Learning completes when vehicle is driven Effect/Inoperative Function when Necessary Procedure not Performed Necessary Procedure Link Front Camera System Drive the vehicle straight ahead at 15 km/h (9 mph) or more for 1 second or more. ( 202304,999999,_95,_139716,_0584193,RM1000000029F4C,)
PROCEDURE

 1.REMOVE ENGINE ASSEMBLY
31270
2.REMOVE TRANSMISSION INPUT DAMPER ASSEMBLY
Using height adjustment attachments and plate lift attachments, place the engine assembly on a flat level surface.
- NOTICE:
- ·
Using height adjustment attachments and plate lift attachments, keep the engine assembly horizontal.
·To prevent the oil pan sub-assembly from deforming, do not place any attachments under the oil pan sub-assembly of the engine assembly.
·Using an engine sling device and engine lift, secure the engine assembly before servicing.
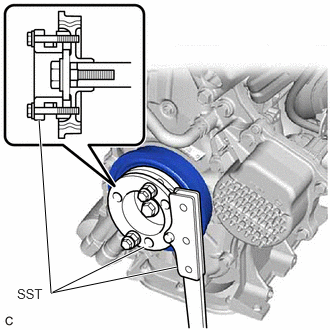
Using SST, hold the crankshaft pulley.
- SST
- 09213-58014 (91551-80840)
09330-00021
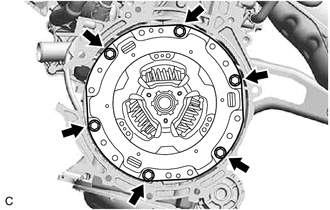
Remove the 6 bolts and transmission input damper assembly from the flywheel sub-assembly.
13405
3.REMOVE FLYWHEEL SUB-ASSEMBLY
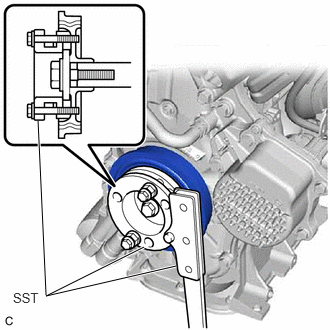
Using SST, hold the crankshaft pulley.
- SST
- 09213-58014 (91551-80840)
09330-00021
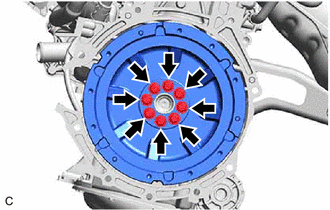
Remove the 8 bolts and flywheel sub-assembly from the crankshaft.
11401L
4.REMOVE REAR ENGINE OIL SEAL

| *a | Cut Position |
| *b | Protective Tape |
Using a knife, cut through the lip of the rear engine oil seal.
Using a screwdriver with its tip wrapped with protective tape, pry out the rear engine oil seal.
- NOTICE:
-
Be careful not to damage the crankshaft.