SEAT OCCUPANT DETECTION SENSOR(for Van) INSTALLATION
CAUTION / NOTICE / HINT
- CAUTION:
- ·
Wear protective gloves. Sharp areas on the parts may injure your hands.
·There is risk of injury.
PROCEDURE

 79135D
1.INSTALL NO. 1 SEAT CUSHION PAD (OCCUPANT DETECTION SENSOR)
79135D
1.INSTALL NO. 1 SEAT CUSHION PAD (OCCUPANT DETECTION SENSOR)
- HINT:
-
When installing a No. 1 seat cushion pad, refer to precaution in order to prevent wrinkles from forming.
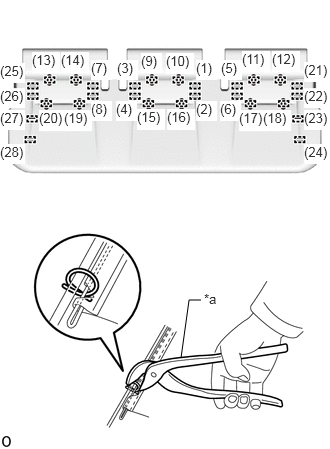
| *a | Hog Ring Pliers |
Using hog ring pliers, install the No. 1 seat cushion pad (occupant detection sensor) to the No. 1 seat cushion cover sub-assembly with 28 new hog rings in the order indicated in the illustration.
- NOTICE:
- ·
Be careful not to damage the No. 1 seat cushion cover sub-assembly.
·Be sure to securely install the hog rings as shown in the illustration while preventing wrinkles from forming on the No. 1 seat cushion cover sub-assembly.
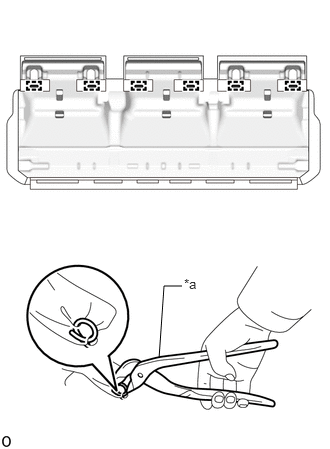
| *a | Hog Ring Pliers |
Using hog ring pliers, install 6 new hog rings.
- NOTICE:
-
Be careful not to damage the No. 1 seat cushion cover sub-assembly.
2.INSTALL SEAT CUSHION COVER WITH PAD
73340
3.INSTALL REAR SEAT LAP TYPE BELT ASSEMBLY LH
73330
4.INSTALL REAR SEAT LAP TYPE BELT ASSEMBLY RH
- HINT:
-
Use the same procedure described for the LH side.
71834J
5.INSTALL NO. 1 SEAT OUTER NO. 1 RECLINING COVER LH
71833K
6.INSTALL NO. 1 SEAT OUTER NO. 1 RECLINING COVER RH
- HINT:
-
Use the same procedure described for the LH side.
72526L
7.INSTALL RECLINING ADJUSTER RELEASE HANDLE LH
72525N
8.INSTALL NO. 1 SEAT RECLINING ADJUSTER RELEASE HANDLE RH
- HINT:
-
Use the same procedure described for the reclining adjuster release handle LH.
72329G
9.INSTALL REAR NO. 2 SEAT ADJUSTER BOLT COVER
72329F
10.INSTALL REAR SEAT ADJUSTER BOLT COVER
- HINT:
-
Use the same procedure described for the rear No. 2 seat adjuster bolt cover.
11.INSTALL REAR SEAT ASSEMBLY
12.INSPECT SEAT BELT WARNING SYSTEM (w/ Seat Belt Warning System)