BRAKE (REAR) REAR BRAKE(for Rear Drum Brake) INSTALLATION
CAUTION / NOTICE / HINT
- NOTICE:
- ·
Immediately after installing the brake shoes, the braking performance may be reduced. Always perform a road test in a safe place while paying attention to the surroundings.
·After replacing the brake shoes, always perform a road test to check the braking performance and check for vibrations.
- HINT:
- ·
Use the same procedure for the RH side and LH side.
·The following procedure is for the LH side.
PROCEDURE

 47570
1.INSTALL REAR WHEEL BRAKE CYLINDER ASSEMBLY
47570
1.INSTALL REAR WHEEL BRAKE CYLINDER ASSEMBLY
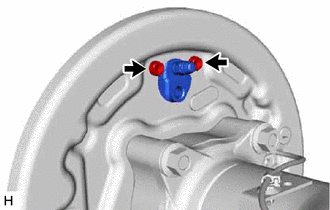
Install the rear wheel brake cylinder assembly to the brake backing plate with the 2 bolts.
- Torque:
- 9.5 N*m (97 kgf*cm, 84 in.*lbf)
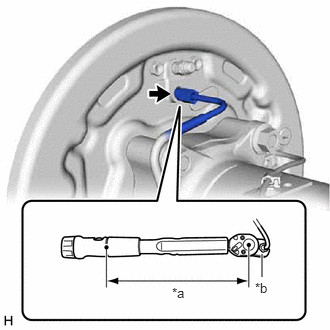
| *a | Torque Wrench Fulcrum Length |
| *b | Union Nut Wrench |
Using a union nut wrench, connect the rear brake tube to the rear wheel brake cylinder assembly.
- Torque:
- Specified tightening torque : 15.2 N*m (155 kgf*cm, 11 ft.*lbf)
- NOTICE:
- ·
Do not kink or damage the brake line.
·Do not allow any foreign matter such as dirt or dust to enter the brake line from the connecting parts.
- HINT:
- ·
Calculate the torque wrench reading when changing the fulcrum length of the torque wrench.
·When using a union nut wrench (fulcrum length of 22 mm (0.866 in.)) + torque wrench (fulcrum length of 162 mm (6.38 in.)):
13.4 N*m (137 kgf*cm, 10 ft.*lbf)
47602
2.INSTALL REAR BRAKE PARKING BRAKE SHOE LEVER SUB-ASSEMBLY

|
High Temperature Grease |
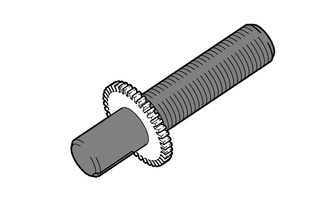
Apply high temperature grease to the adjusting bolt.
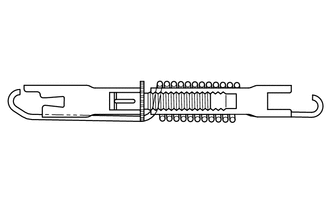
Assemble the rear brake strut kit as shown in the illustration.
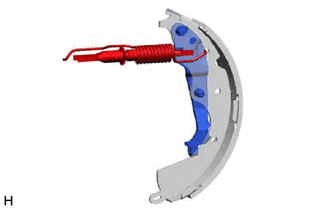
Install the rear brake strut kit and rear brake parking brake shoe lever sub-assembly to the brake shoe (rear).
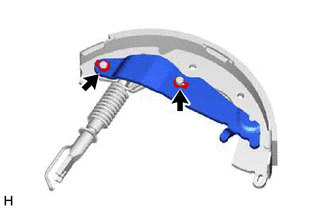
Using needle-nose pliers, install the parking brake reaction lever with 2 new C-washers.
47644A
3.INSTALL REAR BRAKE AUTOMATIC ADJUST LEVER
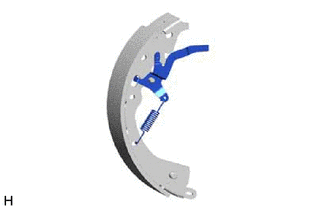
Install the rear brake automatic adjust lever and rear brake automatic adjust lever tension spring to the brake shoe (front).
46430
4.CONNECT NO. 3 PARKING BRAKE CABLE ASSEMBLY
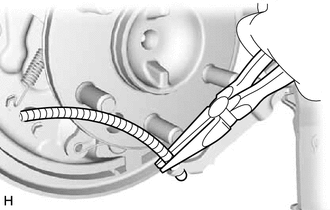
Using needle-nose pliers, install the No. 3 parking brake cable assembly to the rear brake parking brake shoe lever.
04943A
5.INSTALL REAR BRAKE STRUT KIT
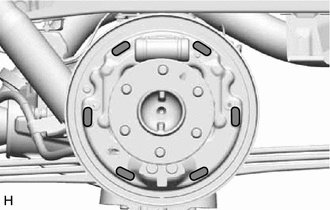
|
|
High Temperature Grease |
Apply high temperature grease to the surfaces of the brake backing plate that contact the brake shoes as shown in the illustration.
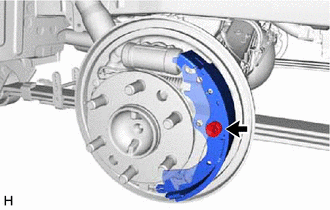
Install the brake shoe (rear), shoe hold down spring pin, shoe hold down spring and shoe hold down spring cup.
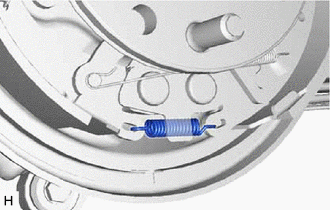
Install the shoe tension spring.
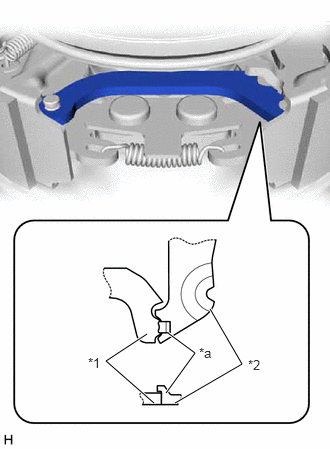
| *1 | Lower Parking Brake Shoe Strut |
| *2 | Parking Brake Reaction Lever |
| *a | Protrusion |
Install the lower parking brake shoe strut.
- HINT:
-
Insert the lower parking brake shoe strut under the protrusion of the parking brake reaction lever as shown in the illustration.
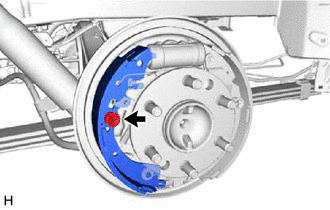
Install the brake shoe (front), shoe hold down spring pin, shoe hold down spring and shoe hold down spring cup.
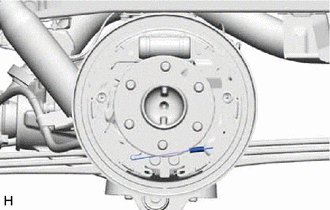
Install the tension spring to the brake shoe.
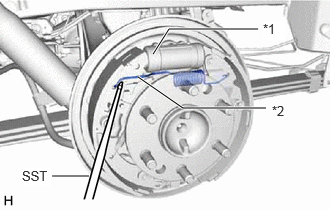
| *1 | Wheel Cylinder Boot |
| *2 | Tension Spring |
Using SST, install the tension spring to the brake shoe (front).
- SST
- 09921-00011
- NOTICE:
-
Do not damage the wheel cylinder boot.
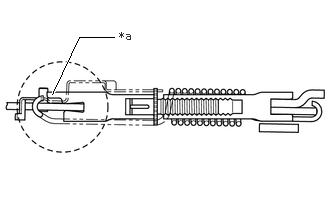
| *a | Ends of the Rear Brake Strut Kit |
Check that the rear brake strut kit is installed properly as shown in the illustration.
- NOTICE:
-
Make sure that the ends of the rear brake strut kit are facing the correct direction by checking the difference in length of the ends.
6.INSPECT REAR DRUM BRAKE
Check that each part is installed properly as shown in the illustration.
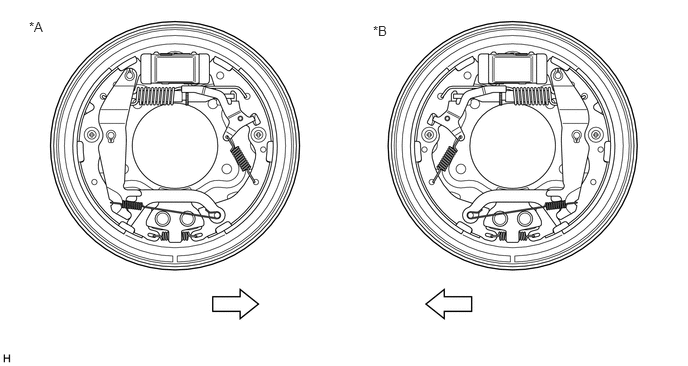
| *A | RH Side | *B | LH Side |

|
Front of the Vehicle | - | - |
- NOTICE:
- ·
Make sure that the wheel cylinder boots are not damaged and are free of lubricants such as grease.
·Make sure that the surfaces of the shoe lining are free of oil and foreign matter.
42431D
7.INSTALL BRAKE DRUM
Install the brake drum.
8.ADJUST REAR DRUM BRAKE SHOE CLEARANCE
Remove the shoe adjusting hole plug.
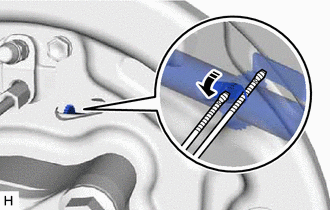

|
Expand |
Using a screwdriver, turn the adjuster to expand the shoe until the brake drum locks.
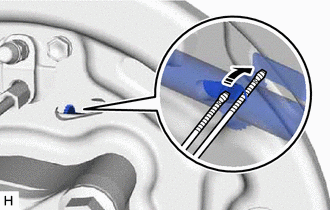
|
|
Contract |
Hold the rear brake automatic adjust lever away from the adjuster, and contract the brake shoe by turning the adjusting bolt using another screwdriver until the brake drum can rotate smoothly.
Install the shoe adjusting hole plug.
9.BLEED BRAKE LINE
10.ADJUST PARKING BRAKE
11.INSTALL REAR WHEEL