MAINTENANCE BRAKE FLUID(for HEV Model) REPLACEMENT
CAUTION / NOTICE / HINT
- NOTICE:
- ·
Move the shift lever to P and apply the parking brake before replacing the brake fluid.
·Add brake fluid to keep the level between the MIN and MAX lines of the reservoir while replacing the brake fluid.
·If brake fluid leaks onto any painted surface, immediately wash it off.
·Do not operate the brake pedal with 2 or more breeder plugs open.
·During fluid replacement, DTCs for pressure sensor malfunctions, etc. may be stored. After fluid replacement and if instructed in the procedures, clear the DTCs.
- HINT:
- ·
Can replace the brake fluid using vacuum.
·If any work is performed on the brake system or if air in the brake lines is suspected, bleed the air from the brake system.
PROCEDURE

 1. START DIAGNOSTIC MODE
- NOTICE:
- ·
Before performing inspections or repairs which may cause warning messages to be displayed or DTCs to be stored, such as a simulation test or road test, it is necessary to enter start diagnostic mode so that unnecessary warning messages are not sent to the service center.
·Make sure to keep the ignition switch ON until the brake fluid replacement is completed as diagnostic mode is canceled when the ignition switch is turned off.
Perform Start Diagnosis Mode.
55783E
2.REMOVE CENTER COWL TOP VENTILATOR LOUVER
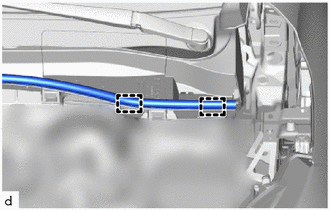
Disengage the 2 hooks and separate the hood to cowl top seal from the cowl top ventilator louver sub-assembly.
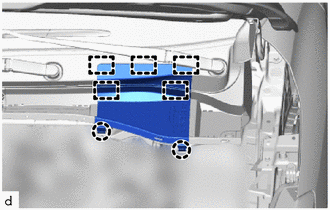
Disengage the 2 claws and 5 guides to remove the center cowl top ventilator louver from the cowl top ventilator louver sub-assembly.
3.REMOVE BRAKE MASTER CYLINDER RESERVOIR FILLER CAP ASSEMBLY
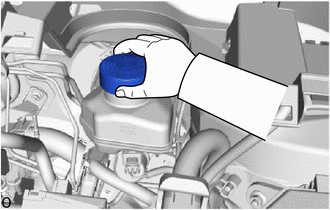
Remove the brake master cylinder reservoir filler cap assembly.
4.FILL RESERVOIR WITH BRAKE FLUID
Fill the reservoir with brake fluid.
- Brake Fluid:
SAE J1703 or FMVSS No. 116 DOT3
SAE J1704 or FMVSS No. 116 DOT4
- NOTICE:
- ·
Make sure that there is sufficient brake fluid in the reservoir.
·Do not remove the filter from the brake master cylinder reservoir and be sure to fill the brake master cylinder reservoir with new brake fluid to avoid any potential contamination of the brake system. Contamination, for example by dirt particles or mineral oil, could lead to functional brake problems.
- HINT:
-
The brake fluid bottle can be inverted and placed on the reservoir filler opening.
5.REPLACE BRAKE FLUID
- NOTICE:
-
Make sure to keep the ignition switch ON until the brake fluid replacement is completed as brake fluid diagnosis startup is canceled when the ignition switch is turned off.
Remove the bleeder plug cap.
Connect a vinyl tube to the bleeder plug.
Depress the brake pedal several times, and then loosen the bleeder plug with the pedal depressed.*1
- NOTICE:
- ·
Add brake fluid to keep the level between the MIN and MAX lines of the reservoir while replacing the brake fluid.
·Do not operate the brake pedal with 2 or more breeder plugs open.
When fluid stops coming out, tighten the bleeder plug and release the brake pedal.*2
Repeat steps *1 and *2 until new brake fluid comes out.
Tighten the bleeder plug completely.
- Torque:
- 8.3 N*m (85 kgf*cm, 73 in.*lbf)
Install the bleeder plug cap.
Repeat the above steps to replace the brake fluid of the brake lines for each wheel.
6.INSPECT FOR BRAKE FLUID LEAK
7.INSPECT BRAKE FLUID LEVEL IN RESERVOIR
8.INSTALL BRAKE MASTER CYLINDER RESERVOIR FILLER CAP ASSEMBLY
Install the brake master cylinder reservoir filler cap assembly.
55783E
9.INSTALL CENTER COWL TOP VENTILATOR LOUVER
Engage the 5 guides and 2 claws to install the center cowl top ventilator louver to the cowl top ventilator louver sub-assembly.
Engage the 2 hooks to install the hood to cowl top seal to the cowl top ventilator louver sub-assembly.
10.INSPECT BRAKE SYSTEM WARNING LIGHT
Turn the ignition switch off.
Turn the ignition switch to ON.
With the ignition switch ON, depress the brake pedal for 1 second or more and confirm that the brake system warning light (yellow) in the meter is not illuminated.