HYBRID / BATTERY CONTROL MOTOR GENERATOR CONTROL SYSTEM P033506 Crankshaft Position Sensor "A" Algorithm Based Failure P033562 Crankshaft Position Sensor "A" Signal Compare Failure
DESCRIPTION
The motor generator control ECU (MG ECU) (built into the inverter with converter assembly) compares the engine speed value calculated based on the crankshaft position signal input from the ECM versus the engine speed value received from the ECM via CAN communication, and when it has frequently judged that the engine speed is high and the deviation between the engine speed values is large, it will store DTC P033506 or P033562.
| DTC No. | Detection Item | DTC Detection Condition | Trouble Area | MIL | Warning Indicate | Note |
|---|---|---|---|---|---|---|
| P033506 | Crankshaft Position Sensor "A" Algorithm Based Failure | When the engine is running, the deviation between the engine speed calculated based on the crankshaft position signal and the engine speed received via CAN communication exceeds the specified value for 1.5 seconds or more.
(2 trip detection logic) |
·
SFI system ·
Inverter with converter assembly ·
ECM ·
Wire harness or connector |
Comes on | Master Warning:
Comes on |
SAE Code:
P0336 |
| P033562 | Crankshaft Position Sensor "A" Signal Compare Failure | When the engine is running, the deviation between the engine speed calculated based on the crankshaft position signal and the engine speed received via CAN communication exceeds the specified value for 1.5 seconds or more.
(2 trip detection logic) |
·
SFI system ·
Inverter with converter assembly ·
ECM ·
Wire harness or connector |
Comes on | Master Warning:
Comes on |
SAE Code:
P0336 |
MONITOR DESCRIPTION
Calculated engine speed is calculated from the time interval of crankshaft position signals. Fail counter is counted up when difference between engine speed and calculated engine speed is over the criteria. Malfunction is detected when fail counter value is over the criteria.
MONITOR STRATEGY
| Related DTCs | P0336 (INF P033506/P033562): Crankshaft Position Sensor "A" Circuit Range/Performance |
| Required sensors/components | Crankshaft position sensor |
| Frequency of operation | Engine running |
| Duration | 1.5 seconds or more |
| MIL operation | 2 driving cycles |
| Sequence of operation | None |
TYPICAL ENABLING CONDITIONS
| The monitor will run whenever the following DTCs are not stored | TMC's intellectual property |
| Other conditions belong to TMC's intellectual property | - |
TYPICAL MALFUNCTION THRESHOLDS
| TMC's intellectual property | - |
COMPONENT OPERATING RANGE
| Motor generator control ECU | DTC P0336 (INF P033506/P033562) is not detected |
CONFIRMATION DRIVING PATTERN
- HINT:
- ·
After repair has been completed, clear the DTC and then check that the vehicle has returned to normal by performing the following All Readiness check procedure.
·When clearing the permanent DTCs, refer to the "CLEAR PERMANENT DTC" procedure.
Clear the DTCs (even if no DTCs are stored, perform the clear DTC procedure).
Turn the ignition switch off and wait for 2 minutes or more.
Turn the ignition switch to ON (IG) and wait for 5 seconds or more.
Turn the ignition switch to ON (READY) and wait for 5 seconds or more.
Depress the accelerator pedal to start the engine.
Keep the engine running for 20 seconds.
Enter the following menus: Powertrain / Motor Generator / Utility / All Readiness.
Check the DTC judgment result.
- HINT:
- ·
If the judgment result shows NORMAL, the system is normal.
·If the judgment result shows ABNORMAL, the system has a malfunction.
·If the judgment result shows INCOMPLETE, perform driving pattern again.
WIRING DIAGRAM
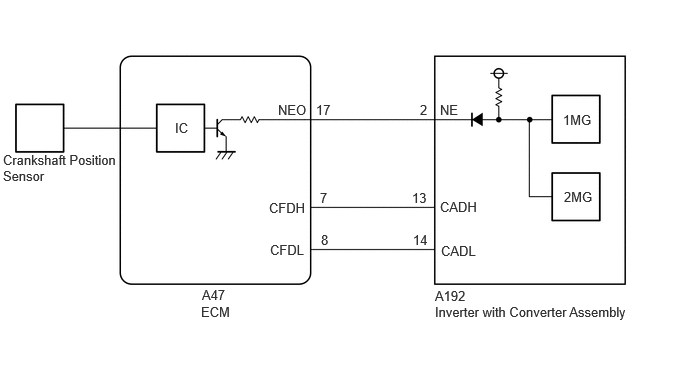
CAUTION / NOTICE / HINT
- CAUTION:
-
Refer to the precautions before inspecting high voltage circuit.
- NOTICE:
- ·
After the ignition switch is turned off, there may be a waiting time before disconnecting the negative (-) auxiliary battery terminal.
·When disconnecting and reconnecting the auxiliary battery.
- HINT:
-
When disconnecting and reconnecting the auxiliary battery, there is an automatic learning function that completes learning when the respective system is used.
PROCEDURE
According to the display on the GTS, select "Health Check".
Check for DTCs.
- Result:
Result Proceed to No DTCs are output. A DTCs are output. B
Turn the ignition switch off.
A
B
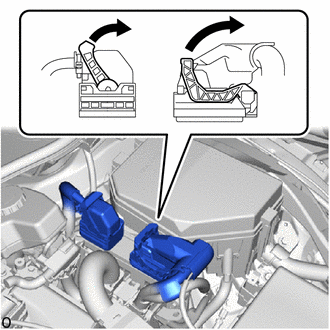
Check the connector connections and contact pressure of the relevant terminals for the ECM connectors.
- NOTICE:
-
Before disconnecting the connector, confirm that it is properly connected by checking that the locking claws are engaged and that the connector cannot be pulled off.
- OK:
- The connector is connected securely.
- The terminals are not deformed and are connected securely.
- No water or foreign matter in the connector.
- Result:
Result Proceed to OK A NG (The connector is not connected securely.) B NG (The terminals are not making secure contact or are deformed, or water or foreign matter exists in the connector.) C
- HINT:
-
When connecting each connector, connect it with the lock lever raised. Rotate the lock lever downward and make sure that the connector is securely connected. When the lock lever is fully lowered, a click will be heard as its claw engages. After the click is heard, pull up on the connector to confirm that it is securely connected.
A
B
C
- CAUTION:
-
Be sure to wear insulated gloves.
Check that the service plug grip is not installed.
- NOTICE:
-
After removing the service plug grip, do not turn the ignition switch to ON (READY), unless instructed by the repair manual because this may cause a malfunction.
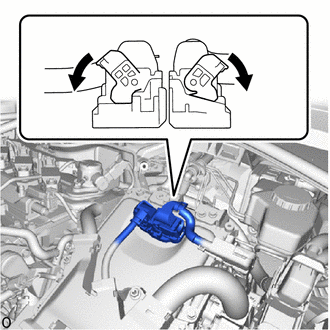
Check the connection condition of the low voltage connectors of the inverter with converter assembly and the contact pressure of each terminal. Check the terminals for deformation, and the connector for water and foreign matter.
- NOTICE:
-
Before disconnecting the connector, confirm that it is properly connected by checking that the claws of the lock levers are engaged and that the connector cannot be pulled off.
- OK:
- The connector is connected securely.
- The terminals are not deformed and are connected securely.
- No water or foreign matter in the connector.
- Result:
Result Proceed to OK A NG (The connector is not connected securely.) B NG (The terminals are not making secure contact or are deformed, or water or foreign matter exists in the connector.) C
- HINT:
-
When connecting the connector, connect it with the lock levers raised. Rotate each lock lever downward and make sure that the connector is securely connected. When a lock lever is fully lowered, a click will be heard as its claw engages. After the click is heard, pull up on the connector to confirm that it is securely connected.
A
B
C
- CAUTION:
-
Be sure to wear insulated gloves.
Check that the service plug grip is not installed.
- NOTICE:
-
After removing the service plug grip, do not turn the ignition switch to ON (READY), unless instructed by the repair manual because this may cause a malfunction.
Disconnect the inverter with converter assembly connector.
Disconnect the ECM connector.
Turn the ignition switch off.
Measure the resistance according to the value(s) in the table below.
- Standard Resistance (Check for Open):
Tester Connection Condition Specified Condition A192-2 (NE) - A47-17 (NEO) Ignition switch off Below 1 Ω A192-13 (CADH) - A47-7 (CFDH) Ignition switch off Below 1 Ω A192-14 (CADL) - A47-8 (CFDL) Ignition switch off Below 1 Ω
- Standard Resistance (Check for Short):
Tester Connection Condition Specified Condition A192-2 (NE) or A47-17 (NEO) - Body ground and other terminals Ignition switch off 10 kΩ or higher A192-13 (CADH) or A47-7 (CFDH) - Body ground and other terminals Ignition switch off 10 kΩ or higher A192-14 (CADL) or A47-8 (CFDL) - Body ground and other terminals Ignition switch off 10 kΩ or higher
Reconnect the ECM connector.
Reconnect the inverter with converter assembly connector.
- Result:
Proceed to OK NG
OK
NG
Disconnect the ECM connector.
Turn the ignition switch to ON.
Measure the voltage according to the value(s) in the table below.
- Standard Voltage:
Tester Connection Condition Specified Condition A47-17 (NEO) - Body ground Ignition switch ON 11 to 14 V
Turn the ignition switch off.
Reconnect the ECM connector.
- Result:
Proceed to OK NG
OK
NG
Disconnect the ECM connector.
Measure the resistance according to the value(s) in the table below.
- Standard Resistance:
Tester Connection Condition Specified Condition A47-7 (CFDH) - A47-8 (CFDL) Ignition switch off 80 to 170 Ω
Reconnect the ECM connector.
- Result:
Proceed to OK NG
OK
NG