HEATING / AIR CONDITIONING AIR CONDITIONING SYSTEM(for HEV Model) B142A88 Servo Motor LIN Communication Bus off
DESCRIPTION
The air conditioning harness assembly connects the air conditioning amplifier assembly and the servo motors. The air conditioning amplifier assembly supplies power and sends operation instructions to each servo motor through the air conditioning harness assembly. Each servo motor sends damper position information to the air conditioning amplifier assembly.
| DTC No. | Detection Item | DTC Detection Condition | Trouble Area | Memory |
|---|---|---|---|---|
| B142A88 | Servo Motor LIN Communication Bus off | Diagnosis Condition:
Ignition switch ON Malfunction Status: Error or lost communication with each servo motor Detection Time: Continuously for 10 seconds or more |
·
Air conditioning harness assembly ·
No. 1 air conditioning radiator damper servo sub-assembly ·
Air conditioning amplifier assembly |
Memorized |
| Vehicle Condition | |||
|---|---|---|---|
| Pattern 1 | Pattern 2 | ||
| Diagnosis Condition | Ignition switch ON | ○ | ○ |
| Malfunction | Error communication with each servo motor | ○ | - |
| Lost communication with each servo motor | - | ○ | |
| Detection Time | Continuously for 10 seconds or more | Continuously for 10 seconds or more | |
| Trip Count | 1 trip | 1 trip | |
- HINT:
-
If the conditions of either of these patterns are detected, a DTC will be stored
WIRING DIAGRAM
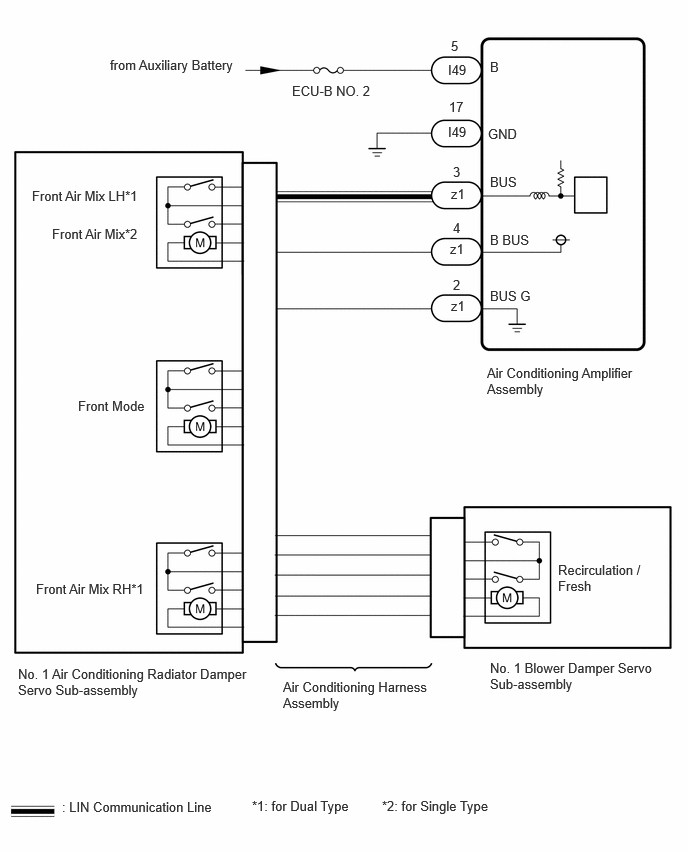
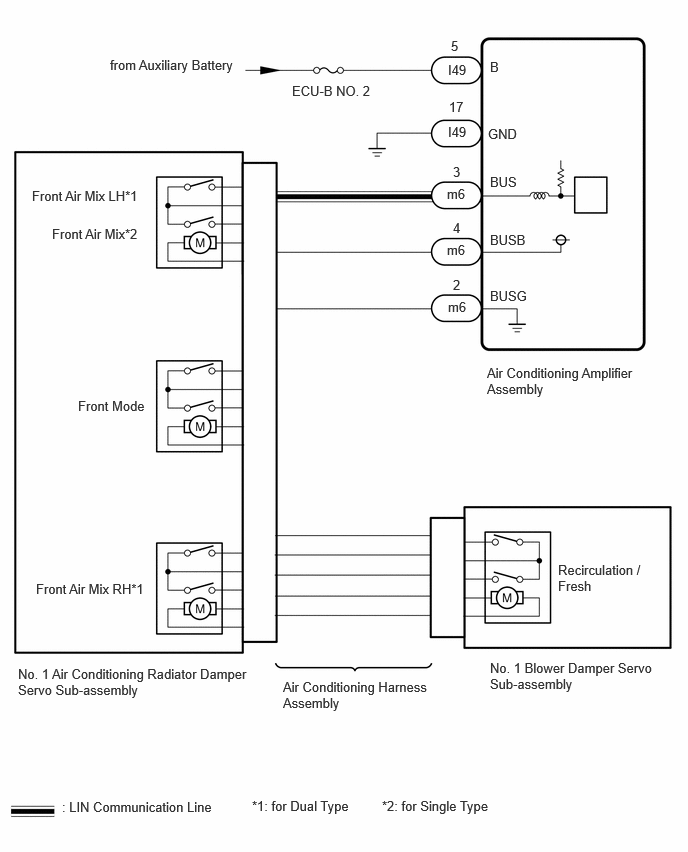
CAUTION / NOTICE / HINT
- NOTICE:
-
This DTC is also output when servomotor initialization has failed. When servomotor initialization has failed, repair any malfunctions and perform servomotor initialization again.
PROCEDURE
Check vehicle specifications.
- Result:
Result Proceed to for Dual Type A for Single Type B
A
B
Perform the Active Test according to the display on the GTS.
- Body Electrical > Air Conditioner > Active Test
-
Tester Display Measurement Item Control Range Diagnostic Note Front Left Air Mix Damper Control Servo Motor No. 1 air conditioning radiator damper servo sub-assembly operation Min.: 128
Max.: 384Operates between 165 to 257 Front Right Air Mix Damper Control Servo Motor No. 1 air conditioning radiator damper servo sub-assembly operation Min.: 128
Max.: 384Operates between 255 to 347 Air Inlet Damper Control Servo Motor No. 1 blower damper servo sub-assembly operation Min.: 128
Max.: 384Operates between 220 to 256 pulses Front Air Outlet Damper Control Servo Motor No. 1 air conditioning radiator damper servo sub-assembly operation Min.: 128
Max.: 384Operates between 234 to 348
- Body Electrical > Air Conditioner > Active Test
-
Tester Display Front Left Air Mix Damper Control Servo Motor - 50004 450 26
- Body Electrical > Air Conditioner > Active Test
-
Tester Display Front Right Air Mix Damper Control Servo Motor - 50004 450 28
- Body Electrical > Air Conditioner > Active Test
-
Tester Display Air Inlet Damper Control Servo Motor - 50004 450 32
- Body Electrical > Air Conditioner > Active Test
-
Tester Display Front Air Outlet Damper Control Servo Motor - 50004 450 47
- Result:
Result Proceed to All of the damper servo motors do not operate A Any of the damper servo motors does not operate B All of the damper servo motors operate C
A
B
C
Perform the Active Test according to the display on the GTS.
- Body Electrical > Air Conditioner > Active Test
-
Tester Display Measurement Item Control Range Diagnostic Note Air Inlet Damper Control Servo Motor No. 1 blower damper servo sub-assembly operation Min.: 128
Max.: 384Operates between 220 to 256 pulses Front Air Mix Damper Control Servo Motor No. 1 air conditioning radiator damper servo sub-assembly operation Min.: 128
Max.: 384Operates between 165 to 257 Front Air Outlet Damper Control Servo Motor No. 1 air conditioning radiator damper servo sub-assembly operation Min.: 128
Max.: 384Operates between 234 to 348
- Body Electrical > Air Conditioner > Active Test
-
Tester Display Front Right Air Mix Damper Control Servo Motor - 50004 450 28
- Body Electrical > Air Conditioner > Active Test
-
Tester Display Air Inlet Damper Control Servo Motor - 50004 450 32
- Body Electrical > Air Conditioner > Active Test
-
Tester Display Front Air Outlet Damper Control Servo Motor - 50004 450 47
- Result:
Result Proceed to All of the damper servo motors do not operate A Any of the damper servo motors does not operate B All of the damper servo motors operate C
A
B
C
Check vehicle specifications.
- Result:
Result Proceed to w/ Rear Air Duct A w/o Rear Air Duct B
A
B
- NOTICE:
-
When inspecting the air conditioning amplifier assembly, do not bring the tester probes too close to each other as a short circuit may occur.
Disconnect the z1 air conditioning amplifier assembly connector.
Measure the resistance according to the value(s) in the table below.
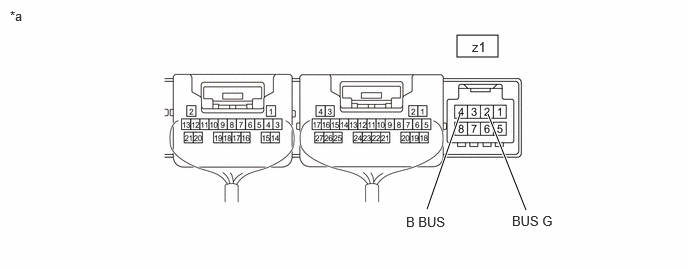
| *a | Component without harness connected
(Air Conditioning Amplifier Assembly) |
- | - |
- Standard Resistance:
Tester Connection Condition Specified Condition z1-2 (BUS G) - Body ground Always Below 1 Ω
Measure the voltage according to the value(s) in the table below.
- Standard Voltage:
Tester Connection Condition Specified Condition z1-4 (B BUS) - Body ground Always 11 to 14 V
- Result:
Proceed to OK NG
OK
NG
- NOTICE:
-
When inspecting the air conditioning amplifier assembly, do not bring the tester probes too close to each other as a short circuit may occur.
Using an oscilloscope, check the waveform.
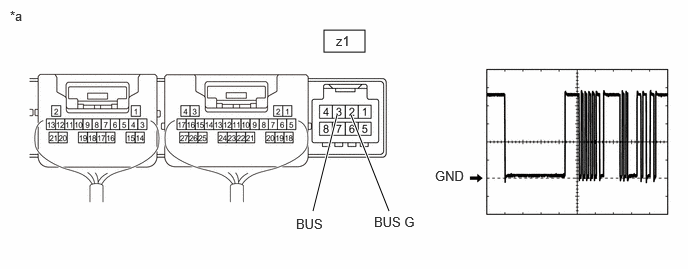
| *a | Component without harness connected
(Air Conditioning Amplifier Assembly) |
- | - |
| Tester Connection | Tool Setting | Switch Condition |
|---|---|---|
| z1-3 (BUS) - z1-2 (BUS G) | 2 V/DIV., 2 ms./DIV. | Ignition switch ON |
- OK:
Waveform is similar to that shown in the illustration.
- Result:
Proceed to OK NG
OK
NG
- NOTICE:
-
When inspecting the air conditioning amplifier assembly, do not bring the tester probes too close to each other as a short circuit may occur.
Disconnect the m6 air conditioning amplifier assembly connector.
Measure the resistance according to the value(s) in the table below.
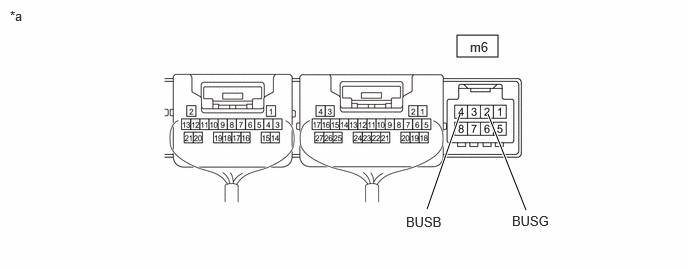
| *a | Component without harness connected
(Air Conditioning Amplifier Assembly) |
- | - |
- Standard Resistance:
Tester Connection Condition Specified Condition m6-2 (BUSG) - Body ground Always Below 1 Ω
Measure the voltage according to the value(s) in the table below.
- Standard Voltage:
Tester Connection Condition Specified Condition m6-4 (BUSB) - Body ground Always 11 to 14 V
- Result:
Proceed to OK NG
OK
NG
- NOTICE:
-
When inspecting the air conditioning amplifier assembly, do not bring the tester probes too close to each other as a short circuit may occur.
Using an oscilloscope, check the waveform.

| *a | Component without harness connected
(Air Conditioning Amplifier Assembly) |
- | - |
| Tester Connection | Tool Setting | Switch Condition |
|---|---|---|
| m6-3 (BUS) - m6-2 (BUSG) | 2 V/DIV., 2 ms./DIV. | Ignition switch ON |
- OK:
Waveform is similar to that shown in the illustration.
- Result:
Proceed to OK NG
OK
NG