WINDOW / GLASS BACK DOOR GLASS REMOVAL
CAUTION / NOTICE / HINT
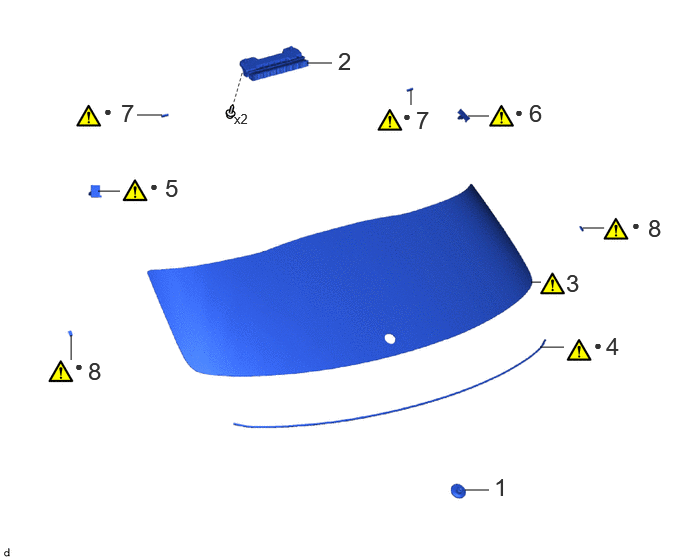
| Procedure | Part Name Code | 
|

|

|
|
|---|---|---|---|---|---|
| 1 | REAR WIPER MOTOR GROMMET | 85143R | - | - | - |
| 2 | CENTER STOP LIGHT ASSEMBLY | 81006 | - | - | - |
| 3 | BACK DOOR GLASS SUB-ASSEMBLY | - | ( 202201,999999,_59,_115107,_0510343,RM1000000020927_01_0236,) 202201,999999,_59,_115107,_0510343,RM1000000020927_01_0236,)
|
- | - |
| 4 | BACK DOOR WINDOW GLASS ADHESIVE DAM | 64813B | (202201,999999,_59,_115107,_0510343,RM1000000020927_01_0264,)
|
- | - |
| 5 | NO. 2 BACK WINDOW GLASS SPACER | 64819B | (202201,999999,_59,_115107,_0510343,RM1000000020927_01_0239,)
|
- | - |
| 6 | NO. 1 BACK WINDOW GLASS SPACER | 64818B | (202201,999999,_59,_115107,_0510343,RM1000000020927_01_0240,)
|
- | - |
| 7 | NO. 2 BACK DOOR GLASS ADHESIVE DAM | 68294D | (202201,999999,_59,_115107,_0510343,RM1000000020927_01_0265,)
|
- | - |
| 8 | BACK DOOR WINDOW FRAME SPACER | 68699 | (202201,999999,_59,_115107,_0510343,RM1000000020927_01_0266,)
|
- | - |
| ● | Non-reusable part | - | - |
CAUTION / NOTICE / HINT
- NOTICE:
-
Make sure to use Toyota Genuine Windshield Glass Adhesive (High Modulus Type) or equivalent.
PROCEDURE

 85143R
1.REMOVE REAR WIPER MOTOR GROMMET
85143R
1.REMOVE REAR WIPER MOTOR GROMMET
81006
2.REMOVE CENTER STOP LIGHT ASSEMBLY
3.REMOVE BACK DOOR GLASS SUB-ASSEMBLY
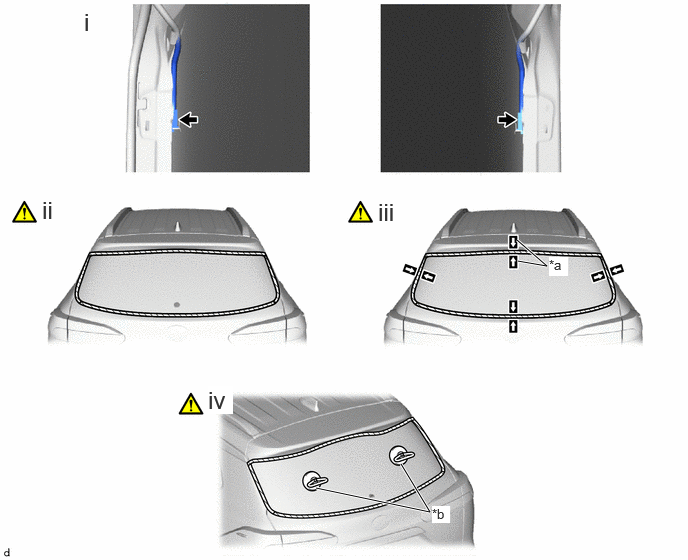
| *a | Matchmark | *b | Suction Cup |
Disconnect the 2 connectors.
Apply protective tape to the area around the installation position of the back door glass sub-assembly on the vehicle body to prevent it from being scratched as shown in the illustration.
Place matchmarks on the back door glass sub-assembly and vehicle body at the locations indicated in the illustration.
- HINT:
-
Matchmarks are not necessary if the back door glass sub-assembly is not going to be reused.
Install the suction cups to the back door glass sub-assembly.
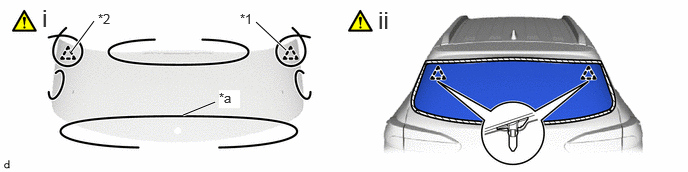
| *1 | No. 1 Back Window Glass Spacer | *2 | No. 2 Back Window Glass Spacer |
| *a | Piano Wire | - | - |
Cut off the adhesive by the below procedure.
1. Pass a piano wire between the vehicle body and back door glass sub-assembly from the interior.
2. Tie both wire ends to wooden blocks or similar objects that can serve as handles.
3. Cut off the adhesive by pulling the piano wire around the back door glass sub-assembly.
- NOTICE:
- ·
When separating the back door glass sub-assembly, be careful not to damage the paint or interior and exterior ornaments.
·When cutting off the adhesive, take care not to damage the connectors on the back door glass sub-assembly.
·The No. 1 back window glass spacer and No. 2 back window glass spacer are installed to the back door glass sub-assembly as shown in the illustration. Be careful not to damage the back door glass sub-assembly when cutting the adhesive.
Remove the back door glass sub-assembly by the below procedure.
1. Using suction cups, disengage the No. 1 back window glass spacer and No. 2 back window glass spacer to remove the back door glass sub-assembly.
- NOTICE:
- ·
To prevent the back door glass sub-assembly from falling when performing this operation, be sure to hold the back door glass sub-assembly using suction cups.
·Be careful not to drop the back door glass sub-assembly.
·Leave as much adhesive on the vehicle body as possible when removing the back door glass sub-assembly.
64813B
4.REMOVE BACK WINDOW GLASS ADHESIVE DAM
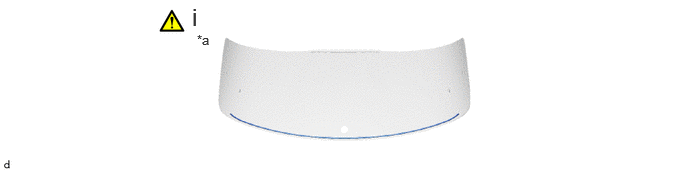
| *a | Back Side of Back Door Glass Sub-assembly | - | - |
When reusing the back door glass sub-assembly.
1. Using a scraper, remove the back window glass adhesive dam.
- NOTICE:
- ·
Be careful not to damage the back door glass sub-assembly.
·Be sure to replace the back window glass adhesive dam with a new one.
64819B
5.REMOVE NO. 2 BACK WINDOW GLASS SPACER
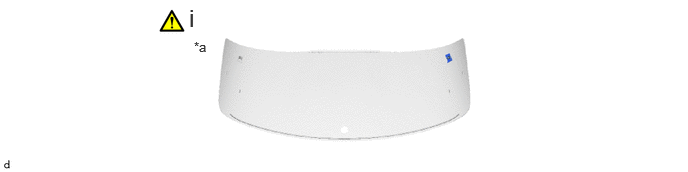
| *a | Back Side of Back Door Glass Sub-assembly | - | - |
When reusing the back door glass sub-assembly.
1. Using a scraper, remove the No. 2 back window glass spacer.
- NOTICE:
- ·
Be careful not to damage the back door glass sub-assembly.
·Be sure to replace the No. 2 back window glass spacer with a new one.
64818B
6.REMOVE NO. 1 BACK WINDOW GLASS SPACER
Use the same procedure as for the No. 2 back window glass spacer.
68294D
7.REMOVE NO. 2 BACK DOOR GLASS ADHESIVE DAM
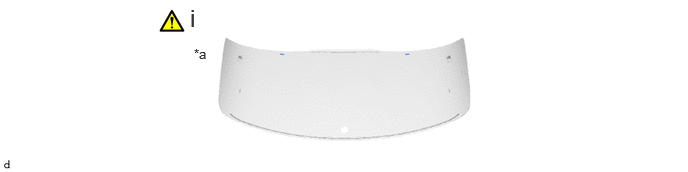
| *a | Back Side of Back Door Glass Sub-assembly | - | - |
When reusing the back door glass sub-assembly.
1. Using a scraper, remove the 2 No. 2 back door glass adhesive dams.
- NOTICE:
- ·
Be careful not to damage the back door glass sub-assembly.
·Be sure to replace the 2 No. 2 back door glass adhesive dams with a new ones.
68699
8.REMOVE BACK DOOR WINDOW FRAME SPACER
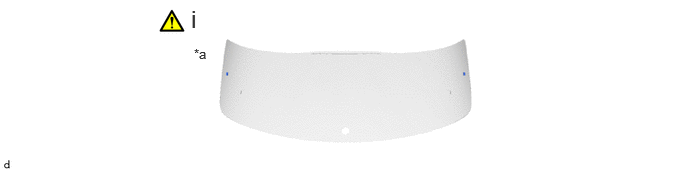
| *a | Back Side of Back Door Glass Sub-assembly | - | - |
When reusing the back door glass sub-assembly.
1. Using a scraper, remove the 2 back door window frame spacers.
- NOTICE:
- ·
Be careful not to damage the back door glass sub-assembly.
·Be sure to replace the 2 back door window frame spacers with a new ones.