EXTERIOR PANELS / TRIM FRONT DOOR WINDOW FRAME MOULDING REMOVAL
CAUTION / NOTICE / HINT
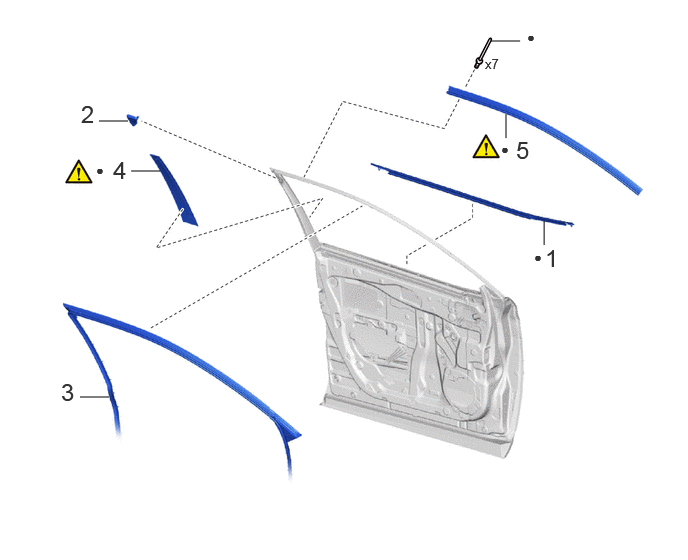
| Procedure | Part Name Code | 
|

|

|
|
|---|---|---|---|---|---|
| 1 | FRONT DOOR BELT MOULDING ASSEMBLY | 75720 | - | - | - |
| 2 | DOOR FRAME UPPER GARNISH | 67664 | - | - | - |
| 3 | FRONT DOOR WEATHERSTRIP | 67862 | - | - | - |
| 4 | FRONT DOOR WINDOW FRAME MOULDING (CENTER PILLAR SIDE) | 75756D | ( 202201,999999,_59,_114126,_0505933,RM100000001ZPFL_01_0222,) 202201,999999,_59,_114126,_0505933,RM100000001ZPFL_01_0222,)
|
- | - |
| 5 | FRONT DOOR UPPER WINDOW FRAME MOULDING | 75754A | (202201,999999,_59,_114126,_0505933,RM100000001ZPFL_01_0221,)
|
- | - |
| ● | Non-reusable part | - | - |
CAUTION / NOTICE / HINT
- HINT:
- ·
Use the same procedure for the RH side and LH side.
·The following procedure is for the LH side.
PROCEDURE

 75720
1.REMOVE FRONT DOOR BELT MOULDING ASSEMBLY
75720
1.REMOVE FRONT DOOR BELT MOULDING ASSEMBLY
67664
2.REMOVE DOOR FRAME UPPER GARNISH
67862
3.SEPARATE FRONT DOOR WEATHERSTRIP
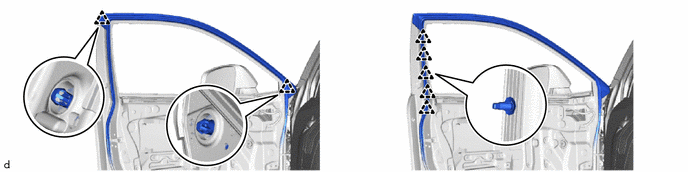
75756D
4.REMOVE FRONT DOOR WINDOW FRAME MOULDING (CENTER PILLAR SIDE)
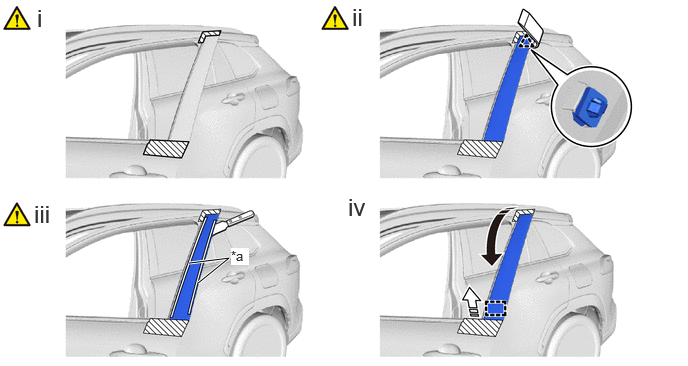
| *a | Double-sided Tape | - | - |

|
Remove in this Direction (1) | 
|
Remove in this Direction (2) |
Apply protective tape around the front door window frame moulding (center pillar side) as shown in the illustration.
Using a moulding remover D, disengage the clip.
Using a scraper, separate the double-sided tape from the front door window frame moulding (center pillar side).
- NOTICE:
-
Be careful not to damage the front door panel.
Disengage the guide to remove the front door window frame moulding (center pillar side) as shown in the illustration.
75754A
5.REMOVE FRONT DOOR UPPER WINDOW FRAME MOULDING
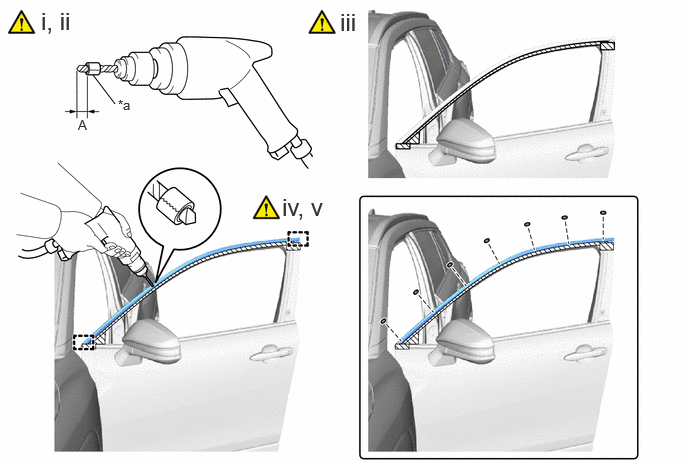
| *a | Tape | - | - |
Insert a 4.0 mm (0.157 in.) drill bit into a drill.
Tape the 4.0 mm (0.157 in.) drill bit 5.0 mm (0.197 in.) from the tip as shown in the illustration.
- Standard Measurement:
Area Measurement Area Measurement A 5.0 mm (0.197 in.) - -
- NOTICE:
-
Tape the 4.0 mm (0.157 in.) drill bit to prevent the drill bit from going too deep.
Apply protective tape around the front door upper window frame moulding as shown in the illustration.
Lightly press the drill bit against the rivets to drill off the rivet flanges, and remove the 7 rivets.
- CAUTION:
-
Be careful of the drilled rivets, as they may be hot.
- NOTICE:
- ·
Pressing the drill too firmly will cause the rivet to turn and result in the rivet not being drilled through.
·Prying the rivets with the drill may damage the rivet installation holes or drill bit.
Disengage the guides to remove the front door upper window frame moulding from the front door frame.
- HINT:
-
Using a vacuum cleaner, remove the rivet fragments and shavings from the drilled areas.