POWER DISTRIBUTION MAIN BODY ECU REMOVAL
CAUTION / NOTICE / HINT
The necessary procedures (adjustment, calibration, initialization, or registration) that must be performed after parts are removed, installed, or replaced during the main body ECU (multiplex network body ECU) removal/installation are shown below.
| Replaced Part or Performed Procedures | Necessary procedures | Effect/Inoperative Function When Necessary Procedures are not Performed | Link |
|---|---|---|---|
| Main body ECU (multiplex network body ECU) | ECU configuration | - | ( 202405,999999,_V1,_083041,_0402305,RM100000002M670,) 202405,999999,_V1,_083041,_0402305,RM100000002M670,)
|
| Code registration | ·
Wireless door lock control system (w/ Smart Entry and Start System) ·
Smart entry and start system (for Entry Function, HV Model) ·
Smart entry and start system (for Start Function, HV Model) ·
Hybrid control system cannot be started ·
Telematics system ·
Digital key system |
See Service Bulletin for the registration method. |
- HINT:
-
When the cable is disconnected/reconnected to the auxiliary battery terminal, systems temporarily stop operating. However, each system has a function that completes learning the first time the system is used.
- ·
Learning completes when vehicle is driven
Effect/Inoperative Function When Necessary Procedures are not Performed Necessary Procedures Link Lane tracing assist system Drive the vehicle straight ahead at 35 km/h (22 mph) or more for 5 second or more. ( 201910,999999,_58,_083101,_0401880,RM100000001JE9I,)
Pre-collision system
·Learning completes when vehicle is operated normally
Effect/Inoperative Function When Necessary Procedures are not Performed Necessary Procedures Link Power back door function Fully close the back door by hand.
- HINT:
-
Initialization is not necessary if the above procedures are performed while the back door is closed.
( 202304,999999,_59,_083093,_0584672,RM1000000029PGT,)
Power door lock control system If the back door is locked and therefore cannot be opened, it is necessary to unlock the back door using the door control switch, electrical key transmitter sub-assembly switch. ( 202409,999999,_58,_083092,_0403003,RM100000002NS90,)
Air conditioning system After the ignition switch is turned to ON, the servo motor standard position is recognized -
| Replaced Part or Performed Procedures | Necessary procedures | Effect/Inoperative Function When Necessary Procedures are not Performed | Link |
|---|---|---|---|
w/ Smart entry and start system:
Main body ECU (multiplex network body ECU) |
ECU configuration | - | (202405,999999,_V1,_083041,_0402305,RM100000002M670,)
|
| Code registration | ·
Wireless door lock control system (w/ Smart Entry and Start System) ·
Smart entry and start system (for Entry Function, Gasoline Model) ·
Smart entry and start system (for Start Function, Gasoline Model) ·
Engine start function ·
Telematics system ·
Digital key system |
See Service Bulletin for the registration method. |
- HINT:
-
When the cable is disconnected/reconnected to the auxiliary battery terminal, systems temporarily stop operating. However, each system has a function that completes learning the first time the system is used.
- ·
Learning completes when vehicle is driven
Effect/Inoperative Function When Necessary Procedures are not Performed Necessary Procedures Link Stop and start system Drive the vehicle until stop and start control is permitted (approximately 5 to 60 minutes). ( 202409,999999,_51,_083056,_0402418,RM100000002NSFO,)
Lane tracing assist system Drive the vehicle straight ahead at 15 km/h (10 mph) or more for 1 second or more. ( 201910,999999,_58,_083101,_0401880,RM100000001JE9I,)
Pre-collision system
·Learning completes when vehicle is operated normally
Effect/Inoperative Function When Necessary Procedures are not Performed Necessary Procedures Link *: w/ Power back door system
Power back door function* Fully close the back door by hand.
- HINT:
-
Initialization is not necessary if the above procedures are performed while the back door is closed.
( 202304,999999,_59,_083093,_0584672,RM1000000029PGT,)
Power door lock control system If the back door is locked and therefore cannot be opened, it is necessary to unlock the back door using the door control switch, electrical key transmitter sub-assembly switch. ( 202409,999999,_58,_083092,_0403003,RM100000002NS90,)
Air conditioning system After the ignition switch is turned to ON, the servo motor standard position is recognized -
PROCEDURE

 1. PRECAUTION
- CAUTION:
-
-
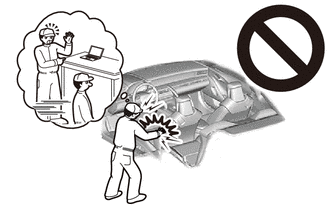
Some of these service operations affect the SRS airbag system. Read the precautionary notices concerning the SRS airbag system before servicing.
- ·
- NOTICE:
- ·
Do not remove the main body ECU (multiplex network body ECU) except when replacing it.
·When removing the main body ECU (multiplex network body ECU), always replace it with a new one.
2.DISCONNECT CABLE FROM NEGATIVE AUXILIARY BATTERY TERMINAL
- CAUTION:
-
- ·
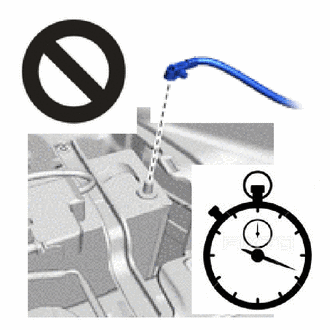
Wait at least 60 seconds after disconnecting the cable from the negative (-) auxiliary battery terminal to disable the SRS system.
·If the airbag deploys for any reason, it may cause a serious accident.
for M20C-FKS:
Click hereGeneral>MAINTENANCE>M20C-FKS BATTERY>REMOVAL202409,999999,_V1,_083136,_0418197,RM100000002NHPI,
for M20D-FKS:
Click hereGeneral>MAINTENANCE>M20D-FKS BATTERY>REMOVAL202409,999999,_V1,_083136,_0403617,RM100000002NHPJ,
73900
3.REMOVE LOWER NO. 1 INSTRUMENT PANEL AIRBAG ASSEMBLY
55308C
4.REMOVE CENTER INSTRUMENT PANEL BRACKET SUB-ASSEMBLY
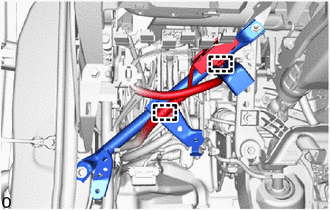
Detach the 2 wire harness clamps.
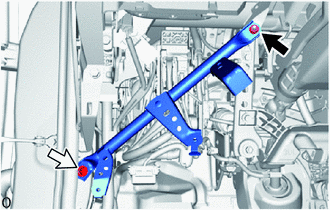

|
Nut |

|
Bolt |
Remove the nut, bolt and center instrument panel bracket sub-assembly.
5.REMOVE POWER DISTRIBUTION BOX ASSEMBLY WITH MAIN BODY ECU
w/ Power Back Door:
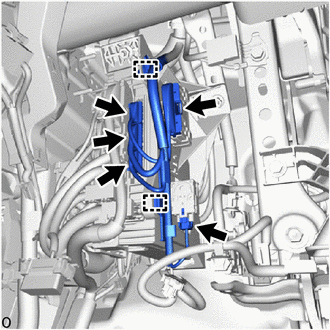
Disconnect the 5 connectors.
Detach the wire harness clamp.
w/o Power Back Door:
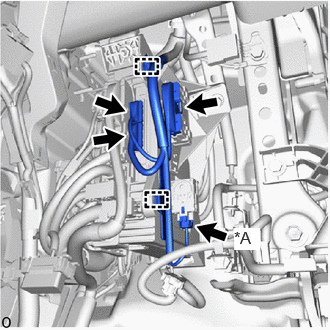
| *A | w/ TOYOTA Parking Assist-sensor System |
w/ TOYOTA Parking Assist-sensor System:
Disconnect the 4 connectors.
w/o TOYOTA Parking Assist-sensor System:
Disconnect the 3 connectors.
Detach the wire harness clamp.
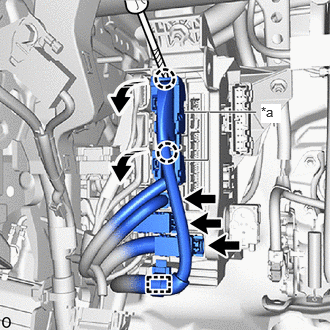
| *a | Lever Connector |

|
Rotate in this Direction |

|
Protective Tape |
Using a thin-bladed screwdriver with its tip wrapped with protective tape, detach the claw and disconnect the 2 lever connectors.
Detach the wire harness clamp.
Disconnect the 3 connectors.
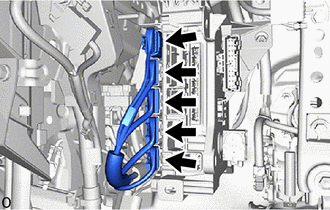
Disconnect the 5 connectors.
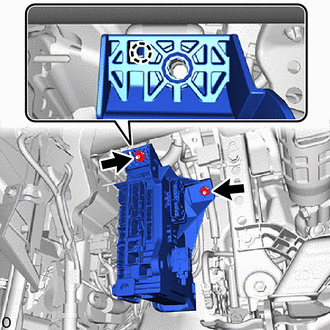
Remove the 2 nuts.
Detach the claw and disconnect the power distribution box assembly with main body ECU.
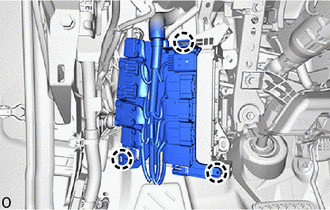
Detach the claw and remove the power distribution box assembly with main body ECU from the connector holder.
Using a thin-bladed screwdriver with its tip wrapped with protective tape, detach the claw and disconnect the 2 lever connectors.
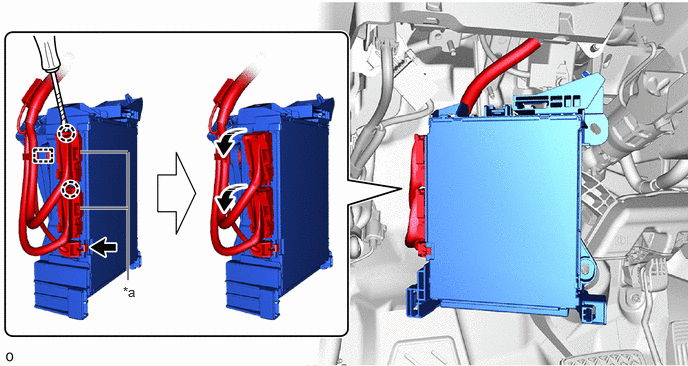
| *a | Lever Connector | - | - |
|
|
Rotate in this Direction |
|
Protective Tape |
Disconnect the connector.
Detach the wire harness clamp and remove the power distribution box assembly with main body ECU.
89221
6.REMOVE MAIN BODY ECU (MULTIPLEX NETWORK BODY ECU)
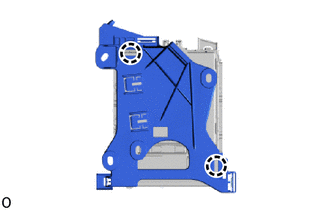
Detach the claw and remove the junction block bracket from the power distribution box assembly with main body ECU.
Press the lock of the power distribution box assembly and release the lock of the main body ECU (multiplex network body ECU) as shown in the illustration.
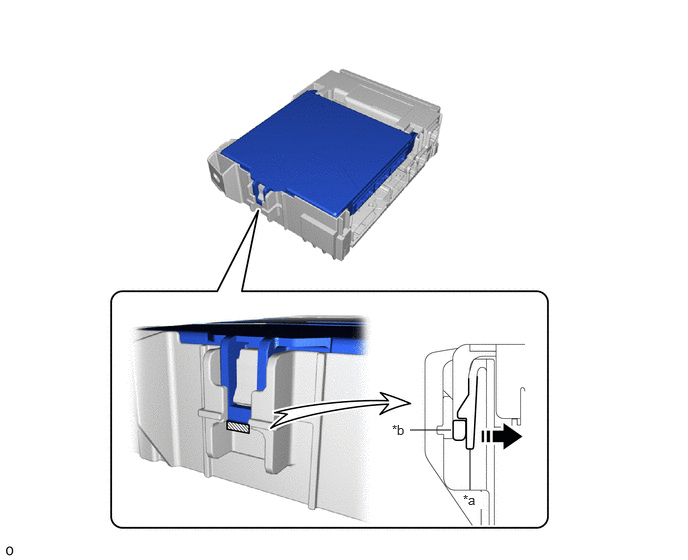
| *a | Power Distribution Box Assembly | *b | Main Body ECU (Multiplex Network Body ECU) |
|
|
Movement Direction |
|
Power Distribution Box Assembly Lock |
While pressing the lock, horizontally insert a thin-bladed screwdriver with its tip wrapped with protective tape between the main body ECU (multiplex network body ECU) and power distribution box assembly.
- NOTICE:
-
Use a screwdriver with a diameter between 5.0 mm (0.197 in.) and 6.3 mm (0.248 in.) and a length of approximately 90 mm (3.54 in.).
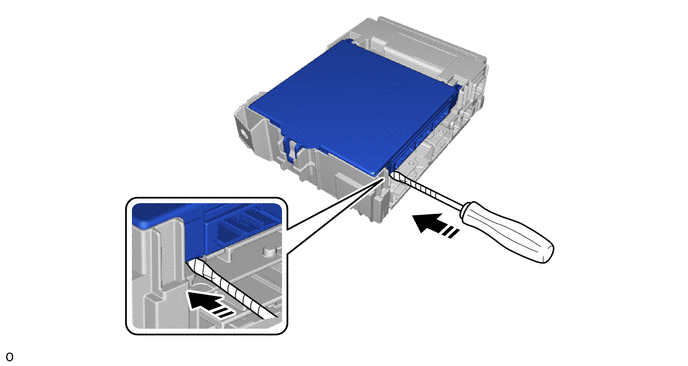
|
|
Horizontally Insert a Thin-bladed Screwdriver |
|
Protective Tape |
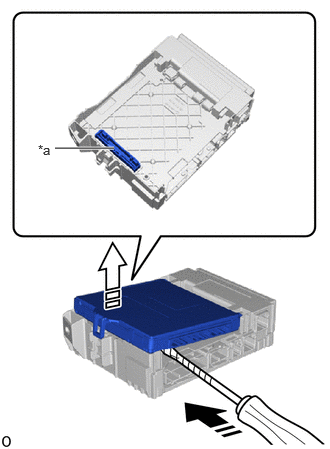
| *a | Internal Connector |
|
|
Insert a Thin-bladed Screwdriver in this Direction |

|
Released in this Direction |
|
|
Protective Tape |
When the thin-bladed screwdriver with its tip wrapped with protective tape is inserted, the internal connector lock is released.
- NOTICE:
- ·
Do not twist the screwdriver to raise the main body ECU (multiplex network body ECU).
·Do not excessively insert the screwdriver. Otherwise, the internal connector terminals may become deformed or damaged.
·Replace the power distribution box assembly when the connector terminal, the locking section, or the case is damaged or deformed.
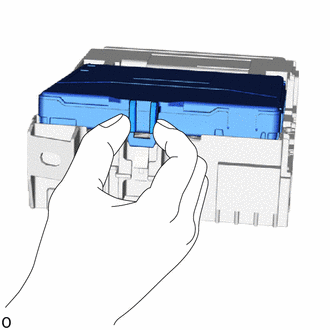
Hold the rib of the main body ECU (multiplex network body ECU).
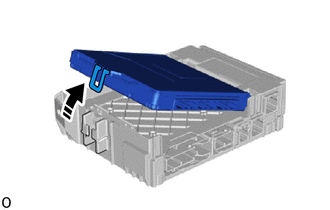
|
|
Rotate in this Direction |
While rotating the main body ECU (multiplex network body ECU), completely release the lock.
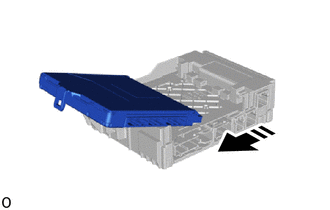
|
|
Remove in this Direction |
Remove the main body ECU (multiplex network body ECU) from the power distribution box assembly.