EXTERIOR PANELS / TRIM WHEEL OPENING MOULDING(for Rear) INSTALLATION
CAUTION / NOTICE / HINT
- HINT:
- ·
Use the same procedure for the RH and LH sides.
·The following procedure is for the LH side.
PROCEDURE

 75897A
1.INSTALL NO. 3 MOULDING TAPE
75897A
1.INSTALL NO. 3 MOULDING TAPE
- HINT:
-
When installing the No. 3 moulding tape, heat the quarter panel wheel opening moulding LH and No. 3 moulding tape using a heat light.
- Standard:
Item Temperature Quarter Panel Wheel Opening Moulding LH 20 to 30°C (68 to 86°F) No. 3 Moulding Tape 20 to 30°C (68 to 86°F)
- CAUTION:
-
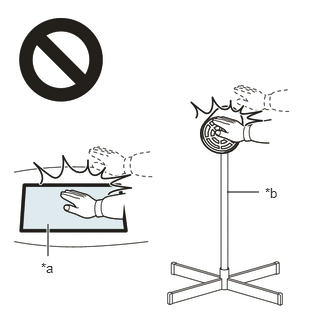 2.365,2 2.698,2 false 0.5,2.333 0.5,2.667 true 0.427,2.708 0.74,2.865 0.313,0.156 10 false *a 2.76,1.927 3.073,2.083 0.313,0.156 10 false *b
*a Heated Part *b Heat Light
- ·
Do not touch the heat light and heated parts.
·Touching the heat light may result in burns.
·Touching heated parts for a long time may result in burns.
When reusing the quarter panel wheel opening moulding LH:
Using a heat light, heat the quarter panel wheel opening moulding LH.
Remove any remaining double-sided tape quarter panel wheel opening moulding LH.
Wipe off any tape adhesive residue with cleaner.
- NOTICE:
- ·
Installing the No. 3 moulding tape with any double-sided tape remaining may cause poor adhesion. Perform this procedure until the tape is sufficiently removed.
·Make sure to use a cloth when removing. Using a screwdriver, etc., may cause damage and poor adhesion.
Apply primer to quarter panel wheel opening moulding LH on the installation area of the No. 3 moulding tape using a brush or felt.
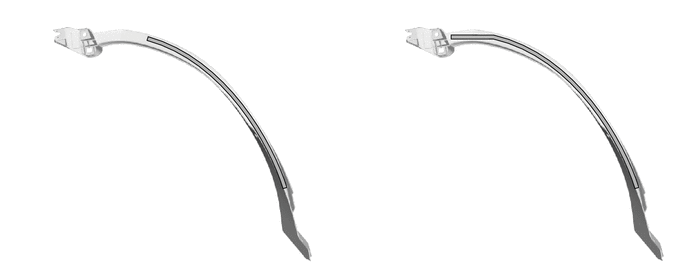
| *A | for Type A | *B | for Type B |

|
Primer | - | - |
- NOTICE:
- ·
Replace the brush or felt if it is dirty or has become hardened.
·Keep any painted surface free from primer.
·If the primer contacts a painted surface, it may leave light primer marks. Therefore, use protective tape when using liquid primer.
·Do not touch surfaces to which primer has been applied until the No. 3 moulding tape has been attached.
Let the primer dry sufficiently.
- NOTICE:
-
Do not touch applied surfaces until the primer is dry.
- Recommended drying time:
10 minutes or more (at 23°C (73°F))
Using a heat light, heat the quarter panel wheel opening moulding LH and a new No. 3 moulding tape.
- NOTICE:
-
Do not heat quarter panel wheel opening moulding LH and No. 3 moulding tape excessively.
Remove the release paper from the No. 3 moulding tape.
- NOTICE:
-
After removing the peeling paper, do not touch the surface of the tape with your fingers or cotton work gloves.
Install the No. 3 moulding tape in the position shown in the illustration.
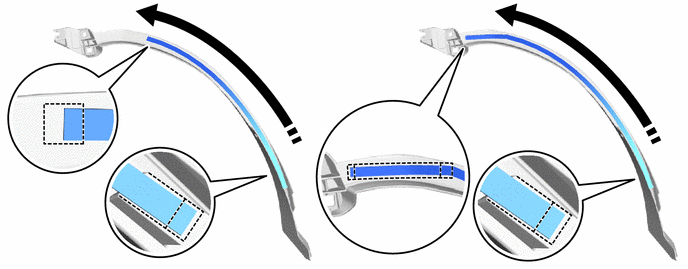
| *A | for Type A | *B | for Type B |
| *a | Mark-off Line | - | - |

|
Install in this Direction | - | - |
- NOTICE:
-
The application strength of the No. 3 moulding tape will weaken if reapplied. If reapplication is necessary, be sure to replace it with a new one.
- HINT:
- ·
Make sure that the end of the No. 3 moulding tape is between the mark-off lines.
·Apply pressure so that it does not lift up from the quarter panel wheel opening moulding LH.
75896A
2.INSTALL NO. 2 MOULDING TAPE (for Type A)
- HINT:
-
When installing the No. 2 moulding tape, heat the quarter panel wheel opening moulding LH and No. 2 moulding tape using a heat light.
- Standard:
Item Temperature Quarter Panel Wheel Opening Moulding LH 20 to 30°C (68 to 86°F) No. 2 Moulding Tape 20 to 30°C (68 to 86°F)
- CAUTION:
-
2.365,2 2.698,2 false 0.5,2.333 0.5,2.667 true 0.427,2.708 0.74,2.865 0.313,0.156 10 false *a 2.76,1.927 3.073,2.083 0.313,0.156 10 false *b
*a Heated Part *b Heat Light
- ·
Do not touch the heat light and heated parts.
·Touching the heat light may result in burns.
·Touching heated parts for a long time may result in burns.
When reusing the quarter panel wheel opening moulding LH:
Using a heat light, heat the quarter panel wheel opening moulding LH.
Remove any remaining double-sided tape quarter panel wheel opening moulding LH.
Wipe off any tape adhesive residue with cleaner.
- NOTICE:
- ·
Installing the No. 2 moulding tape with any double-sided tape remaining may cause poor adhesion. Perform this procedure until the tape is sufficiently removed.
·Make sure to use a cloth when removing. Using a screwdriver, etc., may cause damage and poor adhesion.
Apply primer to quarter panel wheel opening moulding LH on the installation area of the No. 2 moulding tape using a brush or felt.
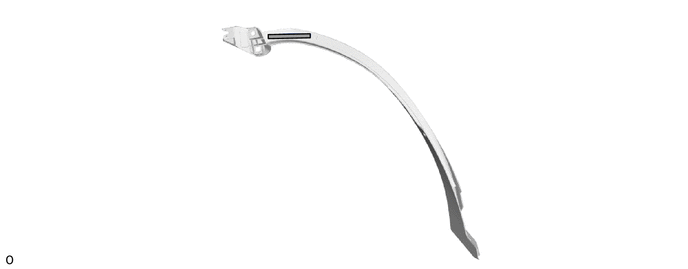
|
|
Primer | - | - |
- NOTICE:
- ·
Replace the brush or felt if it is dirty or has become hardened.
·Keep any painted surface free from primer.
·If the primer contacts a painted surface, it may leave light primer marks. Therefore, use protective tape when using liquid primer.
·Do not touch surfaces to which primer has been applied until the No. 2 moulding tape has been attached.
Let the primer dry sufficiently.
- NOTICE:
-
Do not touch applied surfaces until the primer is dry.
- Recommended drying time:
10 minutes or more (at 23°C (73°F))
Using a heat light, heat the quarter panel wheel opening moulding LH and a new No. 2 moulding tape.
- NOTICE:
-
Do not heat quarter panel wheel opening moulding LH and No. 2 moulding tape excessively.
Remove the release paper from the No. 2 moulding tape.
- NOTICE:
-
After removing the peeling paper, do not touch the surface of the tape with your fingers or cotton work gloves.
Install the No. 2 moulding tape in the position shown in the illustration.
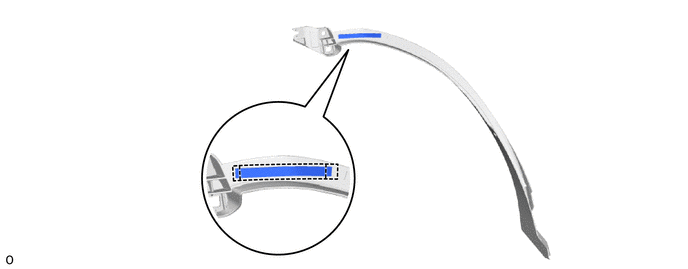
| *a | Mark-off Line | - |
- NOTICE:
-
The application strength of the No. 2 moulding tape will weaken if reapplied. If reapplication is necessary, be sure to replace it with a new one.
- HINT:
- ·
Make sure that the end of the No. 2 moulding tape is between the mark-off lines.
·Apply pressure so that it does not lift up from the quarter panel wheel opening moulding LH.
75895A
3.INSTALL NO. 1 MOULDING TAPE
- HINT:
-
When installing the No. 1 moulding tape, heat the quarter panel wheel opening moulding LH and No. 1 moulding tape using a heat light.
- Standard:
Item Temperature Quarter Panel Wheel Opening Moulding LH 20 to 30°C (68 to 86°F) No. 1 Moulding Tape 20 to 30°C (68 to 86°F)
- CAUTION:
-
2.365,2 2.698,2 false 0.5,2.333 0.5,2.667 true 0.427,2.708 0.74,2.865 0.313,0.156 10 false *a 2.76,1.927 3.073,2.083 0.313,0.156 10 false *b
*a Heated Part *b Heat Light
- ·
Do not touch the heat light and heated parts.
·Touching the heat light may result in burns.
·Touching heated parts for a long time may result in burns.
When reusing the quarter panel wheel opening moulding LH:
Using a heat light, heat the quarter panel wheel opening moulding LH.
Remove any remaining double-sided tape quarter panel wheel opening moulding LH.
Wipe off any tape adhesive residue with cleaner.
- NOTICE:
- ·
Installing the No. 1 moulding tape with any double-sided tape remaining may cause poor adhesion. Perform this procedure until the tape is sufficiently removed.
·Make sure to use a cloth when removing. Using a screwdriver, etc., may cause damage and poor adhesion.
Apply primer to quarter panel wheel opening moulding LH on the installation area of the No. 1 moulding tape using a brush or felt.
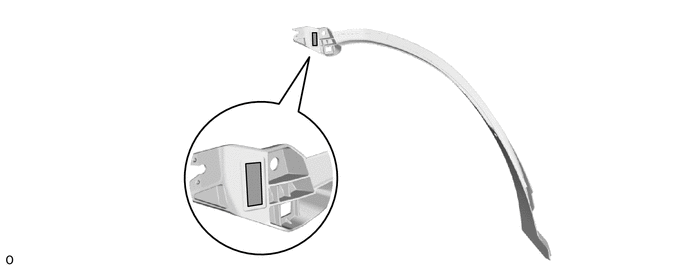
|
|
Primer | - | - |
- NOTICE:
- ·
Replace the brush or felt if it is dirty or has become hardened.
·Keep any painted surface free from primer.
·If the primer contacts a painted surface, it may leave light primer marks. Therefore, use protective tape when using liquid primer.
·Do not touch surfaces to which primer has been applied until the No. 1 moulding tape has been attached.
Let the primer dry sufficiently.
- NOTICE:
-
Do not touch applied surfaces until the primer is dry.
- Recommended drying time:
10 minutes or more (at 23°C (73°F))
Using a heat light, heat the quarter panel wheel opening moulding LH and a new No. 1 moulding tape.
- NOTICE:
-
Do not heat quarter panel wheel opening moulding LH and No. 1 moulding tape excessively.
Remove the release paper from the No. 1 moulding tape.
- NOTICE:
-
After removing the peeling paper, do not touch the surface of the tape with your fingers or cotton work gloves.
Install the No. 1 moulding tape in the position shown in the illustration.
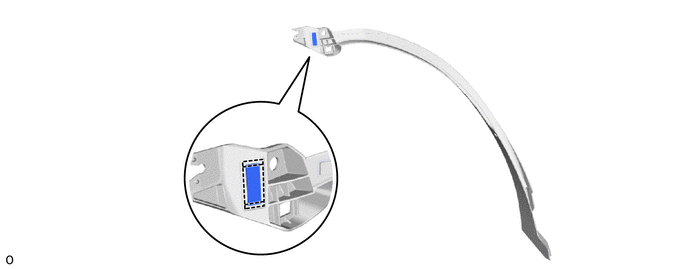
| *a | Mark-off Line | - | - |
- NOTICE:
-
The application strength of the No. 1 moulding tape will weaken if reapplied. If reapplication is necessary, be sure to replace it with a new one.
- HINT:
- ·
Make sure that the end of the No. 1 moulding tape is between the mark-off lines.
·Apply pressure so that it does not lift up from the quarter panel wheel opening moulding LH.
75874
4.INSTALL QUARTER PANEL WHEEL OPENING MOULDING LH
- HINT:
-
When installing the quarter panel wheel opening moulding LH, heat the vehicle body and quarter panel wheel opening moulding LH using a heat light.
- Standard:
Item Temperature Vehicle Body 40 to 60°C (104 to 140°F) Quarter Panel Wheel Opening Moulding LH 20 to 30°C (68 to 86°F)
- CAUTION:
-
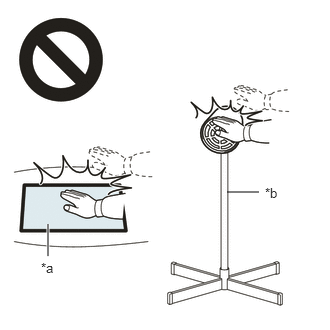 2.365,2 2.698,2 false 0.5,2.333 0.5,2.667 true 0.427,2.708 0.74,2.865 0.313,0.156 10 false *a 2.76,1.927 3.073,2.083 0.313,0.156 10 false *b
*a Heated Part *b Heat Light
- ·
Do not touch the heat light and heated parts.
·Touching the heat light may result in burns.
·Touching heated parts for a long time may result in burns.
- NOTICE:
-
Do not heat the vehicle body and quarter panel wheel opening moulding LH excessively.
Clean the vehicle body surface.
Using a heat light, heat the vehicle body surface.
Remove any remaining double-sided tape from the vehicle body.
Wipe off any tape adhesive residue with cleaner.
- NOTICE:
- ·
Installing the quarter panel wheel opening moulding LH with any double-sided tape remaining may cause poor adhesion. Perform this procedure until the tape is sufficiently removed.
·Make sure to use a cloth when removing. Using a screwdriver, etc., may cause damage and poor adhesion.
Using a heat light, heat the vehicle body and quarter panel wheel opening moulding LH.
- NOTICE:
-
Do not heat the vehicle body and quarter window upper moulding LH excessively.
Remove the release paper from the No. 2 moulding tape and No. 1 moulding tape.
- NOTICE:
-
After removing the peeling paper, do not touch the surface of the tape with your fingers or cotton work gloves.
Attach the clip and double-sided tape to install the quarter panel wheel opening moulding LH as shown in the illustration.
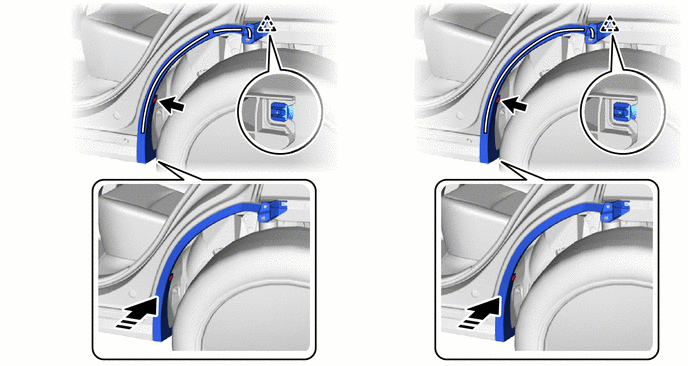
| *A | for Type A | *B | for Type B |
| *a | Double-sided Tape | - | - |
|
|
Install in this Direction | - | - |
- NOTICE:
-
The application strength of the No. 2 moulding tape and No. 1 moulding tape will weaken if reapplied. If reapplication is necessary, be sure to replace it with a new one.
- HINT:
-
Apply pressure so that it does not lift up from the vehicle body.
Install the clip.
75606A
5.INSTALL QUARTER OUTSIDE MOULDING SUB-ASSEMBLY LH (except Off Road Package)
When reusing the front fender moulding sub-assembly LH:
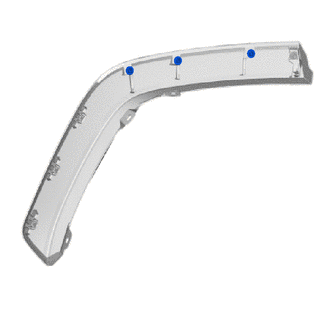
Install the 3 clips.
- NOTICE:
-
Replace the clip with a new one.
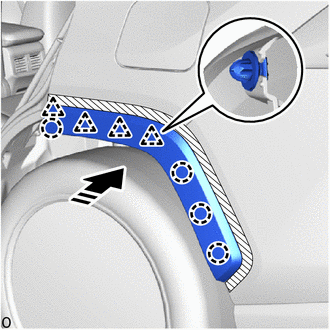
|
|
Install in this Direction |
Attach the claw and clip to install the quarter outside moulding sub-assembly LH.
Remove the protective tape.
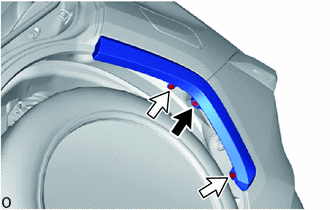

|
Screw |

|
Clip |
Install the screw and 2 clips.
75606A
6.INSTALL QUARTER OUTSIDE MOULDING SUB-ASSEMBLY LH (for Off Road Package)
- HINT:
-
When installing the quarter outside moulding sub-assembly LH, heat the vehicle body and quarter outside moulding sub-assembly LH using a heat light.
- Standard:
Item Temperature Vehicle Body 40 to 60°C (104 to 140°F) Quarter Outside Moulding Sub-assembly LH 20 to 30°C (68 to 86°F)
- CAUTION:
-
2.365,2 2.698,2 false 0.5,2.333 0.5,2.667 true 0.427,2.708 0.74,2.865 0.313,0.156 10 false *a 2.76,1.927 3.073,2.083 0.313,0.156 10 false *b
*a Heated Part *b Heat Light
- ·
Do not touch the heat light and heated parts.
·Touching the heat light may result in burns.
·Touching heated parts for a long time may result in burns.
- NOTICE:
-
Do not heat the vehicle body and quarter outside moulding sub-assembly LH excessively.
Clean the vehicle body surface.
Using a heat light, heat the vehicle body surface.
Remove any remaining double-sided tape from the vehicle body.
Wipe off any tape adhesive residue with cleaner.
- NOTICE:
- ·
Installing the quarter outside moulding sub-assembly LH with some double-sided tape remaining may cause poor adhesion. Perform this procedure until sufficiently removed it.
·Make sure to use a cloth when removing. Using a screwdriver, etc., may cause damage and poor adhesion.
Install the quarter outside moulding sub-assembly LH.
Using a heat light, heat the vehicle body.
Remove the release paper from the face of the No. 1 body outside moulding pad.
- HINT:
-
After removing the release paper, keep the exposed adhesive free from foreign matter.
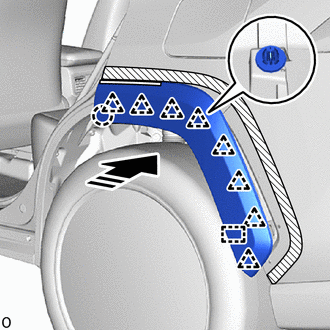
| *a | Double-sided Tape |
|
|
Install in this Direction |
Attach the guide and claw and clip and double-sided tape to install the quarter outside moulding sub-assembly LH.
- HINT:
-
Press the quarter outside moulding sub-assembly LH firmly to install it.
Remove the protective tape.
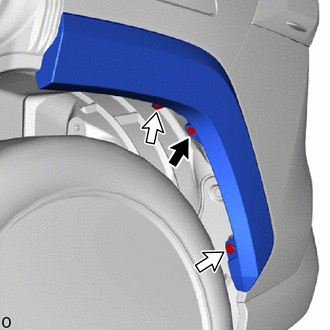
|
|
Screw |
|
|
Clip |
Install the screw and 2 clips.
65632B
7.INSTALL REAR WHEEL FRONT HOUSE PLATE LH