AUDIO / VIDEO FRONT DOOR SPEAKER INSTALLATION
CAUTION / NOTICE / HINT
- HINT:
- ·
Use the same procedure for the RH and LH sides.
·The procedure listed below is for the LH side.
PROCEDURE

 86160
1.INSTALL FRONT NO. 1 SPEAKER ASSEMBLY
86160
1.INSTALL FRONT NO. 1 SPEAKER ASSEMBLY
- NOTICE:
-
Do not touch the cone part of the speaker.
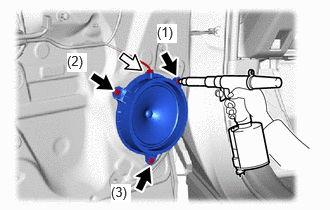
Install a nose piece to an air riveter or hand riveter. Then insert the mandrel part of a new φ4.9 mm (0.193 in.) waterproof rivet into the nose piece.

|
Rivet |

|
Connector |
Using an air riveter or hand riveter, install the front No. 1 speaker assembly with 3 new rivets in the order shown in the illustration.
- NOTICE:
- ·
 1.5,1.177 1.5,1.542 false 1.75,2.5 2.49,2.5 false 1.51,1.833 1.51,2.208 false 2.479,0.885 1.792,0.885 false 2.531,2.448 2.844,2.604 0.313,0.156 10 false *1 1.438,1.625 1.75,1.781 0.313,0.156 10 false *2 0.042,0.052 0.354,0.208 0.313,0.156 10 false *a 0.063,1.833 0.375,1.99 0.313,0.156 10 false *b 2.531,0.813 2.844,0.969 0.313,0.156 10 false *1
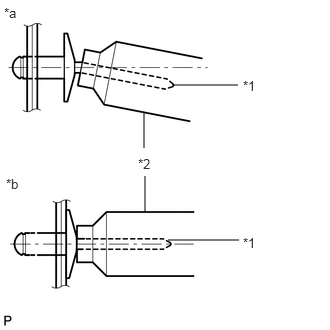
*1 Mandrel *2 Riveter *a INCORRECT *b CORRECT
Do not pry the rivet with the riveter, as this will cause damage to the riveter and mandrel.
· 0.802,2.427 1.135,2.427 false 0.813,1.135 1.146,1.135 false 0.719,0.156 1.052,0.156 false 1.135,0.083 1.448,0.24 0.313,0.156 10 false *1 2.469,0.594 2.781,0.75 0.313,0.156 10 false *a 2.396,2.792 2.708,2.948 0.313,0.156 10 false *b 2.365,1.552 2.677,1.708 0.313,0.156 10 false *a 1.198,1.073 1.51,1.229 0.313,0.156 10 false *1 1.188,2.354 1.5,2.51 0.313,0.156 10 false *1
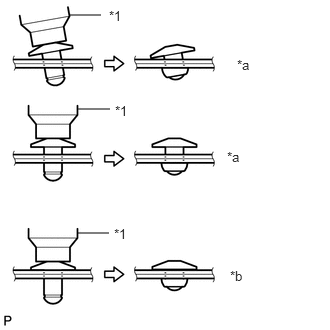
*1 Riveter *a INCORRECT *b CORRECT
Confirm that the rivets are seated properly against the speaker.
·Do not tilt the riveter when installing the rivet to the speaker.
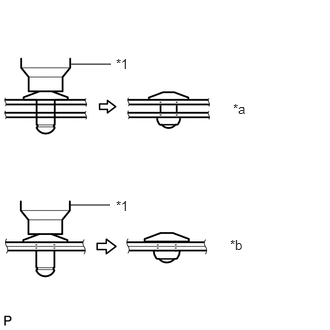
·Do not leave any space between the rivet head and speaker.
· 0.74,0.667 1.156,0.667 false 0.729,2.135 1.146,2.135 false 1.208,0.583 1.521,0.74 0.313,0.156 10 *1 2.427,1.052 2.74,1.208 0.313,0.156 10 *a 2.396,2.469 2.708,2.625 0.313,0.156 10 *b 1.208,2.063 1.521,2.219 0.313,0.156 10 *1
*1 Riveter *a INCORRECT *b CORRECT
Do not leave any space between the speaker and door. Firmly hold together the 2 items while installing the rivet.
Connect the connector.
67602
2.INSTALL FRONT DOOR TRIM BOARD SUB-ASSEMBLY LH
3.INSTALL POWER WINDOW REGULATOR SWITCH ASSEMBLY WITH FRONT DOOR ARMREST BASE PANEL (for Front Passenger Side)
4.INSTALL MULTIPLEX NETWORK MASTER SWITCH ASSEMBLY WITH FRONT DOOR ARMREST BASE PANEL (for Driver Side)
74640C
5.INSTALL DOOR ASSIST GRIP ASSEMBLY LH
69278B
6.INSTALL FRONT DOOR INSIDE HANDLE BEZEL LH