K120 / K120F / K121 / K121F CVT K121 / K121F CONTINUOUSLY VARIABLE TRANSAXLE SYSTEM Indicator Circuit
DESCRIPTION
In accordance with the shift lever position, each shift position indicator light will turn on.
WIRING DIAGRAM
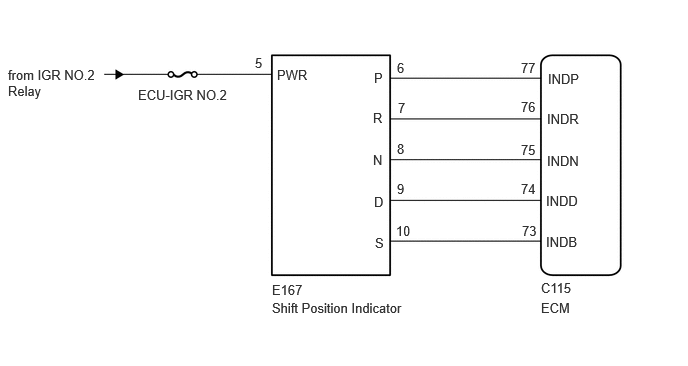
PROCEDURE
Turn the ignition switch to ON.
Check that each shift position indicator light turns on correctly.
- Result:
Result Proceed to All shift position indicator lights turn on simultaneously A Shift position indicator lights other than corresponding one turns on B Corresponding shift position indicator light does not turn on C No shift position indicator lights turn on D
Turn the ignition switch off.
A
B
C
D
Disconnect the C115 ECM connector.
Measure the resistance according to the value(s) in the table below.
- Standard Resistance:
Tester Connection Condition Specified Condition Click Location & Routing(C115)Location & Routingewd_type=routing;type=c;code=C115
Click Connector(C115)Engine Compartment>Engine Wire>ECMewd_type=component;type=c;code=C115;pinno=77,76,75,74,73
C115-77 (INDP) - Body ground and other terminals Always 10 kΩ or higher C115-76 (INDR) - Body ground and other terminals Always 10 kΩ or higher C115-75 (INDN) - Body ground and other terminals Always 10 kΩ or higher C115-74 (INDD) - Body ground and other terminals Always 10 kΩ or higher C115-73 (INDB) - Body ground and other terminals Always 10 kΩ or higher
Connect the C115 ECM connector.
- Result:
Proceed to OK NG
OK
NG
- HINT:
- Result:
Proceed to NEXT
NEXT
for Registration: Click hereDrivetrain>K120 / K120F / K121 / K121F (CVT)>K121 / K121F CONTINUOUSLY VARIABLE TRANSAXLE SYSTEM>REGISTRATION202303,999999,_52,_111806,_0584611,RM1000000029R1L,
for Initialization: Click hereDrivetrain>K120 / K120F / K121 / K121F (CVT)>K121 / K121F CONTINUOUSLY VARIABLE TRANSAXLE SYSTEM>INITIALIZATION202303,999999,_52,_111806,_0584611,RM1000000029R1M,
Disconnect the C115 ECM connector.
Disconnect the E167 shift position indicator connector.
Measure the resistance according to the value(s) in the table below.
- Standard Resistance:
Tester Connection Condition Specified Condition Click Location & Routing(C115,E167)Location & Routingewd_type=routing;type=c,c;code=C115,E167
Click Connector(C115)Engine Compartment>Engine Wire>ECMewd_type=component;type=c;code=C115;pinno=77,76,75,74,73
Click Connector(E167)Instrument Panel>Instrument Panel Wire / Telephone Computer Wire>Shift Position Indicatorewd_type=component;type=c;code=E167;pinno=6,7,8,9,10
C115-77 (INDP) or E167-6 (P) - Body ground and other terminals Always 10 kΩ or higher C115-76 (INDR) or E167-7 (R) - Body ground and other terminals Always 10 kΩ or higher C115-75 (INDN) or E167-8 (N) - Body ground and other terminals Always 10 kΩ or higher C115-74 (INDD) or E167-9 (D) - Body ground and other terminals Always 10 kΩ or higher C115-73 (INDB) or E167-10 (S) - Body ground and other terminals Always 10 kΩ or higher
Connect the E167 shift position indicator connector.
Connect the C115 ECM connector.
- Result:
Proceed to OK NG
OK
NG
Disconnect the E167 shift position indicator connector.
Turn the ignition switch to ON.
Measure the voltage according to the value(s) in the table below.
- Standard Voltage:
Tester Connection Condition Specified Condition Click Location & Routing(E167)Location & Routingewd_type=routing;type=c;code=E167
Click Connector(E167)Instrument Panel>Instrument Panel Wire / Telephone Computer Wire>Shift Position Indicatorewd_type=component;type=c;code=E167;pinno=5
E167-5 (PWR) - Body ground Ignition switch ON 11 to 14 V
Turn the ignition switch off.
Connect the E167 shift position indicator connector.
- Result:
Proceed to OK NG
OK
NG
Disconnect the C115 ECM connector.
Turn the ignition switch to ON.
Measure the voltage according to the value(s) in the table below.
- Standard Voltage:
Tester Connection Condition Specified Condition Click Location & Routing(C115)Location & Routingewd_type=routing;type=c;code=C115
Click Connector(C115)Engine Compartment>Engine Wire>ECMewd_type=component;type=c;code=C115;pinno=77,76,75,74,73
C115-77 (INDP) - Body ground and other terminals Ignition switch ON 11 to 14 V C115-76 (INDR) - Body ground and other terminals Ignition switch ON 11 to 14 V C115-75 (INDN) - Body ground and other terminals Ignition switch ON 11 to 14 V C115-74 (INDD) - Body ground and other terminals Ignition switch ON 11 to 14 V C115-73 (INDB) - Body ground and other terminals Ignition switch ON 11 to 14 V
Turn the ignition switch off.
Connect the C115 ECM connector.
- Result:
Proceed to OK NG
OK
NG
- HINT:
- Result:
Proceed to NEXT
NEXT
for Registration: Click hereDrivetrain>K120 / K120F / K121 / K121F (CVT)>K121 / K121F CONTINUOUSLY VARIABLE TRANSAXLE SYSTEM>REGISTRATION202303,999999,_52,_111806,_0584611,RM1000000029R1L,
for Initialization: Click hereDrivetrain>K120 / K120F / K121 / K121F (CVT)>K121 / K121F CONTINUOUSLY VARIABLE TRANSAXLE SYSTEM>INITIALIZATION202303,999999,_52,_111806,_0584611,RM1000000029R1M,
Disconnect the C115 ECM connector.
Disconnect the E167 shift position indicator connector.
Measure the resistance according to the value(s) in the table below.
- Standard Resistance:
Tester Connection Tester Connection Specified Condition Click Location & Routing(C115,E167)Location & Routingewd_type=routing;type=c,c;code=C115,E167
Click Connector(C115)Engine Compartment>Engine Wire>ECMewd_type=component;type=c;code=C115;pinno=77,76,75,74,73
Click Connector(E167)Instrument Panel>Instrument Panel Wire / Telephone Computer Wire>Shift Position Indicatorewd_type=component;type=c;code=E167;pinno=6,7,8,9,10
C115-77 (INDP) - E167-6 (P) Always Always C115-76 (INDR) - E167-7 (R) Always Always C115-75 (INDN) - E167-8 (N) Always Always C115-74 (INDD) - E167-9 (D) Always Always C115-73 (INDB) - E167-10 (S) Always Always
Connect the E167 shift position indicator connector.
Connect the C115 ECM connector.
- Result:
Proceed to OK NG
OK
NG