WINDOW / GLASS QUARTER WINDOW GLASS INSTALLATION
CAUTION / NOTICE / HINT
- HINT:
- ·
Use the same procedure for the RH side and LH side.
·The following procedure is for the LH side.
PROCEDURE

 62720A
1.INSTALL QUARTER WINDOW ASSEMBLY
62720A
1.INSTALL QUARTER WINDOW ASSEMBLY
Using a brush or sponge, coat the adhesive application area of a new quarter window assembly with glass primer.
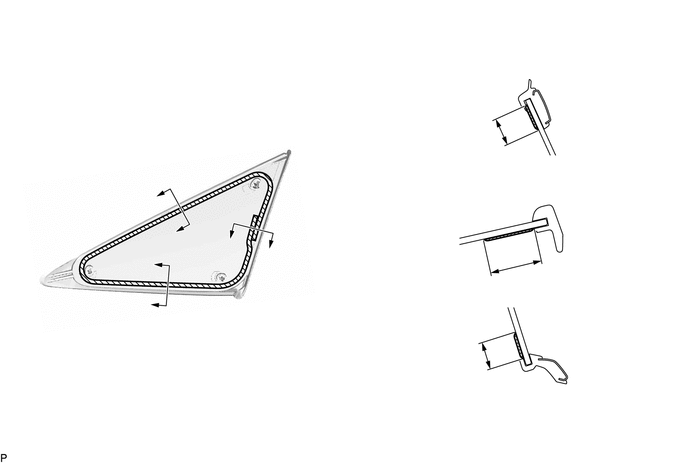
| *A | Back Side | - | - |

|
Glass Primer | - | - |
- Standard Dimension:
Area Dimension Area Dimension a 9.5 mm (0.374 in.) or more b 17.8 mm (0.701 in.) or more c 11.0 mm (0.433 in.) or more - -
- NOTICE:
- ·
Do not apply too much glass primer.
·Allow the glass primer to dry for 3 minutes or more.
·Throw away any leftover glass primer.
- HINT:
-
If an area other than specified is coated by accident, wipe off the glass primer with a clean piece of cloth before it dries.
Apply adhesive to the quarter window assembly.
- Adhesive:
Toyota Genuine Windshield Glass Adhesive or equivalent
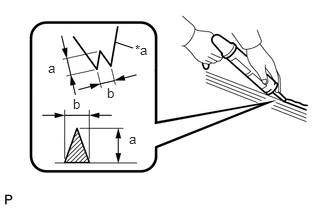
| *a | Nozzle |
Cut off the tip of the cartridge nozzle as shown in the illustration.
- Standard Dimension:
Area Dimension a 12.0 to 15.0 mm (0.472 to 0.591 in.) b 8.0 to 11.0 mm (0.315 to 0.433 in.)
Load the sealer gun with the cartridge.
Apply adhesive to the quarter window assembly as shown in the illustration.
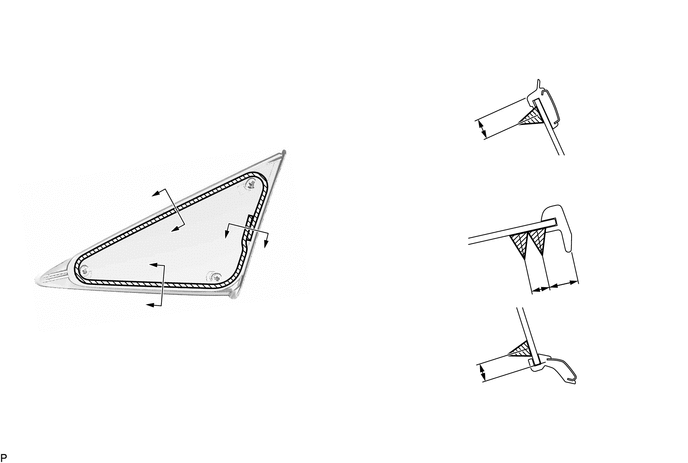
| *A | Back Side | - | - |
|
|
Adhesive | - | - |
- Standard Dimension:
Area Dimension Area Dimension a 8.5 mm (0.335 in.) b 12.8 mm (0.504 in.) c 8.0 mm (0.315 in.) d 9.5 mm (0.374 in.)
Install the quarter window assembly to the vehicle body.
Using suction cups, engage the 3 clips to install the quarter window assembly.
- NOTICE:
- ·
Check that the clips are engaged to the vehicle body correctly.
·Check the clearance between the vehicle body and quarter window assembly.
Lightly press the outer surface of the quarter window assembly to ensure that the quarter window assembly is securely fit to the vehicle body.
- HINT:
-
Press the glass with a force of 98 N (10 kgf, 22.0 lbf) or more.
Using a scraper, remove any excess or protruding adhesive.
Hold the quarter window assembly using protective tape until the applied adhesive becomes hard.
- HINT:
-
Follow the instructions supplied by the adhesive manufacturer or in the corresponding instruction manual for the minimum amount of time necessary to wait before driving the vehicle.
2.INSPECT FOR LEAK
After the adhesive has hardened, apply water from the outside of the vehicle. Check that no water leaks into the cabin.
If water leaks into the cabin, allow the water to dry and add adhesive.
Remove the protective tape.
62480A
3.INSTALL ROOF SIDE INNER GARNISH ASSEMBLY
64740C
4.INSTALL DECK TRIM SIDE PANEL ASSEMBLY LH (for LH Side)
64730B
5.INSTALL DECK TRIM SIDE PANEL ASSEMBLY RH (for RH Side)
81330
6.INSTALL NO. 1 LUGGAGE COMPARTMENT LIGHT ASSEMBLY (for RH Side)
62552F
7.INSTALL REAR SEAT SIDE GARNISH
71304C
8.INSTALL REAR SEATBACK HINGE SUB-ASSEMBLY
73706
9.INSTALL CHILD RESTRAINT SEAT ANCHOR BRACKET SUB-ASSEMBLY
58467H
10.INSTALL NO. 3 BATTERY SERVICE COVER BOARD (for HV Model)
62332C
11.INSTALL REAR DOOR OPENING TRIM WEATHERSTRIP
67918A
12.INSTALL REAR DOOR SCUFF PLATE
58387B
13.INSTALL REAR FLOOR FINISH PLATE
58577E
14.INSTALL REAR NO. 1 FLOOR MAT SUPPORT SIDE PLATE
64779
15.INSTALL SPARE WHEEL COVER TRAY
58417
16.INSTALL REAR NO. 3 FLOOR BOARD (for LH Side)
58416K
17.INSTALL REAR NO. 2 FLOOR BOARD (for RH Side)
18.INSTALL REAR SEATBACK ASSEMBLY LH (for LH Side)
for SFTM Made: Click hereVehicle Interior>SEAT>REAR SEAT ASSEMBLY (for SFTM Made)>INSTALLATION202111,999999,_58,_111839,_0500762,RM100000001Z3BH_01_0035,
for GTMC Made: Click hereVehicle Interior>SEAT>REAR SEAT ASSEMBLY (for GTMC Made)>INSTALLATION202203,999999,_58,_111839,_0524495,RM10000000220ZZ_01_0002,
19.INSTALL REAR SEATBACK ASSEMBLY RH (for RH Side)
for SFTM Made: Click hereVehicle Interior>SEAT>REAR SEAT ASSEMBLY (for SFTM Made)>INSTALLATION202111,999999,_58,_111839,_0500762,RM100000001Z3BH_01_0036,
for GTMC Made: Click hereVehicle Interior>SEAT>REAR SEAT ASSEMBLY (for GTMC Made)>INSTALLATION202203,999999,_58,_111839,_0524495,RM10000000220ZZ_01_0003,
73350C
20.CONNECT REAR CENTER SEAT OUTER BELT ASSEMBLY (for RH Side)
for SFTM Made: Click hereVehicle Interior>SEAT>REAR SEAT ASSEMBLY (for SFTM Made)>INSTALLATION202111,999999,_58,_111839,_0500762,RM100000001Z3BH_01_0037,
for GTMC Made: Click hereVehicle Interior>SEAT>REAR SEAT ASSEMBLY (for GTMC Made)>INSTALLATION202203,999999,_58,_111839,_0524495,RM10000000220ZZ_01_0022,
72693
21.INSTALL REAR SEAT CUSHION LOCK HOOK
for SFTM Made: Click hereVehicle Interior>SEAT>REAR SEAT ASSEMBLY (for SFTM Made)>INSTALLATION202111,999999,_58,_111839,_0500762,RM100000001Z3BH_01_0038,
for GTMC Made: Click hereVehicle Interior>SEAT>REAR SEAT ASSEMBLY (for GTMC Made)>INSTALLATION202203,999999,_58,_111839,_0524495,RM10000000220ZZ_01_0010,
22.INSTALL REAR SEAT CUSHION ASSEMBLY
for SFTM Made: Click hereVehicle Interior>SEAT>REAR SEAT ASSEMBLY (for SFTM Made)>INSTALLATION202111,999999,_58,_111839,_0500762,RM100000001Z3BH_01_0025,
for GTMC Made: Click hereVehicle Interior>SEAT>REAR SEAT ASSEMBLY (for GTMC Made)>INSTALLATION202203,999999,_58,_111839,_0524495,RM10000000220ZZ_01_0043,
71940A
23.INSTALL REAR SEAT HEADREST ASSEMBLY
for SFTM Made: Click hereVehicle Interior>SEAT>REAR SEAT ASSEMBLY (for SFTM Made)>INSTALLATION202111,999999,_58,_111839,_0500762,RM100000001Z3BH_01_0052,
for GTMC Made: Click hereVehicle Interior>SEAT>REAR SEAT ASSEMBLY (for GTMC Made)>INSTALLATION202203,999999,_58,_111839,_0524495,RM10000000220ZZ_01_0034,
71960B
24.INSTALL REAR SEAT CENTER HEADREST ASSEMBLY (for RH Side)
for SFTM Made: Click hereVehicle Interior>SEAT>REAR SEAT ASSEMBLY (for SFTM Made)>INSTALLATION202111,999999,_58,_111839,_0500762,RM100000001Z3BH_01_0051,
for GTMC Made: Click hereVehicle Interior>SEAT>REAR SEAT ASSEMBLY (for GTMC Made)>INSTALLATION202203,999999,_58,_111839,_0524495,RM10000000220ZZ_01_0042,
58410B
25.INSTALL DECK BOARD ASSEMBLY