WINDOW / GLASS QUARTER WINDOW GLASS REMOVAL
CAUTION / NOTICE / HINT
- HINT:
- ·
Use the same procedure for the RH side and LH side.
·The following procedure is for the LH side.
PROCEDURE

 58410B
1.REMOVE DECK BOARD ASSEMBLY
58410B
1.REMOVE DECK BOARD ASSEMBLY
71940A
2.REMOVE REAR SEAT HEADREST ASSEMBLY
71960B
3.REMOVE REAR SEAT CENTER HEADREST ASSEMBLY (for RH Side)
4.REMOVE REAR SEAT CUSHION ASSEMBLY
72693
5.REMOVE REAR SEAT CUSHION LOCK HOOK
6.REMOVE REAR SEATBACK ASSEMBLY LH (for LH Side)
73350C
7.DISCONNECT REAR CENTER SEAT OUTER BELT ASSEMBLY (for RH Side)
8.REMOVE REAR SEATBACK ASSEMBLY RH (for RH Side)
58417
9.REMOVE REAR NO. 3 FLOOR BOARD (for LH Side)
58416K
10.REMOVE REAR NO. 2 FLOOR BOARD (for RH Side)
64779
11.REMOVE SPARE WHEEL COVER TRAY
58577E
12.REMOVE REAR NO. 1 FLOOR MAT SUPPORT SIDE PLATE
58387B
13.REMOVE REAR FLOOR FINISH PLATE
67918A
14.REMOVE REAR DOOR SCUFF PLATE
62332C
15.DISCONNECT REAR DOOR OPENING TRIM WEATHERSTRIP
58467H
16.REMOVE NO. 3 BATTERY SERVICE COVER BOARD (for HV Model)
73706
17.REMOVE CHILD RESTRAINT SEAT ANCHOR BRACKET SUB-ASSEMBLY
71304C
18.REMOVE REAR SEATBACK HINGE SUB-ASSEMBLY
62552F
19.REMOVE REAR SEAT SIDE GARNISH
64740C
20.REMOVE DECK TRIM SIDE PANEL ASSEMBLY LH (for LH Side)
81330
21.REMOVE NO. 1 LUGGAGE COMPARTMENT LIGHT ASSEMBLY (for RH Side)
64730B
22.REMOVE DECK TRIM SIDE PANEL ASSEMBLY RH (for RH Side)
62480A
23.REMOVE ROOF SIDE INNER GARNISH ASSEMBLY
62720A
24.REMOVE QUARTER WINDOW ASSEMBLY
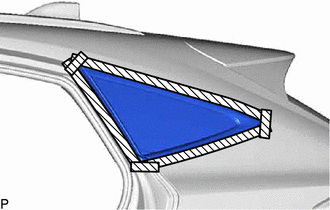

|
Protective Tape |
Apply protective tape to the area around the installation position of the quarter window assembly on the vehicle body to prevent it from being scratched.
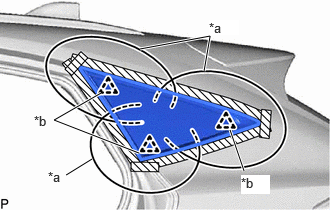
| *a | Piano Wire |
| *b | Clip |
Pass a piano wire between the vehicle body and quarter window assembly from the interior.
Tie both wire ends to wooden blocks or similar objects that can serve as handles.
Cut the adhesive by pulling the piano wire around the quarter window assembly.
- NOTICE:
-
When separating the quarter window assembly, be careful not to damage the paint or interior and exterior ornaments.
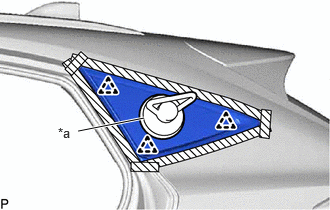
| *a | Suction Cup |
Using suction cups, disengage the 3 clips and remove the quarter window assembly.
- NOTICE:
-
Be careful not to drop the quarter window assembly.
25.CLEAN VEHICLE BODY
Clean and shape the contact surfaces of the vehicle body.
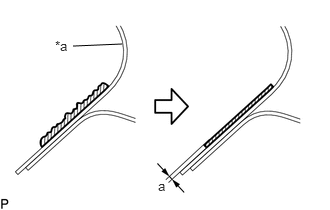
| *a | Vehicle Body |
|
|
Adhesive |
Using a knife, cut off any excess adhesive on the contact surfaces of the vehicle body as shown in the illustration.
- Standard Dimension:
Area Dimension a 1.0 mm (0.0394 in.) or more
- NOTICE:
-
Be careful not to damage the vehicle body.
- HINT:
-
Leave approximately 1.0 mm (0.0394 in.) of adhesive on the vehicle body.
Clean the contact surfaces of the vehicle body with a piece of cloth saturated with non-residue solvent.
- HINT:
-
Even if all of the adhesive has been removed, clean the vehicle body.