M20C-FKS, M20D-FKS INTAKE / EXHAUST INTAKE MANIFOLD REMOVAL
CAUTION / NOTICE / HINT
The necessary procedures (adjustment, calibration, initialization or registration) that must be performed after parts are removed and installed, or replaced during intake manifold removal/installation are shown below.
| Replaced Part or Performed Procedure | Necessary Procedure | Effect/Inoperative Function when Necessary Procedure not Performed | Link |
|---|---|---|---|
·
Replacement of throttle body with motor assembly ·
Cleaning the deposits from the throttle body with motor assembly ·
Gas leak from exhaust system is repaired |
Inspection after repair | ·
Poor idle, etc. ·
Engine start function, etc. |
( 202111,202303,_51,_111785,_0504416,RM100000001ZIBM,202303,999999,_51,_111785,_0504416,RM1000000029BFF,) 202111,202303,_51,_111785,_0504416,RM100000001ZIBM,202303,999999,_51,_111785,_0504416,RM1000000029BFF,)
|
- NOTICE:
-
This procedure includes the removal of small-head bolts. Refer to Small-Head Bolts of Basic Repair Hint to identify the small-head bolts.
PROCEDURE

 22030
1.REMOVE THROTTLE BODY WITH MOTOR ASSEMBLY
22030
1.REMOVE THROTTLE BODY WITH MOTOR ASSEMBLY
25601
2.REMOVE NO. 1 EGR PIPE SUB-ASSEMBLY
82121
3.DISCONNECT ENGINE WIRE
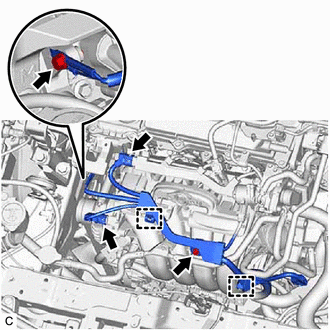
Disconnect the 2 connectors.
Remove the 2 bolts.
Disengage the 2 wire harness clamps and disconnect the engine wire.
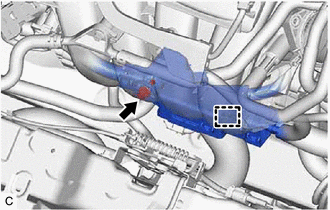
Remove the bolt.
Disengage the wire harness clamp and disconnect the engine wire.
16279
4.SEPARATE NO. 3 WATER BY-PASS PIPE
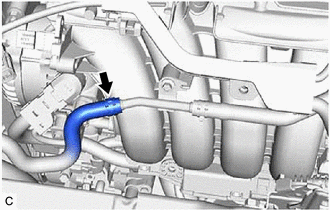
Slide the clip and disconnect the No. 5 water by-pass hose from the No. 3 water by-pass pipe.
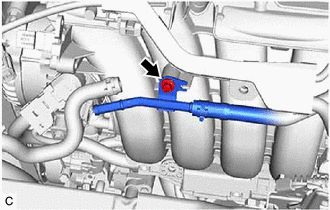
Using an 8 mm socket wrench, remove the bolt.
17138B
5.REMOVE INTAKE MANIFOLD STAY
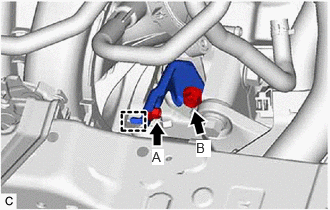
Using an 8 mm socket wrench, remove the bolt (A).
Remove the bolt (B).
Disengage the guide and remove the intake manifold stay.
23827D
6.DISCONNECT NO. 2 FUEL VAPOR FEED HOSE
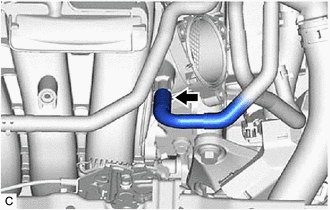
Disconnect the No. 2 fuel vapor feed hose.
17111
7.REMOVE INTAKE MANIFOLD
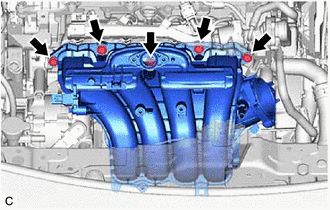
w/o Stud Bolt:
Remove the 5 bolts and intake manifold from the cylinder head sub-assembly.
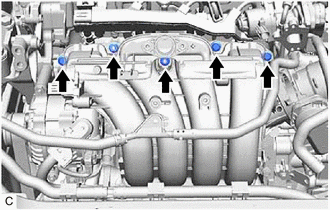
w/ Stud Bolt:
Remove the 3 bolts and 2 nuts.
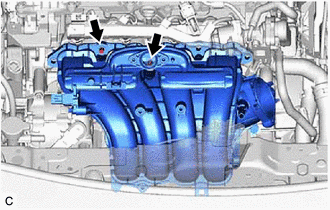
Using an E8 "TORX" socket wrench, remove the 2 stud bolts and separate the intake manifold from the cylinder head sub-assembly.
17177
8.REMOVE NO. 1 INTAKE MANIFOLD TO HEAD GASKET
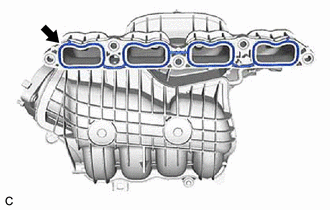
Remove the No. 1 intake manifold to head gasket from the intake manifold.