GF1A TRANSFER / 4WD / AWD TRANSFER OIL ON-VEHICLE INSPECTION
PROCEDURE

 53896B
1.REMOVE FRONT FENDER FRONT SPLASH SHIELD LH
53896B
1.REMOVE FRONT FENDER FRONT SPLASH SHIELD LH
53895B
2.REMOVE FRONT FENDER FRONT SPLASH SHIELD RH
51441
3.REMOVE NO. 1 ENGINE UNDER COVER
51420
4.REMOVE NO. 2 ENGINE UNDER COVER ASSEMBLY
5.CHECK TRANSFER OIL
Stop the vehicle on a level surface.
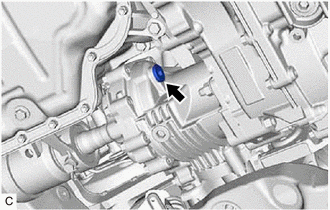
Using a 10 mm straight hexagon and 10 x 12 mm long offset wrench, remove the transfer filler plug and gasket from the transfer assembly.
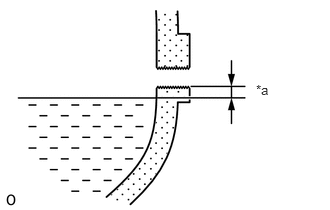
| *a | 0 to 5 mm (0 to 0.197 in.) |
Check that the oil level is between 0 to 5 mm (0 to 0.197 in.) from the bottom lip of the transfer filler plug hole.
If the result is not as specified, add transfer oil.
- Oil Grade:
Toyota genuine differential gear oil LT, LX or equivalent
- NOTICE:
- ·
Using transfer oil other than the specified oil may cause abnormal noise or vibration, or damage the transfer of the vehicle.
·When adding transfer oil, pour it slowly.
·Too much or too little transfer oil will lead to transfer problems.
If the oil level is low, refill transfer oil after checking for oil leaks.
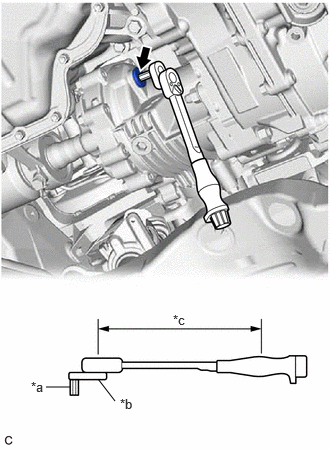
| *a | 10 mm Straight Hexagon |
| *b | 10 mm Union Nut Wrench |
| *c | Torque Wrench Fulcrum Length |
Using a 10 mm straight hexagon and 10 mm union nut wrench, install a new gasket and the transfer filler plug to the transfer assembly.
- Torque:
- Specified Tightening Torque : 39 N*m (398 kgf*cm, 29 ft.*lbf)
- HINT:
- ·
Calculate the torque wrench reading when changing the fulcrum length of the torque wrench.
·When using a 10 mm union nut wrench (fulcrum length of 22 mm (0.866 in.)) + torque wrench (fulcrum length of 180 mm (7.09 in.)):
34.8 N*m (355 kgf*cm, 26 ft.*lbf)
6.INSPECT FOR TRANSFER OIL LEAK
51420
7.INSTALL NO. 2 ENGINE UNDER COVER ASSEMBLY
51441
8.INSTALL NO. 1 ENGINE UNDER COVER
53895B
9.INSTALL FRONT FENDER FRONT SPLASH SHIELD RH
53896B
10.INSTALL FRONT FENDER FRONT SPLASH SHIELD LH