AXLE AND DIFFERENTIAL FRONT AXLE HUB INSTALLATION
CAUTION / NOTICE / HINT
- NOTICE:
- ·
When removing or installing the front disc brake caliper assembly, pushing back the disc brake piston may cause a large clearance between the brake pads and brake disc. When the brake pedal is depressed with a large clearance between the brake pads and the brake disc, DTC C140000 and/or C140A00 related to abnormal brake fluid pressure may be stored. Make sure to clear any DTCs after performing this procedure. (for HV Model)
·While the auxiliary battery is connected, even if the ignition switch is off, the brake control system activates when the brake pedal is depressed or any door courtesy switch turns on. Therefore, when servicing the brake system components, do not operate the brake pedal or open/close the doors while the auxiliary battery is connected. (for HV Model)
- HINT:
- ·
Use the same procedure for the RH side and LH side.
·The following procedure is for the LH side.
PROCEDURE

 43502C
1.INSTALL FRONT AXLE HUB SUB-ASSEMBLY
43502C
1.INSTALL FRONT AXLE HUB SUB-ASSEMBLY
Secure the steering knuckle between aluminum plates in a vise.
- NOTICE:
-
Do not overtighten the vise.
Install the front axle hub sub-assembly and front disc brake dust cover to the steering knuckle with the 4 bolts.
- Torque:
- 120 N*m (1224 kgf*cm, 89 ft.*lbf)
- NOTICE:
- ·
Be careful not to damage the speed sensor rotor or contact surfaces.
·Do not allow foreign matter to contact the speed sensor rotor or contact surfaces.
2.INSTALL FRONT AXLE ASSEMBLY
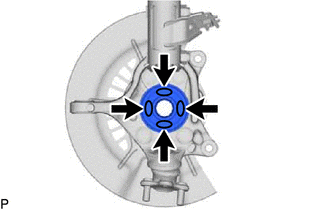

|
Toyota Body Grease W |
Apply 0.1 to 0.3 g (0.00353 to 0.0105 oz) of Toyota Body Grease W to each of the 4 areas shown in the illustration.
Install the front axle assembly to the front shock absorber assembly with the 2 bolts and 2 nuts.
- Torque:
- 290 N*m (2957 kgf*cm, 214 ft.*lbf)
- NOTICE:
- ·
Do not apply lubricants to the steering knuckle and shock absorber contact surfaces.
·When installing the nuts, keep the bolts from rotating.
- HINT:
-
The bolts can be installed in either direction, however, make sure that they are both installed in the same direction.
43420
3.INSTALL FRONT DRIVE SHAFT ASSEMBLY
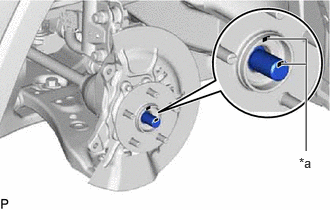
| *a | Matchmark |
Align the matchmarks on the front drive shaft assembly and front axle hub sub-assembly, and connect the front drive shaft assembly to the front axle assembly.
- NOTICE:
- ·
Do not push the front axle assembly towards the outside of the vehicle any further than necessary.
·Check that there is no foreign matter on the speed sensor rotor or contact surfaces.
·Do not damage the front drive shaft outboard joint boot.
·Do not damage the front disc brake dust cover.
·Do not damage the speed sensor rotor.
48069
4.CONNECT FRONT LOWER NO. 1 SUSPENSION ARM SUB-ASSEMBLY
Connect the front lower No. 1 suspension arm sub-assembly to the front lower ball joint assembly with the bolt and 2 nuts.
- Torque:
- 92 N*m (938 kgf*cm, 68 ft.*lbf)
45470
5.CONNECT TIE ROD ASSEMBLY
43512
6.INSTALL FRONT DISC
7.INSTALL FRONT DISC BRAKE CALIPER ASSEMBLY
43502H
8.INSTALL FRONT AXLE SHAFT NUT
Clean the threaded parts on the front drive shaft assembly and a new front axle shaft nut using non-residue solvent.
- NOTICE:
- ·
Be sure to perform this work even when using a new front drive shaft assembly.
·Keep the threaded parts free of oil and foreign matter.
Using a 30 mm deep socket wrench, while applying the brakes, temporarily install the front axle shaft nut.
- Torque:
- 294 N*m (2998 kgf*cm, 217 ft.*lbf)
- NOTICE:
-
Stake the front axle shaft nut after inspecting for looseness and runout in the following steps.
- HINT:
-
Keep depressing the brake pedal to prevent the front drive shaft from rotating.
9.SEPARATE FRONT DISC BRAKE CALIPER ASSEMBLY
43512
10.REMOVE FRONT DISC
11.INSPECT FRONT AXLE HUB BEARING LOOSENESS
12.INSPECT FRONT AXLE HUB RUNOUT
43512
13.INSTALL FRONT DISC
14.INSTALL FRONT DISC BRAKE CALIPER ASSEMBLY
89543
15.INSTALL FRONT SPEED SENSOR
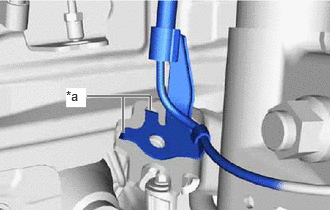
Engage the 2 hooks to install the front speed sensor clamp bracket.
- NOTICE:
-
Do not twist the front speed sensor when installing it.
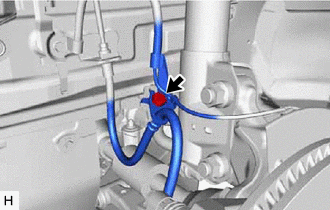
Install the front speed sensor and front flexible hose to the front shock absorber assembly with the bolt.
- Torque:
- 29 N*m (296 kgf*cm, 21 ft.*lbf)
- NOTICE:
-
Do not twist the front flexible hose when installing it.
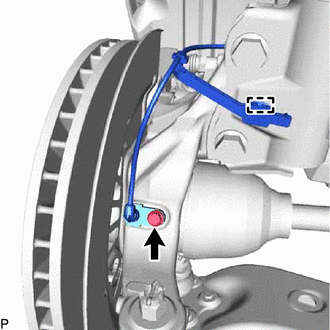
Install the front speed sensor to the steering knuckle with the bolt.
- Torque:
- 8.5 N*m (87 kgf*cm, 75 in.*lbf)
- NOTICE:
- ·
Prevent foreign matter from attaching to the front speed sensor tip.
·Firmly insert the front speed sensor body into the steering knuckle before tightening the bolt.
·After installing the front speed sensor to the steering knuckle, make sure that there is no clearance between the front speed sensor stay and steering knuckle. Also make sure that no foreign matter is stuck between the parts.
·Do not twist the front speed sensor when installing it.
Engage the clamp.
- NOTICE:
-
Do not twist the front speed sensor when installing it.
43502H
16.STAKE FRONT AXLE SHAFT NUT
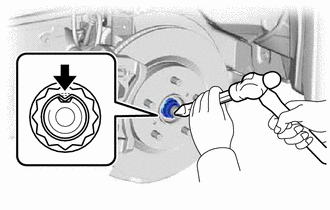
Using a chisel and hammer, stake the front axle shaft nut.
17.INSTALL FRONT WHEEL
18.CONNECT CABLE TO NEGATIVE AUXILIARY BATTERY TERMINAL (for HV Model)
Connect the reservoir level switch connector.
Connect the cable to the negative (-) auxiliary battery terminal.
Turn the ignition switch to ON (READY).
Depress the brake pedal and release it.
19.INSPECT AND ADJUST FRONT WHEEL ALIGNMENT
20.CHECK FOR SPEED SENSOR SIGNAL
for HV Model: Click hereBrake>BRAKE CONTROL / DYNAMIC CONTROL SYSTEMS>ELECTRONICALLY CONTROLLED BRAKE SYSTEM (for HV Model)>SIGNAL CHECK202111,999999,_54,_111814,_0500671,RM100000001Z2YR,
for Gasoline Model: Click hereBrake>BRAKE CONTROL / DYNAMIC CONTROL SYSTEMS>ELECTRONICALLY CONTROLLED BRAKE SYSTEM (for Gasoline Model)>SIGNAL CHECK202111,999999,_54,_111814,_0503031,RM100000001ZCWS,
21. INITIALIZATION AFTER RECONNECTING AUXILIARY BATTERY TERMINAL (for HV Model)
- HINT:
-
When disconnecting and reconnecting the auxiliary battery, there is an automatic learning function that completes learning when the respective system is used.