BRAKE SYSTEM (OTHER) BRAKE FLUID(for Gasoline Model) BLEEDING
CAUTION / NOTICE / HINT
- NOTICE:
- ·
Move the shift lever to P and apply the parking brake before bleeding the brakes.
·Add brake fluid to keep the level between the MIN and MAX lines of the reservoir while bleeding the brakes.
·Do not allow brake fluid to contact any painted surface. If brake fluid leaks onto any painted surface, immediately wash it off.
·Do not operate the brake actuator assembly while air is in the brake system or in the brake master cylinder sub-assembly. Doing so may cause air to enter the brake actuator assembly.
·When bleeding air, select the suitable procedure according to the table below.
Replaced/Installed Item Work Procedure Flexible hose (front/rear) Bleed brake line Disc brake cylinder assembly (front/rear) Brake actuator assembly Bleed brake system Brake master cylinder sub-assembly Brake master cylinder reservoir assembly Brake booster assembly
- HINT:
-
If any work is performed on the brake system or if air in the brake lines is suspected, bleed the air from the brake system.
PROCEDURE

 1.BLEED BRAKE LINE
Remove the center cowl top ventilator louver.
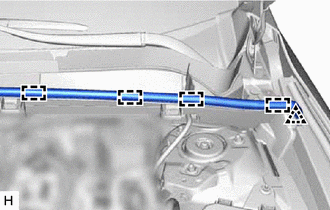
Disengage the 4 hooks and clip to separate the hood to cowl top seal from the cowl top ventilator louver sub-assembly.
- HINT:
-
Turning the clip 45° counterclockwise can make it easier to disengage the clip.
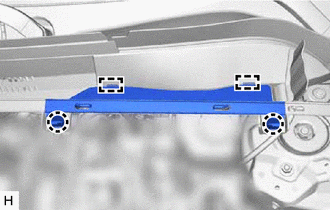
Disengage the 2 claws and 2 guides to remove the center cowl top ventilator louver from the cowl top ventilator louver sub-assembly.
Remove the brake master cylinder reservoir filler cap assembly.
Add brake fluid to keep the level between the MIN and MAX lines of the reservoir while bleeding the brakes.
- Brake Fluid:
SAE J1703 or FMVSS No. 116 DOT3
SAE J1704 or FMVSS No. 116 DOT4
- NOTICE:
- ·
Make sure that there is sufficient brake fluid in the reservoir.
·Do not remove the filter from the reservoir and be sure to fill the reservoir with new brake fluid to avoid any potential contamination of the brake system. Contamination, for example by dirt particles or mineral oil, could lead to functional brake problems.
Remove the bleeder plug cap.
Connect a vinyl tube to the bleeder plug.
Depress the brake pedal several times, and then loosen the bleeder plug with the pedal depressed.*1
When fluid stops coming out, tighten the bleeder plug and release the brake pedal.*2
Repeat steps *1 and *2 until all the air in the brake fluid is completely bled out and new brake fluid comes out.
Tighten the bleeder plug completely.
- Torque:
- 8.3 N*m (85 kgf*cm, 73 in.*lbf)
Install the bleeder plug cap.
Repeat the above steps to bleed the brake fluid of the brake lines for each wheel.
Inspect for brake fluid leaks.
Inspect the brake fluid level in the reservoir.
Install the brake master cylinder reservoir filler cap assembly.
Install the center cowl top ventilator louver.
Engage the 2 claws and 2 guides to install the center cowl top ventilator louver to the cowl top ventilator louver sub-assembly.
Engage the 4 hooks and clip to install the hood to cowl top seal to the cowl top ventilator louver sub-assembly.
2.BLEED BRAKE SYSTEM
- NOTICE:
- ·
To prevent brake fluid from damaging painted surfaces, cover any surrounding parts with a piece of cloth.
·Be sure to clean your hands before bleeding the brake master cylinder sub-assembly to avoid any potential contamination of the brake system. Contamination, for example by dirt particles or mineral oil, could lead to functional brake problems.
Remove the cowl ventilator panel sub-assembly.
Remove the brake master cylinder reservoir filler cap assembly.
Add brake fluid to keep the level between the MIN and MAX lines of the reservoir while bleeding the brakes.
- Brake Fluid:
SAE J1703 or FMVSS No. 116 DOT 3
SAE J1704 or FMVSS No. 116 DOT 4
- NOTICE:
- ·
Make sure that there is sufficient brake fluid in the reservoir.
·Do not remove the filter from the reservoir and be sure to fill the reservoir with new brake fluid to avoid any potential contamination of the brake system. Contamination, for example by dirt particles or mineral oil, could lead to functional brake problems.
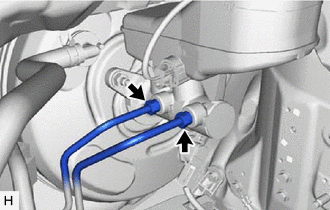
Using a union nut wrench, disconnect the 2 brake lines from the brake master cylinder sub-assembly.
- NOTICE:
- ·
Do not kink or damage the brake lines.
·Do not allow any foreign matter such as dirt or dust to enter the brake lines from the connecting parts.
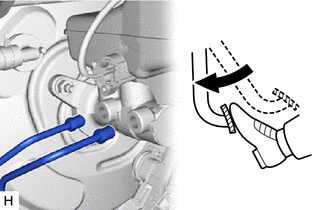
Slowly depress the brake pedal and hold it.*1
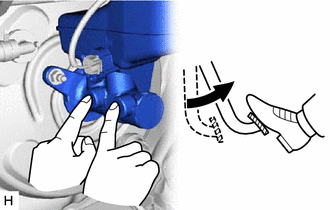
Cover the 2 outer holes with fingers, and release the brake pedal.*2
Repeat steps *1 and *2, 3 or 4 times.
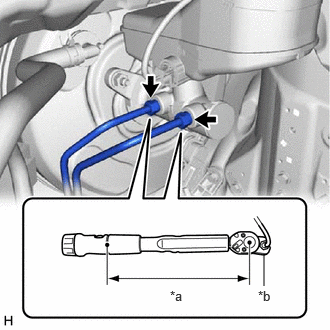
| *a | Torque Wrench Fulcrum Length |
| *b | Union Nut Wrench |
Using a union nut wrench, connect the 2 brake lines to the brake master cylinder sub-assembly.
- Torque:
- Specified tightening torque : 19.5 N*m (199 kgf*cm, 14 ft.*lbf)
- NOTICE:
- ·
Do not kink or damage the brake lines.
·Do not allow the brake lines to twist or interfere with other parts or the vehicle body during tightening.
·Do not allow any foreign matter such as dirt or dust to enter the brake lines from the connecting parts.
- HINT:
- ·
Calculate the torque wrench reading when changing the fulcrum length of the torque wrench.
·When using a union nut wrench (fulcrum length of 20 mm (0.787 in.)) + torque wrench (fulcrum length of 162 mm (6.38 in.)):
17.4 N*m (177 kgf*cm, 13 ft.*lbf)
Remove the bleeder plug cap.
Connect a vinyl tube to the bleeder plug.
Depress the brake pedal several times, and then loosen the bleeder plug with the pedal depressed.*3
When fluid stops coming out, tighten the bleeder plug and release the brake pedal.*4
Repeat steps *3 and *4 until all the air in the brake fluid is completely bled out and new brake fluid comes out.
Tighten the bleeder plug completely.
- Torque:
8.3 N*m (85 kgf*cm, 73 in.*lbf)
Install the bleeder plug cap.
Repeat the above steps to bleed the brake fluid of the brake lines for each wheel.
Inspect for brake fluid leaks.
Inspect the brake fluid level in the reservoir.
Install the brake master cylinder reservoir filler cap assembly.
Install the cowl ventilator panel sub-assembly.