RM38N0EC _56 Audio / Visual / Telematics _111822 AUDIO / VIDEO _0500654 FRONT DOOR SPEAKER A

AUDIO / VIDEO  FRONT DOOR SPEAKER  INSTALLATION  


CAUTION / NOTICE / HINT

HINT:
·

Use the same procedure for the RH side and LH side.

·

The following procedure is for the LH side.


PROCEDURE

Hide 86160 1.INSTALL FRONT NO. 1 SPEAKER ASSEMBLY

NOTICE:

Do not touch the speaker cone.


a.

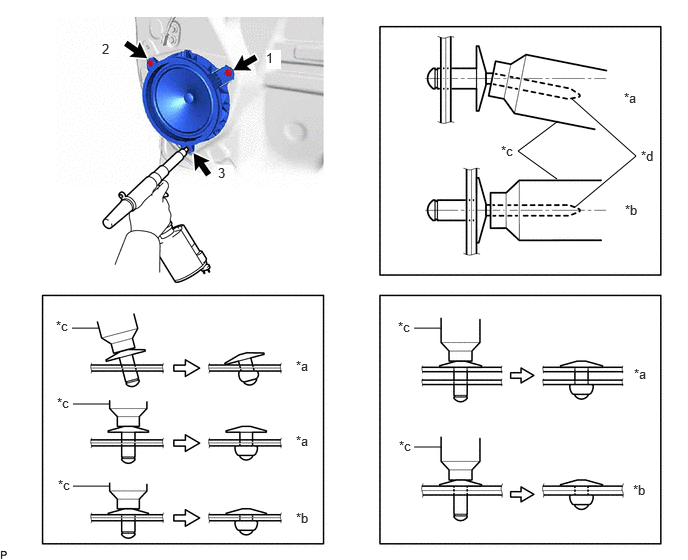
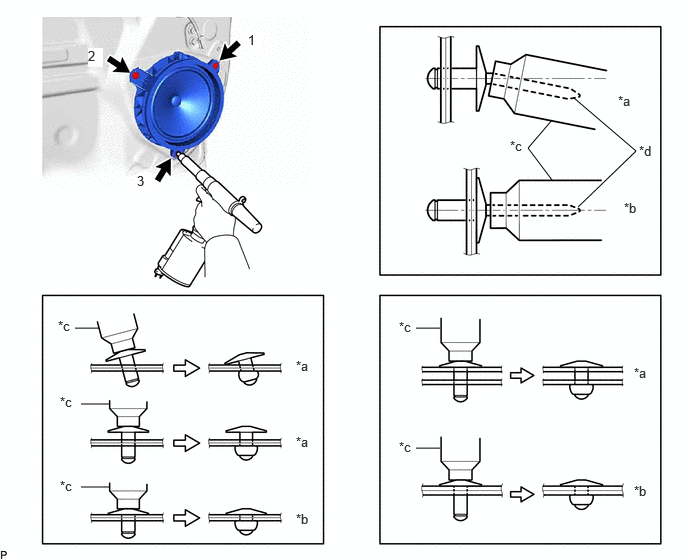
Engage the 2 guides to temporarily install the front No. 1 speaker assembly.


b.

Using an air riveter or a hand riveter, install the front No. 1 speaker assembly with 3 new rivets.

for LH Side:
E474794C01
0.781,3.417 1.031,3.417 false 0.844,4.208 1.135,4.208 false 0.844,5.073 1.135,5.073 false 5.75,1.875 5.5,1.542 5.5,1.542 5.75,1.25 false 6.021,2.156 6.625,1.573 6.625,1.573 5.979,1.021 false 4.333,3.417 4.583,3.417 false 4.333,4.667 4.583,4.667 false 2.583,0.333 2.74,0.531 0.156,0.198 10 true 1 0.917,0.5 1.073,0.698 0.156,0.198 10 true 2 1.427,1.802 1.583,2 0.156,0.198 10 true 3 6.438,0.969 6.75,1.167 0.313,0.198 10 false *a 6.604,3.802 6.917,4 0.313,0.198 10 false *a 3.083,3.729 3.396,3.927 0.313,0.198 10 false *a 3.083,4.521 3.396,4.719 0.313,0.198 10 false *a 0.625,4.104 0.938,4.302 0.313,0.198 10 false *c 0.604,3.313 0.917,3.51 0.313,0.198 10 false *c 0.625,4.979 0.938,5.177 0.313,0.198 10 false *c 4.156,3.323 4.469,3.521 0.313,0.198 10 false *c 4.156,4.573 4.469,4.771 0.313,0.198 10 false *c 5.313,1.438 5.625,1.635 0.313,0.198 10 false *c 6.604,5.031 6.917,5.229 0.313,0.198 10 false *b 3.083,5.323 3.396,5.521 0.313,0.198 10 false *b 6.5,2.083 6.813,2.281 0.313,0.198 10 false *b 6.656,1.49 6.969,1.688 0.313,0.198 10 false *d
*a Incorrect *b Correct
*c Riveter *d Mandrel


for RH Side:

E474795C01
5.99,2.156 6.625,1.625 6.625,1.625 5.948,1.021 false 5.802,1.865 5.396,1.573 5.396,1.573 5.813,1.26 false 0.76,4.208 1.135,4.208 false 0.76,5.063 1.135,5.063 false 0.75,3.417 1.031,3.417 false 4.313,3.417 4.594,3.417 false 4.313,4.656 4.594,4.656 false 6.5,0.938 6.813,1.094 0.313,0.156 10 false *a 6.51,2.104 6.823,2.26 0.313,0.156 10 false *b 5.219,1.49 5.531,1.646 0.313,0.156 10 false *c 6.677,1.542 6.99,1.698 0.313,0.156 10 false *d 6.594,5.021 6.906,5.177 0.313,0.156 10 false *b 6.604,3.813 6.917,3.969 0.313,0.156 10 false *a 3.083,3.729 3.396,3.885 0.313,0.156 10 false *a 3.083,4.51 3.396,4.667 0.313,0.156 10 false *a 3.083,5.313 3.396,5.469 0.313,0.156 10 false *b 0.583,3.313 0.896,3.469 0.313,0.156 10 false *c 0.594,4.115 0.906,4.271 0.313,0.156 10 false *c 0.604,4.969 0.917,5.125 0.313,0.156 10 false *c 4.146,3.323 4.458,3.479 0.313,0.156 10 false *c 4.156,4.563 4.469,4.719 0.313,0.156 10 false *c 2.771,0.521 2.927,0.719 0.156,0.198 10 true 1 1.063,0.427 1.219,0.625 0.156,0.198 10 true 2 2.271,1.719 2.427,1.917 0.156,0.198 10 true 3
*a Incorrect *b Correct
*c Riveter *d Mandrel


NOTICE:
·

Do not pry on the rivets with the riveter, as this will cause damage to the riveter and mandrel.

·

Confirm that the rivets are seated properly against the speaker.

·

Do not tilt the riveter when installing the speaker with the rivets.

·

Do not leave any space between the rivet heads and speaker.

·

Do not leave any space between the speaker and door. Firmly hold the speaker and door together while installing the rivets.


HINT:
·

Install the rivets in the order shown in the illustration.

·

If the mandrel of the rivet does not come off on the first operation of the rivet gun, slide the rivet gun forward on the mandrel and operate it again.


c.

Connect the connector.