EXTERIOR PANELS / TRIM FRONT BUMPER(for SFTM Made) REASSEMBLY
PROCEDURE

 52103A
1.INSTALL FRONT BUMPER EXTENSION SUB-ASSEMBLY LH
52103A
1.INSTALL FRONT BUMPER EXTENSION SUB-ASSEMBLY LH
- HINT:
-
Perform this procedure only when replacement of the front bumper extension sub-assembly LH is necessary.
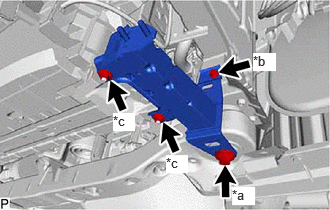
| *a | Bolt A |
| *b | Bolt B |
| *c | Nut |
Install the 2 bolts.
- Torque:
- Bolt A : 135 N*m (1377 kgf*cm, 100 ft.*lbf)
- Bolt B : 9.5 N*m (97 kgf*cm, 84 in.*lbf)
Install the front bumper extension sub-assembly LH with the 2 nuts.
- Torque:
- 12.5 N*m (127 kgf*cm, 9 ft.*lbf)
52102B
2.INSTALL FRONT BUMPER EXTENSION SUB-ASSEMBLY RH
- HINT:
-
Use the same procedure as for the LH side.
52618
3.INSTALL FRONT BUMPER LOWER ABSORBER
- HINT:
-
Perform this procedure only when replacement of the front bumper lower absorber is necessary.
for Gasoline Model:
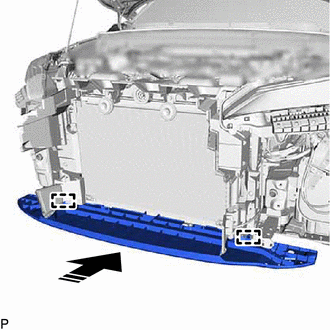

|
Install in this Direction |
Engage the 2 guides as shown in the illustration.
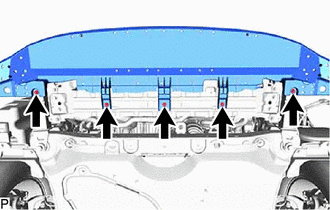
Install the front bumper lower absorber with the 5 screws.
for HV Model:
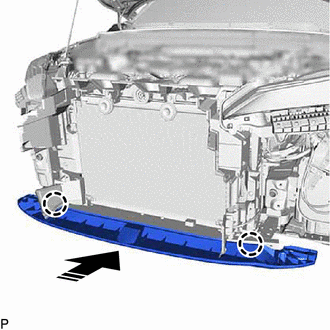
|
|
Install in this Direction |
Engage the 2 claws as shown in the illustration.
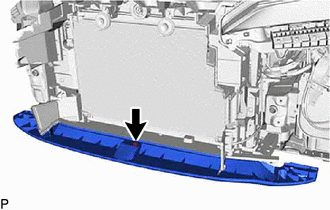
Install the front bumper lower absorber with the clip.
51441
4.INSTALL NO. 1 ENGINE UNDER COVER
- HINT:
-
Perform this procedure only when replacement of the front bumper lower absorber is necessary.
52132A
5.INSTALL NO. 2 FRONT BUMPER REINFORCEMENT (for HV Model)
- HINT:
-
Perform this procedure only when replacement of the No. 2 front bumper reinforcement is necessary.
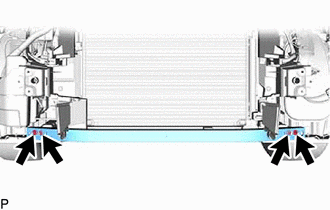
Install the No. 2 front bumper reinforcement with the 4 nuts.
- Torque:
- 18 N*m (184 kgf*cm, 13 ft.*lbf)
52021
6.INSTALL FRONT BUMPER REINFORCEMENT SUB-ASSEMBLY
- HINT:
-
Perform this procedure only when replacement of the front bumper reinforcement sub-assembly is necessary.
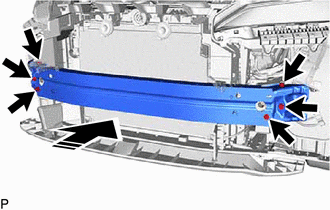
|
|
Install in this Direction |
Install the front bumper reinforcement sub-assembly with the 6 bolts.
- Torque:
- 43 N*m (438 kgf*cm, 32 ft.*lbf)
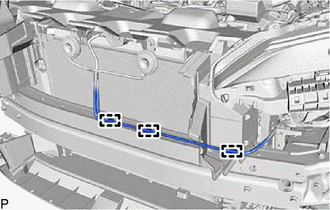
Engage the 3 clamps.
52614
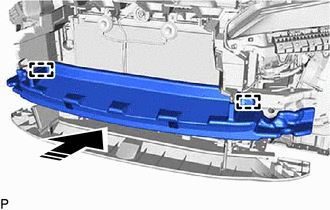
7.INSTALL NO. 2 FRONT BUMPER ENERGY ABSORBER
- HINT:
-
Perform this procedure only when replacement of the No. 2 front bumper energy absorber is necessary.
|
|
Install in this Direction |
Engage the 2 guides to install the No. 2 front bumper energy absorber as shown in the illustration.
52536
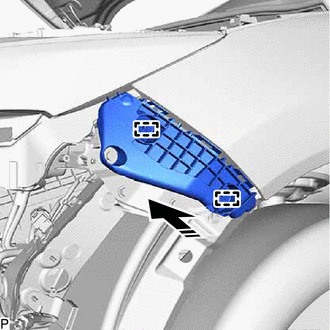
8.INSTALL FRONT BUMPER SIDE RETAINER LH
- HINT:
-
Perform this procedure only when replacement of the front bumper side retainer LH is necessary.
|
|
Install in this Direction |
Engage the 2 clips as shown in the illustration.
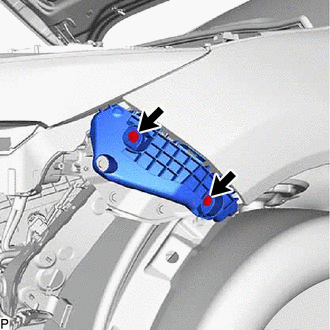
Install the front bumper side retainer LH with the 2 screws.
52535
9.INSTALL FRONT BUMPER SIDE RETAINER RH
- HINT:
-
Use the same procedure as for the LH side.
53879H
10.INSTALL FRONT FENDER LINER RETAINER
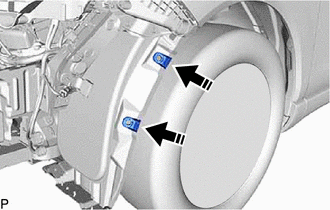
|
|
Install in this Direction |
Install the 2 front fender liner retainers as shown in the illustration.
- HINT:
-
Use the same procedure for the RH side and LH side.
47749F
11.INSTALL PIN HOLD CLIP
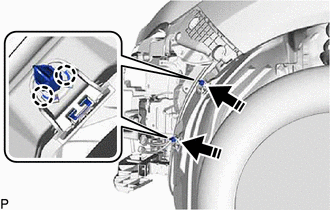
|
|
Install in this Direction |
Engage the 4 claws as shown in the illustration to install the 2 pin hold clips.
- HINT:
-
Use the same procedure for the RH side and LH side.
53102A
12.INSTALL LOWER RADIATOR GRILLE SUB-ASSEMBLY
Engage the 10 claws.
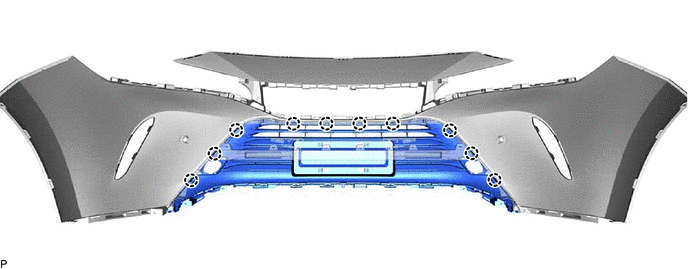
Install the lower radiator grille sub-assembly with the 2 screws.
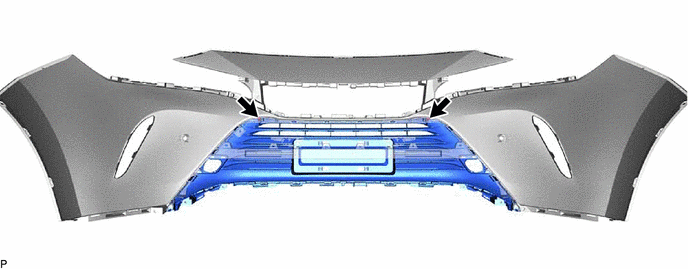
52411
13.INSTALL FRONT BUMPER GUARD
Engage the 5 claws.
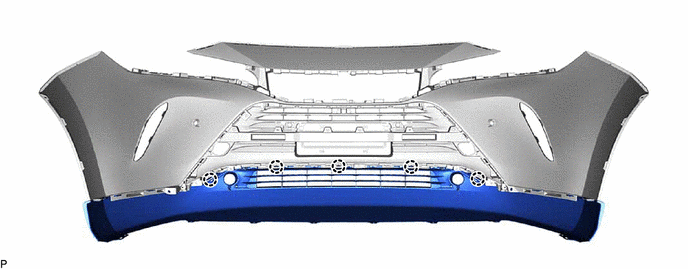
Install the 2 screws.
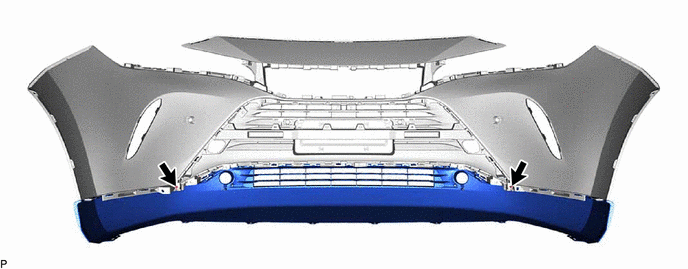
Install the front bumper guard with the 6 clips.
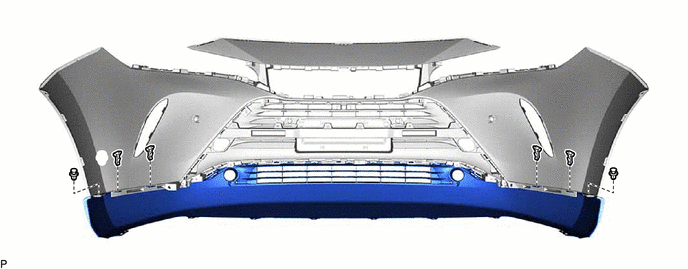
52414
14.INSTALL FRONT BUMPER GUARD PAD LH
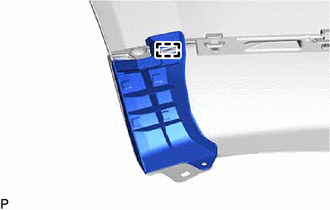
Engage the guide.
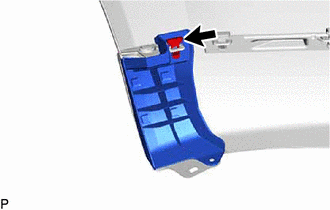
Install the clip.
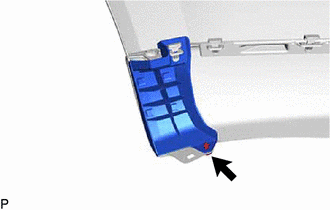
Install the front bumper guard pad LH with the clip.
52413A
15.INSTALL FRONT BUMPER GUARD PAD RH
- HINT:
-
Use the same procedure as for the LH side.
53286C
16.INSTALL FRONT BUMPER ARM HOLE COVER LH
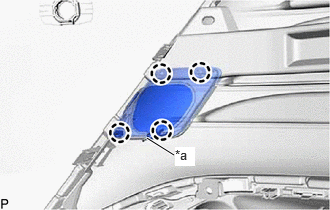
| *a | Hook |
Engage the hook.
Engage the 4 claws to install the front bumper arm hole cover LH.
53285J
17.INSTALL FRONT BUMPER ARM HOLE COVER RH
- HINT:
-
Use the same procedure as for the LH side.
75311
18.INSTALL RADIATOR GRILLE (OR FRONT PANEL) EMBLEM
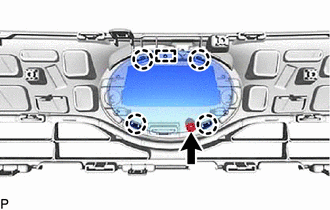
Engage the guide and 4 claws.
Install the radiator grille (or front panel) emblem with the screw.
19.INSTALL RADIATOR GRILLE ASSEMBLY
Engage the 10 claws.
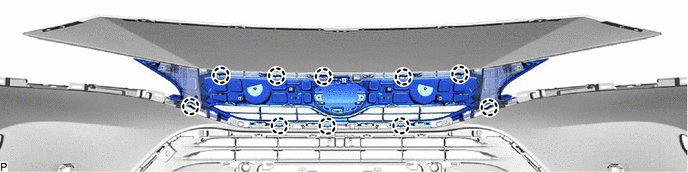
Install the radiator grille assembly with the 3 screws.
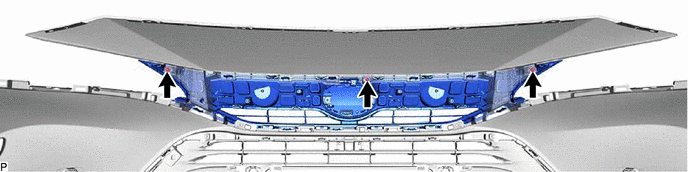
53115B
20.INSTALL RADIATOR GRILLE BRACKET
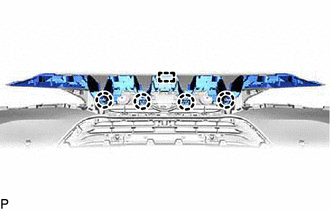
Engage the guide and 4 claws.
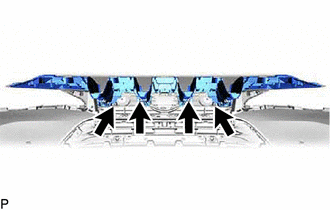
Install the 4 screws.
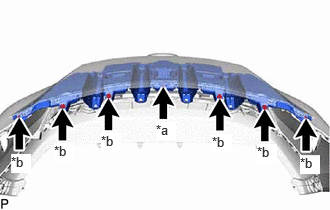
| *a | Screw |
| *b | Clip |
Install the radiator grille bracket with the 6 clips and screw.
53395E
21.INSTALL HOOD TO FRONT END PANEL SEAL
Engage the 16 clips and 2 guides to install the hood to front end panel seal.
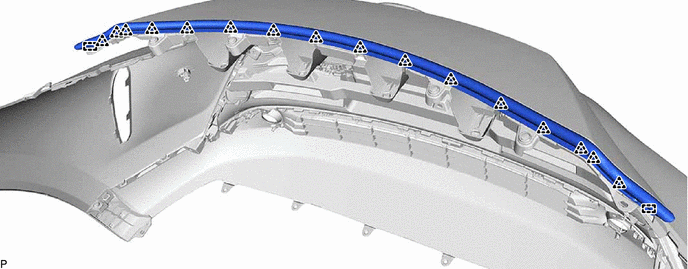
53122E
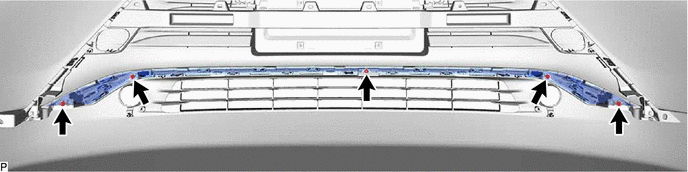
22.INSTALL LOWER RADIATOR GRILLE MOULDING
Engage the 16 claws.
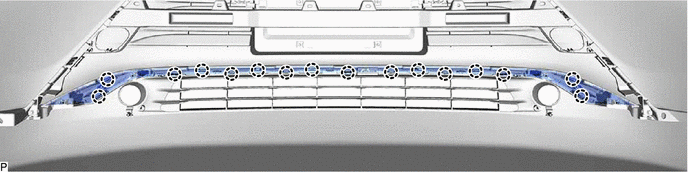
Install the lower radiator grille moulding with the 5 screws.
52128B
23.INSTALL FRONT BUMPER HOLE COVER LH
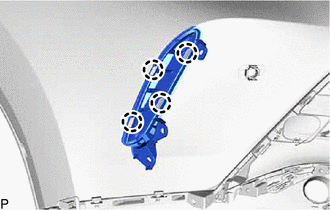
Engage the 4 claws to install the front bumper hole cover LH.
52127C
24.INSTALL FRONT BUMPER HOLE COVER
- HINT:
-
Use the same procedure as for the LH side.
53121A
25.INSTALL RADIATOR GRILLE MOULDING
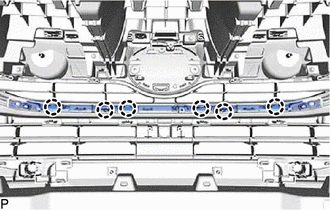
Engage the 6 claws.
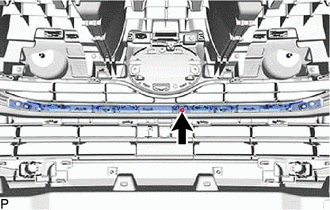
Install the radiator grille moulding with the screw.
53124F
26.INSTALL RADIATOR GRILLE SIDE MOULDING LH
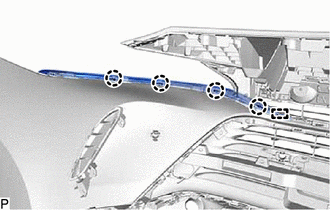
Engage the guide and 4 claws.
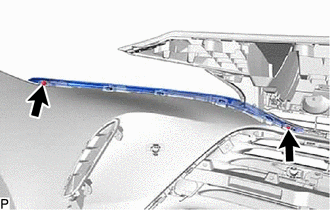
Install the radiator grille side moulding LH with the 2 screws.
53123G
27.INSTALL RADIATOR GRILLE SIDE MOULDING RH
- HINT:
-
Use the same procedure as for the LH side.
82114
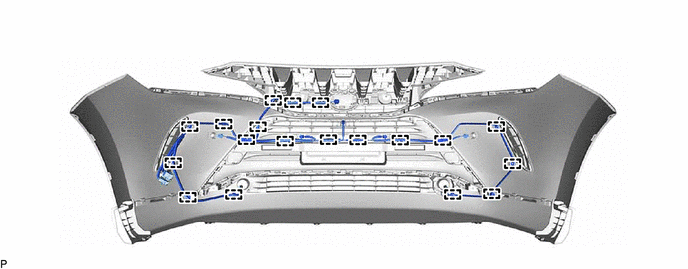
28.INSTALL NO. 4 ENGINE ROOM WIRE
Engage the 19 clamps to install the No. 4 engine room wire.
81269B
29.INSTALL FOG LIGHT SEAL
- HINT:
-
When installing the fog light seal, heat the front bumper assembly using a heat light.
| Item | Temperature |
|---|---|
| Front Bumper Cover | 20 to 30°C (68 to 86°F) |
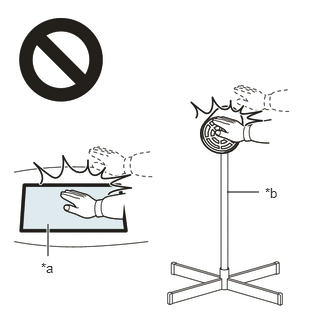
- CAUTION:
-
 2.365,2 2.698,2 false 0.5,2.333 0.5,2.667 true 0.427,2.708 0.74,2.865 0.313,0.156 10 false *a 2.76,1.927 3.073,2.083 0.313,0.156 10 false *b
*a Heated Part *b Heat Light
- ·
Do not touch the heat light and heated parts, touching the heat light may result in burns.
·Touching heated parts for a long time may result in burns.
- NOTICE:
-
Do not heat the front bumper cover excessively.
Clean the front bumper cover surface.
Using a heat light, heat the front bumper cover surface.
Remove any remaining double-sided tape from the front bumper cover.
Wipe off any tape adhesive residue with cleaner.
Using a brush or felt, apply primer or equivalent to the fog light seal installation area.
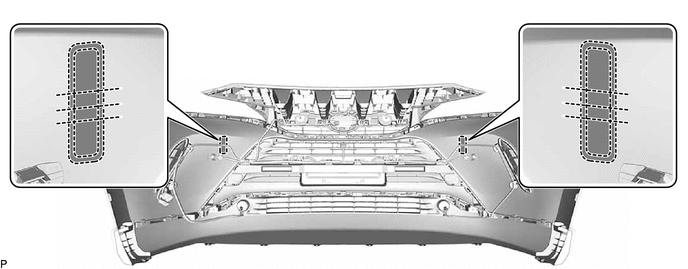

|
Primer | - | - |
- NOTICE:
- ·
Use a clean brush or felt.
·Do not touch the front bumper assembly until the primer has dried.
Remove the release paper from 2 new fog light seals.
- HINT:
-
After removing the release paper, keep the exposed adhesive free from foreign matter.
Install the 2 fog light seals as shown in the illustration.
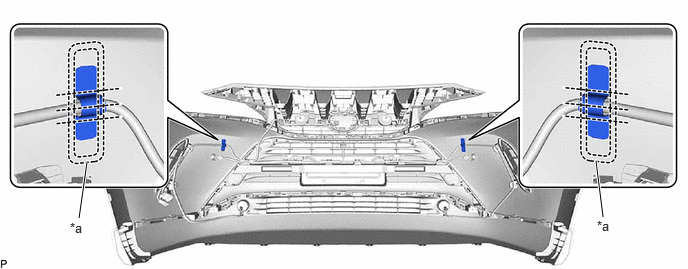
| *a | Line | - | - |
- HINT:
-
Press the fog light seal firmly to install it.
81482C
30.INSTALL FOG LIGHT COVER LH
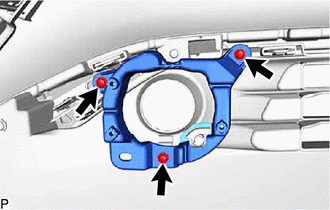
Install the fog light cover LH with the 3 screws.
81481E
31.INSTALL FOG LIGHT COVER RH
- HINT:
-
Use the same procedure as for the LH side.
81220
32.INSTALL FOG LIGHT ASSEMBLY LH
81210A
33.INSTALL FOG LIGHT ASSEMBLY RH
- HINT:
-
Use the same procedure as for the LH side.
88211B
34.INSTALL MILLIMETER WAVE RADAR SENSOR ASSEMBLY
86790B
35.INSTALL FRONT TELEVISION CAMERA ASSEMBLY (w/ Panoramic View Monitor System)
89C48D
36.INSTALL FRONT CORNER ULTRASONIC SENSOR RETAINER (w/ TOYOTA Parking Assist-sensor System)
89341K
37.INSTALL FRONT CORNER ULTRASONIC SENSOR (w/ TOYOTA Parking Assist-sensor System)
89341L
38.INSTALL FRONT CENTER ULTRASONIC SENSOR (w/ TOYOTA Parking Assist-sensor System)