HYBRID / BATTERY CONTROL HYBRID CONTROL SYSTEM Rear Motor High-voltage Circuit
DESCRIPTION
The cause of the malfunction may be the high-voltage circuit of the rear motor.
Check the rear motor internal resistance and the connection condition of the high-voltage line between the inverter and rear motor to check whether there is an open or short circuit.
| Area | Inspection |
|---|---|
| Floor under wire (rear traction motor cable) connection check | Check for open or short circuit in the connection condition of the cable from the inverter to the rear motor. |
| Rear motor or floor under wire (rear traction motor cable) | Check the rear motor (including cable) internal resistance and the insulation resistance with body ground to check for an open or short circuit. |
WIRING DIAGRAM
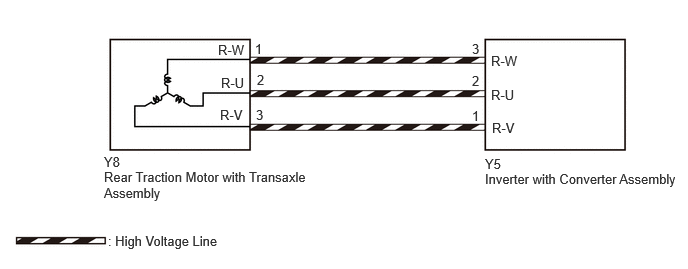
CAUTION / NOTICE / HINT
This diagnostic procedure is referenced to in the diagnostic procedure of several DTCs.
If the result of this diagnostic procedure is normal, proceed as directed in the procedure for the DTC.
- CAUTION:
-
Refer to the precautions before inspecting high voltage circuit.
PROCEDURE
- CAUTION:
-
Be sure to wear insulated gloves.
Check that the service plug grip is not installed.
- NOTICE:
-
After removing the service plug grip, do not turn the power switch on (READY), unless instructed by the repair manual because this may cause a malfunction.
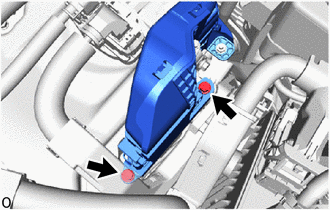
Check that the bolts for the floor under wire (rear traction motor cable) are tightened to the specified torque, the floor under wire (rear traction motor cable) is connected securely, and there are no contact problems.
- Specified Condition:
T = 8.0 N*m (82 kgf*cm, 71 in.*lbf)
Disconnect the floor under wire (rear traction motor cable) from the inverter with converter assembly.
Check for arc marks at the terminals for the floor under wire (rear traction motor cable).
- Result:
Result Proceed to The terminals are connected securely and there are no contact problems. There are no arc marks. A The terminals are not connected securely and there is a contact problem. There are arc marks. B The terminals are not connected securely and there is a contact problem. There are no arc marks. C The terminals are connected securely and there are no contact problems. There are arc marks. B
Reconnect the floor under wire (rear traction motor cable).
A
B
C
- CAUTION:
-
Be sure to wear insulated gloves.
Check that the service plug grip is not installed.
- NOTICE:
-
After removing the service plug grip, do not turn the power switch on (READY), unless instructed by the repair manual because this may cause a malfunction.
Disconnect the floor under wire (rear traction motor cable) from the inverter with converter assembly.
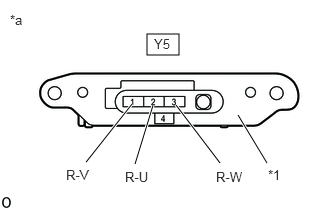
| *1 | Shield Ground |
| *a | Floor Under Wire (Rear Traction Motor Cable)
(Inverter with Converter Assembly Side) |
Using a milliohmmeter, measure the resistance according to the value(s) in the table below.
- HINT:
-
If the rear motor (MGR) temperature is high, the resistance will vary greatly from the specification. Therefore, measure the resistance at least 8 hours after the vehicle is stopped.
- Standard Resistance:
Tester Connection Condition Specified Condition Y5-1 (R-V) - Y5-2 (R-U) Power switch off 110.3 to 120.7 mΩ Y5-2 (R-U) - Y5-3 (R-W) Power switch off 110.5 to 120.9 mΩ Y5-3 (R-W) - Y5-1 (R-V) Power switch off 110.8 to 121.2 mΩ
- NOTICE:
- ·
Use a direct current(DC) resistance tester with a 0.1 mΩ resolution capable of measuring the standard values above when performing this check.
The correct measurement cannot be taken if an alternating current(AC) resistance tester is used for this check.
·Select the appropriate measurement range capable of measuring the standard values above when performing a measurement.
Do not select the inapproprate measurement range as the corrent resistance cannot be measured.
- HINT:
-
To correct the variation of the measured resistance due to temperature, use the following formula to calculate the resistance at 20°C (68°F).
-
R20 = Rt / {1 + 0.00393 X (T - 20)}
-
The calculation is based on the following:
-
R20: Resistance at 20°C (68°F) (mΩ)
-
Rt: Measured resistance (mΩ)
-
T: Temperature when the resistance is measured (°C (°F).)
Using a megohmmeter set to 500 V, measure the resistance according to the value(s) in the table below.
- NOTICE:
- ·
Use a direct current(DC) resistance tester capable of measuring resistances of 100 MΩ or higher at DC 500 V when performing this check.
Do not use an alternating current(AC) resistance tester for this check as the correct measurement cannot be taken.
·After DC 500 V is applied and insulation resistance value has stabilized, read the measured value.
Time is needed for the insulation resistance value to stabilize. If a measurement value is read before it has stabilized, the correct measurement cannot be taken.
- Standard Resistance:
Tester Connection Condition Specified Condition Y5-1 (R-V) - Body ground and shield ground Power switch off 10 MΩ or higher Y5-2 (R-U) - Body ground and shield ground Power switch off 10 MΩ or higher Y5-3 (R-W) - Body ground and shield ground Power switch off 10 MΩ or higher
Reconnect the floor under wire (rear traction motor cable).
- Result:
Proceed to OK NG
OK
NG
- CAUTION:
-
Be sure to wear insulated gloves.
Check that the service plug grip is not installed.
- NOTICE:
-
After removing the service plug grip, do not turn the power switch on (READY), unless instructed by the repair manual because this may cause a malfunction.

Check that the bolts for the floor under wire (rear traction motor cable) are tightened to the specified torque, the floor under wire (rear traction motor cable) is connected securely, and there are no contact problems.
- Specified Condition:
T=8.0 N*m (82 kgf*cm, 71 in.*lbf)
Disconnect the floor under wire (rear traction motor cable) from the rear traction motor with transaxle assembly.
Check for arc marks at the terminals for the floor under wire (rear traction motor cable).
- Result:
Result Proceed to The terminals are connected securely and there are no contact problems. There are no arc marks. A The terminals are not connected securely and there is a contact problem. There are arc marks. B The terminals are not connected securely and there is a contact problem. There are no arc marks. C The terminals are connected securely and there are no contact problems. There are arc marks. B
Reconnect the floor under wire (rear traction motor cable).
A
B
C
- CAUTION:
-
Be sure to wear insulated gloves.
Check that the service plug grip is not installed.
- NOTICE:
-
After removing the service plug grip, do not turn the power switch on (READY), unless instructed by the repair manual because this may cause a malfunction.
Disconnect the floor under wire (rear traction motor cable) from the inverter with converter assembly.
Disconnect the floor under wire (rear traction motor cable) from the rear traction motor with transaxle assembly.
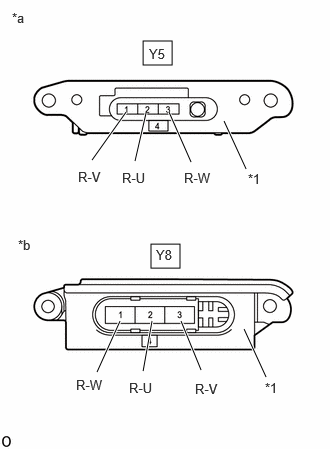
| *1 | Shield Ground |
| *a | Floor Under Wire (Rear Traction Motor Cable)
(Inverter with Converter Assembly Side) |
| *b | Floor Under Wire (Rear Traction Motor Cable)
(Rear Traction Motor with Transaxle Assembly Side) |
Using a megohmmeter set to 500 V, measure the resistance according to the value(s) in the table below.
- NOTICE:
-
Be sure to set the megohmmeter to 500 V when performing this test. Using a setting higher than 500 V can result in damage to the component being inspected.
- Standard Resistance:
Tester Connection Condition Specified Condition Y5-3 (R-W) or Y8-1 (R-W) - Shield ground Power switch off 10 MΩ or higher Y5-1 (R-V) or Y8-3 (R-V) - Shield ground Power switch off 10 MΩ or higher Y5-2 (R-U) or Y8-2 (R-U) - Shield ground Power switch off 10 MΩ or higher
- NOTICE:
-
Wrap the terminals of the motor cable with insulating tape to prevent them from coming into contact with body ground.
Measure the resistance according to the value(s) in the table below.
- Standard Resistance:
Tester Connection Condition Specified Condition Y5-3 (R-W) - Y8-1 (R-W) Power switch off Below 1 Ω Y5-1 (R-V) - Y8-3 (R-V) Power switch off Below 1 Ω Y5-2 (R-U) - Y8-2 (R-U) Power switch off Below 1 Ω Y5-3 (R-W) - Y8-2 (R-U) Power switch off 10 MΩ or higher Y5-1 (R-V) - Y8-1 (R-W) Power switch off 10 MΩ or higher Y5-2 (R-U) - Y8-3 (R-V) Power switch off 10 MΩ or higher
Reconnect the floor under wire (rear traction motor cable) to the rear traction motor with transaxle assembly.
Reconnect the floor under wire (rear traction motor cable) to the inverter with converter assembly.
- Result:
Proceed to OK NG
OK
NG
- CAUTION:
-
Be sure to wear insulated gloves.
Check that the service plug grip is not installed.
- NOTICE:
-
After removing the service plug grip, do not turn the power switch on (READY), unless instructed by the repair manual because this may cause a malfunction.
Remove the rear traction motor cable from the rear traction motor with transaxle assembly.
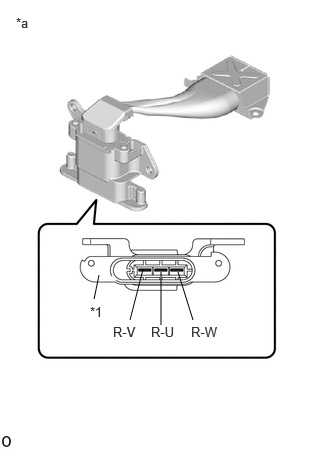
| *1 | Shield Ground |
| *a | Rear Traction Motor Cable |
Using a megohmmeter set to 500 V, measure the resistance according to the value(s) in the table below.
- NOTICE:
-
Be sure to set the megohmmeter to 500 V when performing this test. Using a setting higher than 500 V can result in damage to the component being inspected.
- Standard Resistance:
Tester Connection Condition Specified Condition R-W - Shield ground Ignition switch off 100 MΩ or higher R-V - Shield ground Ignition switch off 100 MΩ or higher R-U - Shield ground Ignition switch off 100 MΩ or higher
Install the rear traction motor cable.
- Result:
Proceed to OK NG
OK
NG