HYBRID / BATTERY CONTROL HYBRID CONTROL SYSTEM P0ABF00 Hybrid/EV Battery Current Sensor "A" Circuit Range/Performance
DESCRIPTION
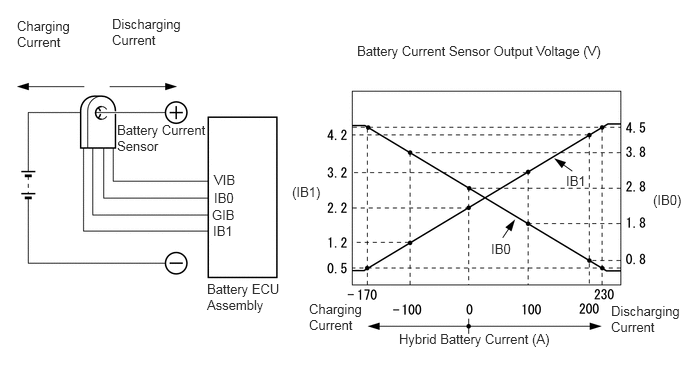
A battery current sensor, which is mounted on the positive cable side of each HV battery junction block assembly, detects the current flowing to or from the battery pack. The battery current sensor sends a voltage, which varies between 0 and 5 V in proportion to the amperage, to the IB0 terminal of the battery ECU assembly. Similarly, it sends a voltage, which varies between 0 and 5 V in inverse proportion to the amperage, to the IB1 terminal of the battery ECU assembly. When the voltage at the IB0 terminal is below 2.8 V and the voltage at the IB1 terminal is above 2.2 V, this indicates that the HV battery is being discharged. Additionally, Meanwhile, when the voltage at of the IB0 terminal is above 2.8 V and the voltage at of the IB1 terminal is below 2.2 V, this indicates that the HV battery is being charged. The battery ECU assembly sends the signals from its IB0 and IB1 terminals to the hybrid vehicle control ECU assembly. The hybrid vehicle control ECU assembly determines the charging and discharging amperage of the HV battery based on the received signals and calculates the SOC of the HV battery using the cumulative amperage value.
| DTC No. | Detection Item | DTC Detection Condition | Trouble Area | MIL | Warning Indicate | Note |
|---|---|---|---|---|---|---|
| P0ABF00 | Hybrid/EV Battery Current Sensor "A" Circuit Range/Performance | Abnormal battery current sensor characteristics:
(based on hybrid system consumption and HV battery output). (1 trip detection logic) |
·
HV battery junction block assembly ·
Battery ECU assembly ·
No. 1 HV supply stack sub-assembly ·
No. 2 HV supply stack sub-assembly |
Comes on | Master Warning:
Comes on |
SAE Code:
P0AC0 |
| DTC No. | Data List |
|---|---|
| P0ABF00 | - |
CONFIRMATION DRIVING PATTERN
- HINT:
- ·
After repair has been completed, clear the DTC and then check that the vehicle has returned to normal by performing the following All Readiness check procedure.
·When clearing the permanent DTCs, refer to the "CLEAR PERMANENT DTC" procedure.
Connect the GTS to the DLC3.
Turn the power switch on (IG) and turn the GTS on.
Clear the DTCs (even if no DTCs are stored, perform the clear DTC procedure).
Turn the power switch off and wait for 2 minutes or more.
Turn the power switch on (IG) and turn the GTS on.
Drive the vehicle for approximately 10 minutes according to the freeze frame data items "Vehicle Speed", "Accelerator Position", "Hybrid/EV Battery Current", "Motor Torque" and "Generator Torque". [*1]
- HINT:
-
[*1]: Normal judgment procedure.
-
The normal judgment procedure is used to complete DTC judgment and also used when clearing permanent DTCs.
Enter the following menus: Powertrain / Hybrid Control / Utility / All Readiness.
Check the DTC judgment result.
- HINT:
- ·
If the judgment result shows NORMAL, the system is normal.
·If the judgment result shows ABNORMAL, the system has a malfunction.
·If the judgment result shows INCOMPLETE, perform the normal judgment procedure again.
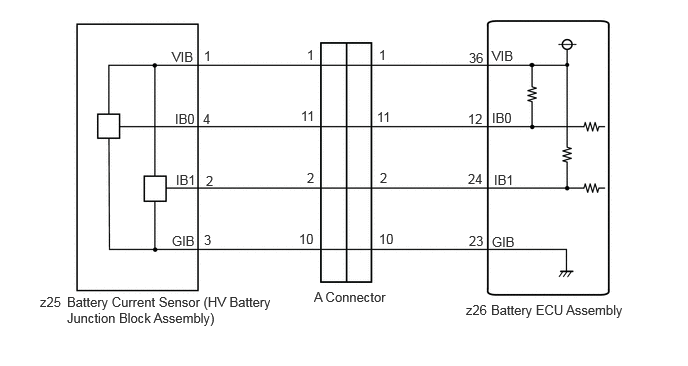
WIRING DIAGRAM
CAUTION / NOTICE / HINT
- CAUTION:
-
Refer to the precautions before inspecting high voltage circuit.
PROCEDURE
- CAUTION:
-
Be sure to wear insulated gloves and protective goggles.
Check that the service plug grip is not installed.
- NOTICE:
-
After removing the service plug grip, do not turn the power switch on (READY), unless instructed by the repair manual because this may cause a malfunction.
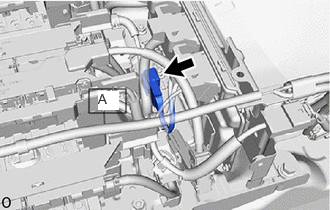
Disconnect the A No. 1 HV supply stack sub-assembly connector.
- NOTICE:
-
Before disconnecting the connector, check that it is not loose or disconnected.
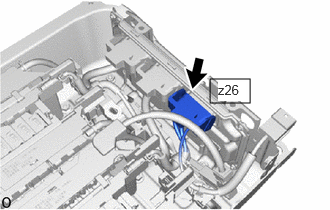
Disconnect the z26 battery ECU assembly connector.
- NOTICE:
-
Before disconnecting the connector, check that it is not loose or disconnected.
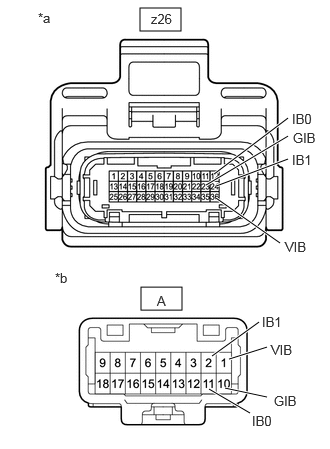
| *a | Front view of wire harness connector
(to Battery ECU Assembly) |
| *b | Front view of wire harness connector
(to No. 2 HV Supply Stack Sub-assembly) |
Measure the resistance according to the value(s) in the tables below.
- Standard Resistance (Check for Open):
Tester Connection Condition Specified Condition z26-24 (IB1) - A-2 (IB1) Power switch off Below 1 Ω z26-23 (GIB) - A-10 (GIB) Power switch off Below 1 Ω z26-12 (IB0) - A-11 (IB0) Power switch off Below 1 Ω z26-36 (VIB) - A-1 (VIB) Power switch off Below 1 Ω
- Standard Resistance (Check for Short):
Tester Connection Condition Specified Condition z26-24 (IB1) or A-2 (IB1) - Body ground and other terminals Power switch off 10 kΩ or higher z26-23 (GIB) or A-10 (GIB) - Body ground and other terminals Power switch off 10 kΩ or higher z26-12 (IB0) or A-11 (IB0) - Body ground and other terminals Power switch off 10 kΩ or higher z26-36 (VIB) or A-1 (VIB) - Body ground and other terminals Power switch off 10 kΩ or higher
Reconnect the z26 battery ECU assembly connector.
Reconnect the A No. 1 HV supply stack sub-assembly connector.
Install the No. 1 HV battery hose.
- Result:
Proceed to OK NG
OK
NG
- CAUTION:
-
Be sure to wear insulated gloves and protective goggles.
Check that the service plug grip is not installed.
- NOTICE:
-
After removing the service plug grip, do not turn the power switch on (READY), unless instructed by the repair manual because this may cause a malfunction.
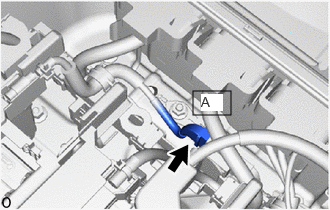
Disconnect the A No. 2 HV supply stack sub-assembly connector.
- NOTICE:
-
Before disconnecting the connector, check that it is not loose or disconnected.
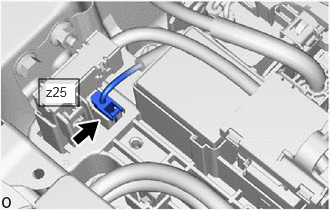
Disconnect the z25 battery current sensor connector from the HV battery junction block assembly.
- NOTICE:
-
Before disconnecting the connector, check that it is not loose or disconnected.
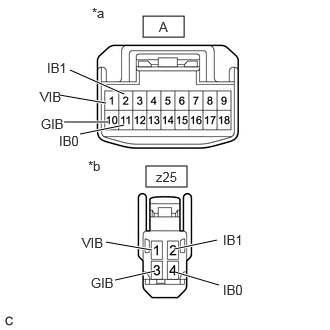
| *a | Front view of wire harness connector
(to No. 1 HV Supply Stack Sub-assembly) |
| *b | Front view of wire harness connector
(to HV Battery Junction Block Assembly (Battery Current Sensor)) |
Measure the resistance according to the value(s) in the tables below.
- Standard Resistance (Check for Open):
Tester Connection Condition Specified Condition A-2 (IB1) - z25-2 (IB1) Power switch off Below 1 Ω A-10 (GIB) - z25-3 (GIB) Power switch off Below 1 Ω A-11 (IB0) - z25-4 (IB0) Power switch off Below 1 Ω A-1 (VIB) - z25-1 (VIB) Power switch off Below 1 Ω
- Standard Resistance (Check for Short):
Tester Connection Condition Specified Condition A-2 (IB1) or z25-2 (IB1) - Body ground and other terminals Power switch off 10 kΩ or higher A-10 (GIB) or z25-3 (GIB) - Body ground and other terminals Power switch off 10 kΩ or higher A-11 (IB0) or z25-4 (IB0) - Body ground and other terminals Power switch off 10 kΩ or higher A-1 (VIB) or z25-1 (VIB) - Body ground and other terminals Power switch off 10 kΩ or higher
Reconnect the z25 battery current sensor connector to the HV battery junction block assembly.
Reconnect the A No. 2 HV supply stack sub-assembly connector.
Install the upper No. 1 HV battery hose.
- Result:
Proceed to OK NG
OK
NG
- CAUTION:
-
Be sure to wear insulated gloves and protective goggles.
Check that the service plug grip is not installed.
- NOTICE:
-
After removing the service plug grip, do not turn the power switch on (READY), unless instructed by the repair manual because this may cause a malfunction.
Disconnect the z26 battery ECU assembly connector.
- NOTICE:
-
Before disconnecting the connector, check that it is not loose or disconnected.
Disconnect the z25 battery current sensor connector from the HV battery junction block assembly.
- NOTICE:
-
Before disconnecting the connector, check that it is not loose or disconnected.
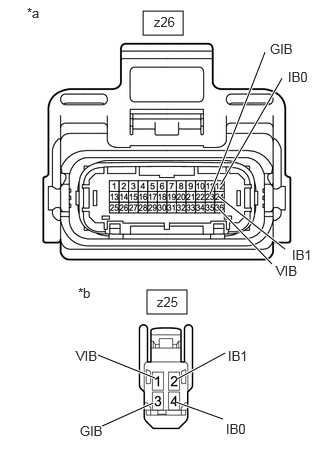
| *a | Front view of wire harness connector
(to Battery ECU Assembly) |
| *b | Front view of wire harness connector
(to HV Battery Junction Block Assembly (Battery Current Sensor)) |
Measure the resistance according to the value(s) in the tables below.
- Standard Resistance (Check for Open):
Tester Connection Condition Specified Condition z26-24 (IB1) - z25-2 (IB1) Power switch off Below 1 Ω z26-23 (GIB) - z25-3 (GIB) Power switch off Below 1 Ω z26-12 (IB0) - z25-4 (IB0) Power switch off Below 1 Ω z26-36 (VIB) - z25-1 (VIB) Power switch off Below 1 Ω
- Standard Resistance (Check for Short):
Tester Connection Condition Specified Condition z26-24 (IB1) or z25-2 (IB1) - Body ground and other terminals Power switch off 10 kΩ or higher z26-23 (GIB) or z25-3 (GIB) - Body ground and other terminals Power switch off 10 kΩ or higher z26-12 (IB0) or z25-4 (IB0) - Body ground and other terminals Power switch off 10 kΩ or higher z26-36 (VIB) or z25-1 (VIB) - Body ground and other terminals Power switch off 10 kΩ or higher
Reconnect the z25 battery current sensor connector to the HV battery junction block assembly.
Reconnect the z26 battery ECU assembly connector.
Install the No. 1 HV battery hose.
- Result:
Proceed to OK NG
OK
NG
- Result:
Proceed to NEXT
NEXT
- Result:
Proceed to NEXT
NEXT
Connect the GTS to the DLC3.
Turn the power switch off.
Enter the following menus: Powertrain / Hybrid Control / Data List / Hybrid/EV Battery SOC.
- Powertrain > Hybrid Control > Data List
-
Tester Display Hybrid/EV Battery SOC - 50003 397 320
Check that "Hybrid/EV Battery SOC" shows 60% or less.
- HINT:
-
If "Hybrid/EV Battery SOC" is 60% or more, reduce it to below 60% by leaving the hybrid system on with shift lever in N.
Apply the parking brake and secure the wheels using chocks.
Turn the power switch on (READY).
Move the shift lever to D while depressing the brake pedal with your left foot and repeat the following steps for 1 minute or more.
- HINT:
-
Depress and release the accelerator pedal in 5-second intervals (2.5 seconds each) continuously.
While depressing the brake pedal with your left foot, depress the accelerator pedal with your right foot.
Release the accelerator pedal.
Turn the power switch off.
- Result:
Proceed to NEXT
NEXT
Connect the GTS to the DLC3.
Turn the power switch on (IG).
Enter the following menus: Powertrain / Hybrid Control / Trouble Codes.
Check for DTCs.
- Powertrain > Hybrid Control > Trouble Codes
- 50001 397
- Result:
Result Proceed to P0ABF00 is not output. A P0ABF00 is output again. B
Turn the power switch off.
A
B
- CAUTION:
-
Be sure to wear insulated gloves and protective goggles.
Check that the service plug grip is not installed.
- NOTICE:
-
After removing the service plug grip, do not turn the power switch on (READY), unless instructed by the repair manual because this may cause a malfunction.
Disconnect the A No. 1 HV supply stack sub-assembly connector.
- NOTICE:
-
Before disconnecting the connector, check that it is not loose or disconnected.
Check the terminals of the male side of the A No. 1 HV supply stack sub-assembly connector.
- OK:
The terminals are free of foreign matter and not damaged.
- Result:
Proceed to OK NG
Reconnect the A No. 1 HV supply stack sub-assembly connector.
Install the upper No. 1 HV battery hose.
OK
NG
- CAUTION:
-
Be sure to wear insulated gloves and protective goggles.
Check that the service plug grip is not installed.
- NOTICE:
-
After removing the service plug grip, do not turn the power switch on (READY), unless instructed by the repair manual because this may cause a malfunction.
Disconnect the A No. 1 HV supply stack sub-assembly connector.
- NOTICE:
-
Before disconnecting the connector, check that it is not loose or disconnected.
Check the terminals of the male side of the A No. 1 HV supply stack sub-assembly connector.
- OK:
The terminals are free of foreign matter and not damaged.
- Result:
Proceed to OK NG
Reconnect the A No. 1 HV supply stack sub-assembly connector.
Install the upper No. 1 HV battery hose.
OK
NG