MAINTENANCE REAR DISC BRAKE PAD INSTALLATION
CAUTION / NOTICE / HINT
- NOTICE:
- ·
Immediately after installing the brake pads, the braking performance may be reduced. Always perform a road test in a safe place while paying attention to the surroundings.
·After replacing the rear disc brake pads, the brake pedal may feel soft due to clearance between the rear disc brake pads and rear disc. Depress the brake pedal several times until the brake pedal feels firm.
·After replacing the rear disc brake pads, always perform a road test to check the braking performance and check for vibrations.
·When the brake pedal is first depressed after replacing the brake pads or pushing back the brake caliper piston, C140000 (oil pressure leak malfunction) or C140A00 (adjustment pressure reservoir leak malfunction) may be output due to the large clearance between the brake pads and disc rotor.In this case, clear the DTCs after work is complete. (for HV Model)
·While the auxiliary battery is connected, even if the power switch is off, the brake control system activates when the brake pedal is depressed or any door courtesy switch turns on. Therefore, when servicing the brake system components, do not operate the brake pedal or open/close the doors while the auxiliary battery is connected. (for HV Model)
- HINT:
- ·
Use the same procedure for the RH side and LH side.
·The following procedure is for the LH side.
PROCEDURE

 04946
1.INSTALL REAR DISC BRAKE ANTI-SQUEAL SHIM KIT
04946
1.INSTALL REAR DISC BRAKE ANTI-SQUEAL SHIM KIT
- NOTICE:
- ·
When replacing worn rear disc brake pads, the rear disc brake anti-squeal shims and rear disc brake pad wear indicator plates must be replaced together with the rear disc brake pads.
·Install each rear disc brake pad wear indicator plate in the correct position and direction.
·Install the rear disc brake anti-squeal shims in the correct positions and directions.
·Do not apply disc brake grease to the lining surface of the rear disc brake pad.
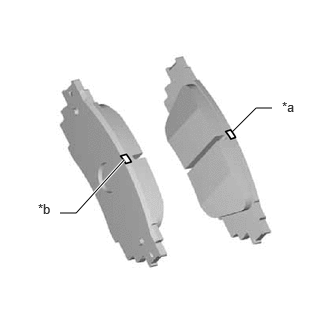
| *a | Inner Side (Yellow) |
| *b | Outer Side (Blue) |
Check the rear disc brake pad.
- HINT:
-
If the rear disc brake pad has an identification mark, be sure to confirm the installation location.

|
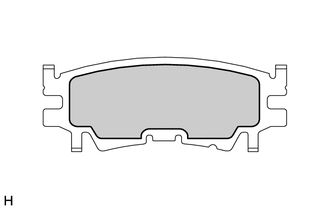
Disc Brake Grease |
Apply disc brake grease to the inner side of the rear disc brake anti-squeal shim as shown in the illustration.
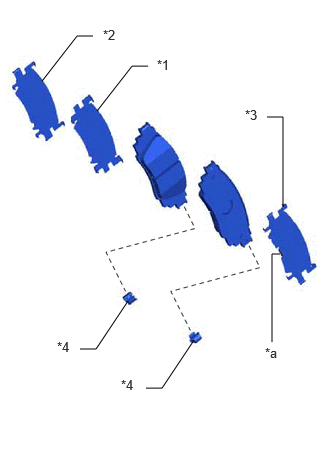
| *1 | Rear No. 1 Disc Brake Anti-squeal Shim |
| *2 | Rear No. 2 Disc Brake Anti-squeal Shim |
| *3 | Rear Disc Brake Anti-squeal Shim |
| *4 | Rear Disc Brake Pad Wear Indicator Plate |
| *a | claw |
Install the rear No. 1 disc brake anti-squeal shim to the rear disc brake pad (inside and outside).
Install the rear No. 2 disc brake anti-squeal shim to the rear disc brake pad (inside and outside).
Install the rear disc brake anti-squeal shim to the rear disc brake pad (outside).
- NOTICE:
-
Install the rear disc brake anti-squeal shim so that its claws are toward the outside of the vehicle.
Install a new rear disc brake pad wear indicator plate to each rear disc brake pad.
04466
2.INSTALL REAR DISC BRAKE PAD
- CAUTION:
-
- ·
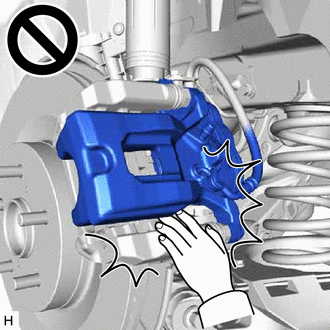
Be careful not to get pinched by the rear disc brake cylinder assembly or other parts when installing the rear disc brake pads.
·After lifting up the rear disc brake cylinder assembly, secure it in place before performing any work on it.
·The rear disc brake cylinder assembly could fall, pinching hands or fingers and causing injury.
Push in the rear disc brake piston.
- NOTICE:
- ·
Make sure the brake fluid does not overflow from the reservoir.
·Do not forcibly push in the rear disc brake piston.
Install the 2 rear disc brake pads to the rear disc brake cylinder mounting.
- NOTICE:
- ·
Keep the friction surfaces of the rear disc brake pads and rear disc free from oil and grease.
·Install the rear disc brake pad so that the rear disc brake pad wear indicator plate is mounted on the lower side of the vehicle.
- HINT:
-
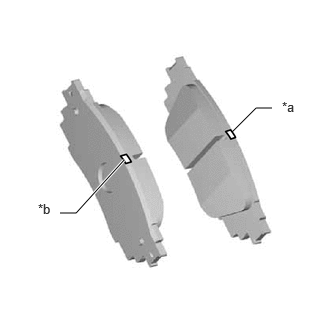 2.417,1.375 2.667,1.125 2.667,1.125 2.833,1.125 false 0.625,2.219 0.792,2.219 0.792,2.219 1.292,1.667 true 2.938,1.031 3.26,1.281 0.323,0.25 10 false *a 0.396,2.094 0.719,2.365 0.323,0.271 10 false *b
*a Inner Side (Yellow) *b Outer Side (Blue)
-
If the rear disc brake pad has an identification mark, be sure to confirm the installation location.
Hold the rear No. 1 disc brake cylinder slide pin and install the rear disc brake cylinder assembly to the rear disc brake cylinder mounting with a new bolt.
- Torque:
- 34.3 N*m (350 kgf*cm, 25 ft.*lbf)
Depress the brake pedal several times. (for Gasoline Model)
890C0A
3.CONNECT NO. 2 PARKING BRAKE WIRE ASSEMBLY
4.CONNECT CABLE TO NEGATIVE AUXILIARY BATTERY TERMINAL (for HV Model)
5.INSPECT BRAKE FLUID LEVEL IN RESERVOIR
6.INSTALL REAR WHEEL
7. NORMAL CONDITION RECOVERY
8. INITIALIZATION AFTER RECONNECTING AUXILIARY BATTERY TERMINAL (for HV Model)
- HINT:
-
When disconnecting and reconnecting the auxiliary battery, there is an automatic learning function that completes learning when the respective system is used.