REAR SUSPENSION REAR COIL SPRING INSTALLATION
CAUTION / NOTICE / HINT
- HINT:
- ·
Use the same procedure for the RH side and LH side.
·The following procedure is for the LH side.
PROCEDURE

 48259A
1.INSTALL REAR UPPER COIL SPRING INSULATOR
48259A
1.INSTALL REAR UPPER COIL SPRING INSULATOR
Install the rear upper coil spring insulator to the vehicle.
48258C
2.INSTALL REAR LOWER COIL SPRING INSULATOR
Install the rear lower coil spring insulator to the rear No. 2 suspension arm assembly.
48231B
3.INSTALL REAR COIL SPRING
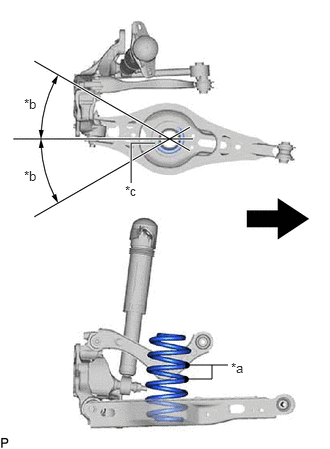
| *a | Identification Mark |
| *b | 30° or less |
| *c | Lower End of Rear Coil Spring |

|
Inner Side of the Vehicle |
Set the rear coil spring to the rear No. 2 suspension arm assembly.
- NOTICE:
- ·
Set the rear coil spring so that its lower end is within the range shown in the illustration.
·Set the rear coil spring so that the identification mark is positioned as shown in the illustration.
·The smaller diameter end must face upward.
Using a jack and wooden block, slowly jack up the rear No. 2 suspension arm assembly and then install the rear No. 2 suspension arm assembly to the rear axle carrier sub-assembly with the bolt and nut.
- CAUTION:
-
Do not jack up the rear No. 2 suspension arm assembly too high as the vehicle may fall.
- NOTICE:
- ·
Because the nut has its own stopper, do not turn the nut. Tighten the bolt with the nut secured.
·When jacking up the rear No. 2 suspension arm assembly, be sure to jack it up slowly.
·Make sure to perform this operation with the vehicle kept as low as possible.
·Insert the bolt with the threaded end facing the front of the vehicle.
4.STABILIZE SUSPENSION
48740F
5.INSTALL REAR NO. 2 SUSPENSION ARM ASSEMBLY
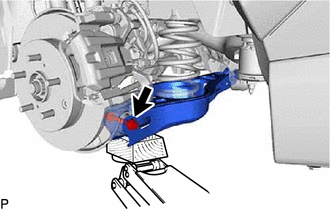
Install the rear No. 2 suspension arm assembly (rear axle carrier sub-assembly side) with the bolt.
- Torque:
- 73 N*m (744 kgf*cm, 54 ft.*lbf)
- NOTICE:
-
Because the nut has its own stopper, do not turn the nut. Tighten the bolt with the nut secured.
48840A
6.INSTALL REAR STABILIZER LINK ASSEMBLY
7.INSTALL REAR WHEEL
48740F
8.INSTALL REAR NO. 2 SUSPENSION ARM ASSEMBLY
Install the rear No. 2 suspension arm assembly (rear suspension member sub-assembly side) with the nut.
9.INSPECT AND ADJUST REAR WHEEL ALIGNMENT