INTERIOR PANELS / TRIM ROOF HEADLINING REASSEMBLY
PROCEDURE

 64714J
1.INSTALL DECK SIDE TRIM COVER RH
64714J
1.INSTALL DECK SIDE TRIM COVER RH
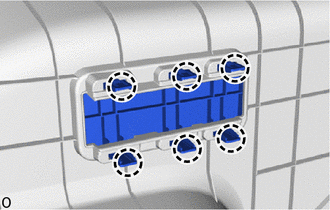
Attach the claw to install the deck side trim cover RH.
86101D
2.INSTALL NO. 3 ANTENNA CORD SUB-ASSEMBLY
82171
3.INSTALL NO. 1 ROOF WIRE
for Normal Roof:
Apply double-sided butyl tape as shown in the illustration.
- HINT:
-
Place the tape securely so that it is not misaligned or peeling.
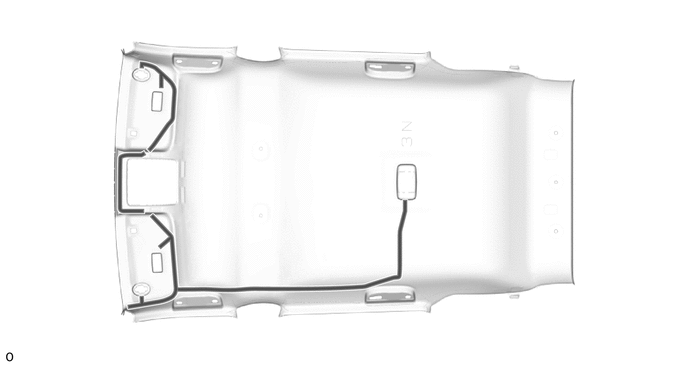

|
Double-sided Butyl Tape | - | - |

|
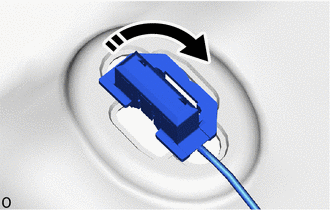
Install in this Direction |
Turn the visor connectors approximately 90° clockwise to install them to the roof headlining.
Attach the No. 1 roof wire to the double-sided butyl tape as shown in the illustration and secure the No. 1 roof wire with pieces of fastening tape.
- HINT:
- ·
Align the positioning tape of the No. 1 roof wire with the protrusion of the roof headlining and wrap fastening tape around them as shown in the part of the illustration labeled (A).
·Secure the No. 1 roof wire so that the positioning tape does not protrude from the cutout of the roof headlining as shown in the part of the illustration labeled (B).
·Adjust the extra length of the No. 1 roof wire in the part of the illustration labeled (C) and apply fastening tape.
·Align the positioning tape of the No. 1 roof wire with the marking on the roof headlining and apply tape as shown in the part of the illustration labeled (D).
·Apply the No. 1 roof wire so that it is securely attached and not twisted.
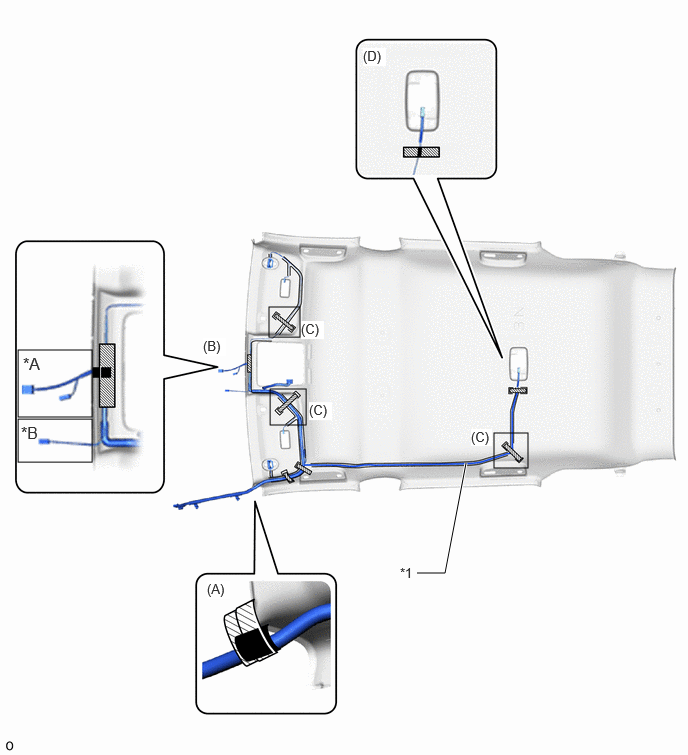
| *A | w/ Pre-collision System | *B | w/ ETC System |
| *1 | No. 1 Roof Wire | - | - |

|
Fastening Tape | 
|
Positioning Tape |
for Moon Roof:
Apply double-sided butyl tape as shown in the illustration.
- HINT:
-
Place the tape securely so that it is not misaligned or peeling.
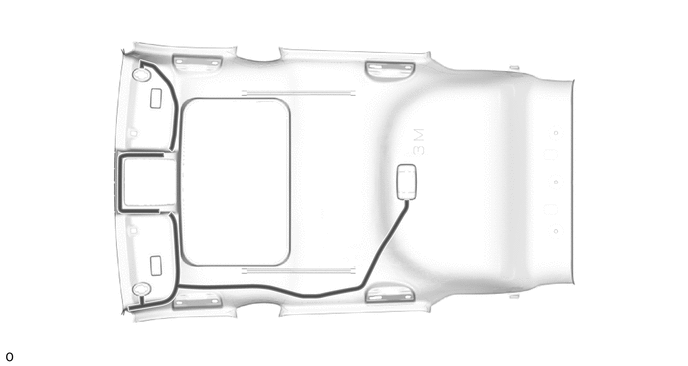
|
|
Double-sided Butyl Tape | - | - |
|
|
Install in this Direction |
Turn the visor connectors approximately 90° clockwise to install them to the roof headlining.
Attach the No. 1 roof wire to the double-sided butyl tape as shown in the illustration and secure the No. 1 roof wire with pieces of fastening tape.
- HINT:
- ·
Align the positioning tape of the No. 1 roof wire with the protrusion of the roof headlining and wrap fastening tape around them as shown in the part of the illustration labeled (A).
·Secure the No. 1 roof wire so that the positioning tape does not protrude from the cutout of the roof headlining as shown in the part of the illustration labeled (B).
·Adjust the extra length of the No. 1 roof wire in the part of the illustration labeled (C) and apply fastening tape.
·Align the positioning tape of the No. 1 roof wire with the marking on the roof headlining and apply tape as shown in the part of the illustration labeled (D).
·Apply the No. 1 roof wire so that it is securely attached and not twisted.
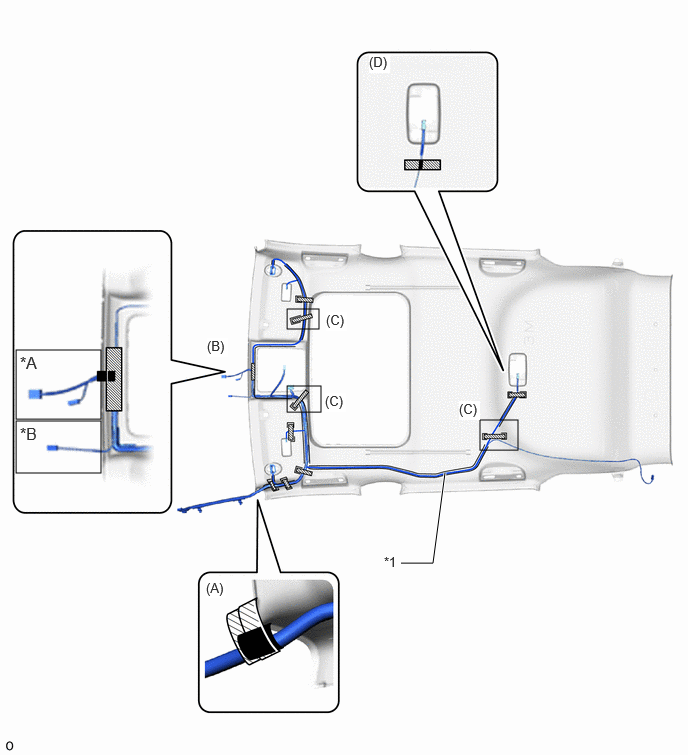
| *A | w/ Pre-collision System | *B | w/ ETC System |
| *1 | No. 1 Roof Wire | - | - |
|
|
Fastening Tape |
|
Positioning Tape |
for Panorama Moon Roof:
Apply double-sided butyl tape as shown in the illustration.
- HINT:
-
Place the tape securely so that it is not misaligned or peeling.
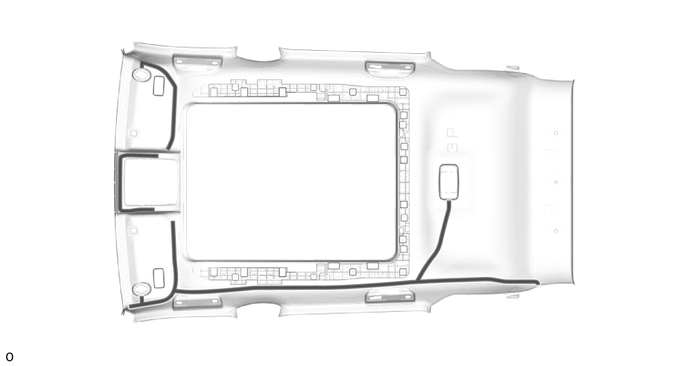
|
|
Double-sided Butyl Tape | - | - |
|
|
Install in this Direction |
Turn the visor connectors approximately 90° clockwise to install them to the roof headlining.
Attach the No. 1 roof wire to the double-sided butyl tape as shown in the illustration and secure the No. 1 roof wire with pieces of fastening tape.
- HINT:
- ·
Align the positioning tape of the No. 1 roof wire with the protrusion of the roof headlining and wrap fastening tape around them as shown in the part of the illustration labeled (A).
·Secure the No. 1 roof wire so that the positioning tape does not protrude from the cutout of the roof headlining as shown in the part of the illustration labeled (B).
·Adjust the extra length of the No. 1 roof wire in the part of the illustration labeled (C) and apply fastening tape.
·Align the positioning tape of the No. 1 roof wire with the marking on the roof headlining and apply tape as shown in the part of the illustration labeled (D).
·Apply the No. 1 roof wire so that it is securely attached and not twisted.

| *A | w/ Digital Inner Mirror | *B | w/ ETC System |
| *1 | No. 1 Roof Wire | - | - |
|
|
Fastening Tape |
|
Positioning Tape |
63354C
4.INSTALL ROOF HEADLINING FRONT SIDE PAD (for Panoramic Moon Roof, SFTM Made)
Remove the release paper from 2 new roof headlining front side pads.
- HINT:
-
After removing the release paper, keep the exposed adhesive free from foreign matter.
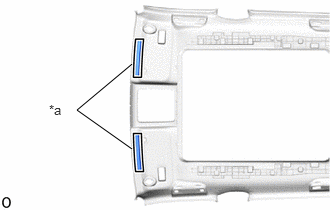
| *a | Marking |
Align the 2 roof headlining front side pads with the markings on the roof headlining assembly and install them as shown in the illustration.
63355C
5.INSTALL ROOF HEADLINING PAD RH (for Panoramic Moon Roof, SFTM Made)
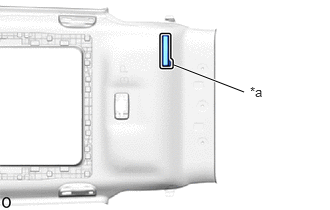
| *a | Marking |
Align the markings on the roof headlining assembly with the roof headlining pad RH and install them using hot-melt glue as shown in the illustration.
63356B
6.INSTALL ROOF HEADLINING PAD LH (for Panoramic Moon Roof, SFTM Made)
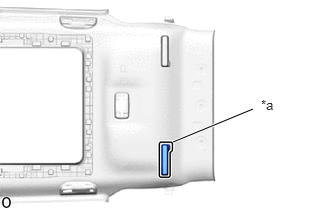
| *a | Marking |
Align the markings on the roof headlining assembly with the roof headlining pad LH and install them using hot-melt glue as shown in the illustration.
63343B
7.INSTALL REAR ROOF SILENCER PAD (for Panoramic Moon Roof, SFTM Made)
Remove the release paper from 2 new rear roof silencer pads.
- HINT:
-
After removing the release paper, keep the exposed adhesive free from foreign matter.
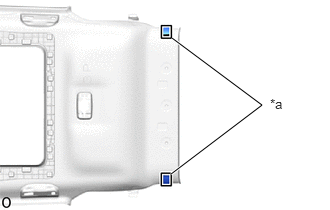
| *a | Marking |
Align the 2 rear roof silencer pads with the markings on the roof headlining assembly and install them as shown in the illustration.
63354C
8.INSTALL ROOF HEADLINING FRONT SIDE PAD (for Moon Roof, SFTM Made)
Remove the release paper from 2 new roof headlining front side pads.
- HINT:
-
After removing the release paper, keep the exposed adhesive free from foreign matter.
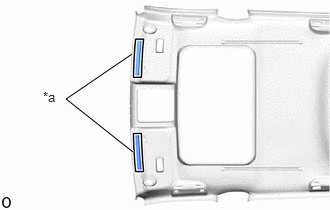
| *a | Marking |
Align the 2 roof headlining front side pads with the markings on the roof headlining assembly and install them as shown in the illustration.
63363
9.INSTALL NO. 3 ROOF HEADLINING SUPPORT (for Moon Roof, SFTM Made)
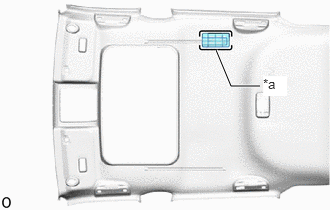
| *a | Marking |
Align the markings on the roof headlining assembly with the No. 3 roof headlining support and install them using hot-melt glue as shown in the illustration.
63364
10.INSTALL NO. 4 ROOF HEADLINING SUPPORT (for Moon Roof, SFTM Made)
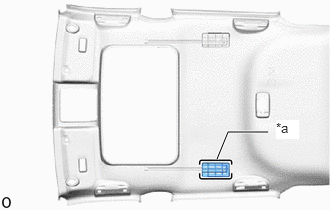
| *a | Marking |
Align the markings on the roof headlining assembly with the No. 4 roof headlining support and install them using hot-melt glue as shown in the illustration.
63361
11.INSTALL NO. 1 ROOF HEADLINING SUPPORT (for Moon Roof, SFTM Made)
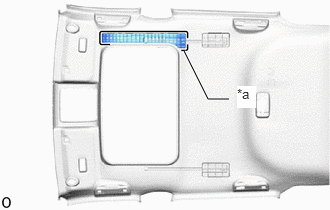
| *a | Marking |
Align the markings on the roof headlining assembly with the No. 1 roof headlining support and install them using hot-melt glue as shown in the illustration.
63362
12.INSTALL NO. 2 ROOF HEADLINING SUPPORT (for Moon Roof, SFTM Made)
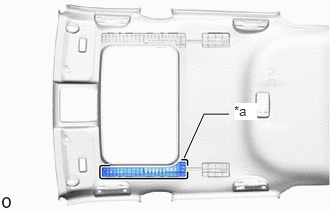
| *a | Marking |
Align the markings on the roof headlining assembly with the No. 2 roof headlining support and install them using hot-melt glue as shown in the illustration.
63355C
13.INSTALL ROOF HEADLINING PAD RH (for Moon Roof, SFTM Made)
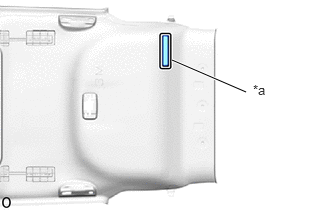
| *a | Marking |
Align the markings on the roof headlining assembly with the roof headlining pad RH and install them using hot-melt glue as shown in the illustration.
63356B
14.INSTALL ROOF HEADLINING PAD LH (for Moon Roof, SFTM Made)
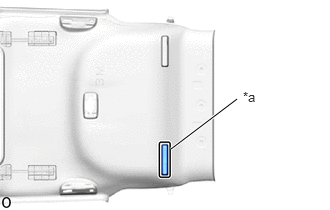
| *a | Marking |
Align the markings on the roof headlining assembly with the roof headlining pad LH and install them using hot-melt glue as shown in the illustration.
63343B
15.INSTALL REAR ROOF SILENCER PAD (for Moon Roof, SFTM Made)
Remove the release paper from 2 new rear roof silencer pads.
- HINT:
-
After removing the release paper, keep the exposed adhesive free from foreign matter.
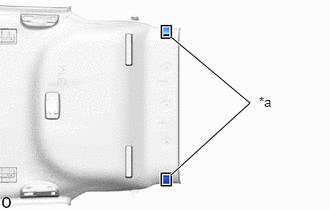
| *a | Marking |
Align the 2 rear roof silencer pads with the markings on the roof headlining assembly and install them as shown in the illustration.
63341
16.INSTALL NO. 1 ROOF SILENCER PAD (for Moon Roof, SFTM Made)
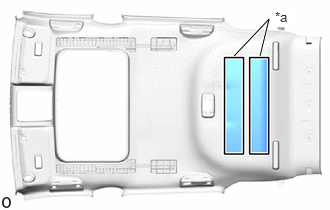
| *a | Marking |
Align 2 new No. 1 roof silencer pads with the silencer marking on the roof headlining assembly and install the 2 No. 1 roof silencer pads using hot-melt glue as shown in the illustration.
63352A
17.INSTALL NO. 11 ROOF SILENCER PAD (for Normal Roof, SFTM Made)
Remove the release paper from new No. 11 roof silencer pad.
- HINT:
-
After removing the release paper, keep the exposed adhesive free from foreign matter.
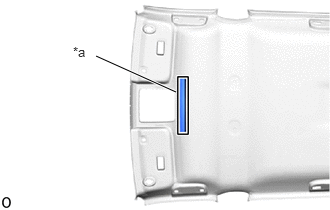
| *a | Marking |
Align the No. 11 roof silencer pad with the markings on the roof headlining assembly and install them as shown in the illustration.
63351A
18.INSTALL NO. 10 ROOF SILENCER PAD (for Normal Roof, SFTM Made)
Remove the release paper from 2 new No. 10 roof silencer pads.
- HINT:
-
After removing the release paper, keep the exposed adhesive free from foreign matter.
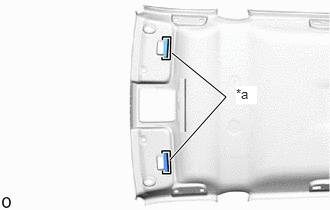
| *a | Marking |
Align the 2 No. 10 roof silencer pads with the markings on the roof headlining assembly and install them as shown in the illustration.
63354C
19.INSTALL ROOF HEADLINING FRONT SIDE PAD (for Normal Roof, SFTM Made)
Remove the release paper from 2 new roof headlining front side pads.
- HINT:
-
After removing the release paper, keep the exposed adhesive free from foreign matter.
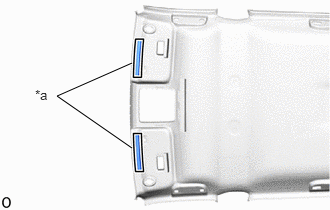
| *a | Marking |
Align the 2 roof headlining front side pads with the markings on the roof headlining assembly and install them as shown in the illustration.
63355C
20.INSTALL ROOF HEADLINING PAD RH (for Normal Roof, SFTM Made)
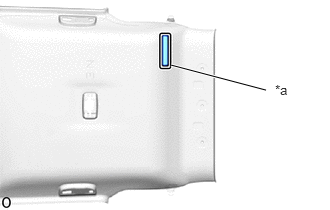
| *a | Marking |
Align the markings on the roof headlining assembly with the roof headlining pad RH and install them using hot-melt glue as shown in the illustration.
63356B
21.INSTALL ROOF HEADLINING PAD LH (for Normal Roof, SFTM Made)
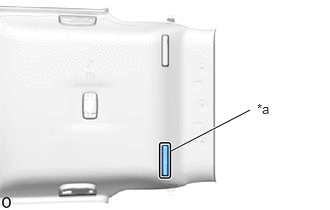
| *a | Marking |
Align the markings on the roof headlining assembly with the roof headlining pad LH and install them using hot-melt glue as shown in the illustration.
63361
22.INSTALL NO. 1 ROOF HEADLINING SUPPORT (for Normal Roof, SFTM Made)
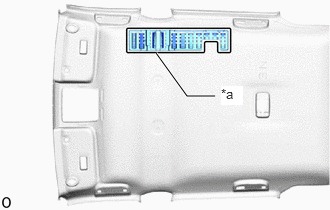
| *a | Marking |
Align the markings on the roof headlining assembly with the No. 1 roof headlining support and install them using hot-melt glue as shown in the illustration.
63362
23.INSTALL NO. 2 ROOF HEADLINING SUPPORT (for Normal Roof, SFTM Made)
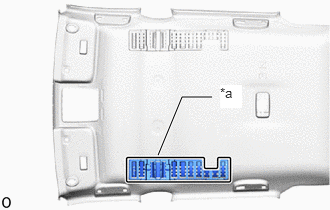
| *a | Marking |
Align the markings on the roof headlining assembly with the No. 2 roof headlining support and install them using hot-melt glue as shown in the illustration.
63343B
24.INSTALL REAR ROOF SILENCER PAD (for Normal Roof, SFTM Made)
Remove the release paper from 2 new rear roof silencer pads.
- HINT:
-
After removing the release paper, keep the exposed adhesive free from foreign matter.
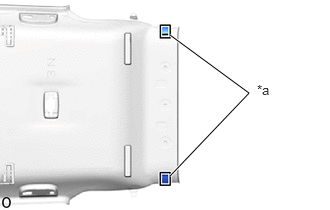
| *a | Marking |
Align the 2 rear roof silencer pads with the markings on the roof headlining assembly and install them as shown in the illustration.
63341
25.INSTALL NO. 1 ROOF SILENCER PAD (for Normal Roof, SFTM Made)
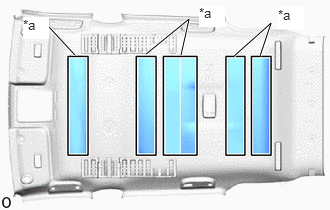
| *a | Marking |
Align 6 new No. 1 roof silencer pads with the silencer marking on the roof headlining assembly and install the 6 No. 1 roof silencer pads using hot-melt glue as shown in the illustration.
81340
26.INSTALL VANITY LIGHT ASSEMBLY