SEAT REAR SEAT ASSEMBLY(for GTMC Made) REMOVAL
CAUTION / NOTICE / HINT
- CAUTION:
- ·
Wear protective gloves. Sharp areas on the parts may injure your hands.
·There is risk of injury.
PROCEDURE

 58410B
1.REMOVE DECK BOARD ASSEMBLY
58410B
1.REMOVE DECK BOARD ASSEMBLY
58416K
2.REMOVE REAR NO. 2 FLOOR BOARD
58417H
3.REMOVE REAR NO. 3 FLOOR BOARD
58386
4.REMOVE REAR FLOOR FINISH PLATE
71940A
5.REMOVE REAR SEAT HEADREST ASSEMBLY
Remove the 2 rear seat headrest assemblies.
71960B
6.REMOVE REAR CENTER SEAT HEADREST ASSEMBLY
Remove the rear center seat headrest assembly.
7.REMOVE BENCH TYPE REAR SEAT CUSHION ASSEMBLY
for Gasoline Model:
Place your hand in the position beside the hook as shown in the illustration and lift the front end of bench type rear seat cushion assembly in the removal direction to detach the cushion wire on the front of bench type rear seat cushion assembly from the rear seat cushion lock hook.
- NOTICE:
- ·
Be sure to detach the hook on the front of bench type rear seat cushion assembly one at a time.
·If the hook on the front of bench type rear seat cushion assembly is detached, replace the rear seat cushion lock hook with a new one.
·Be sure to hold the parts of the bench type rear seat cushion assembly directly next to the bench type rear seat cushion frame hooks when lifting it. Lifting a different part of the cushion may deform the rear seat cushion frame.
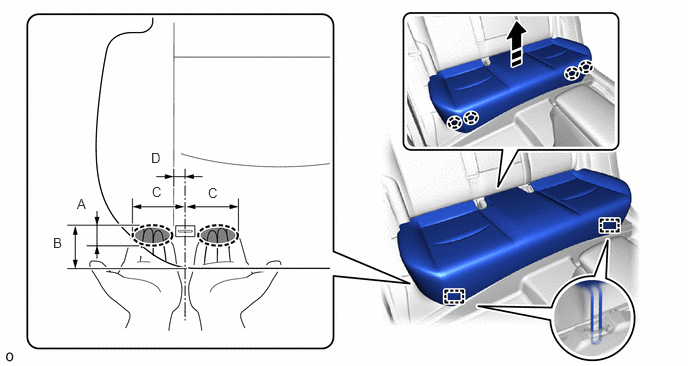

|
Place Hand Here | 
|
Remove in this Direction |
- Dimensions:
Area Measurement Area Measurement A 30 mm (1.18 in.) B 60 mm (2.36 in.) C 80 mm (3.15 in.) D 18 mm (0.71 in.)
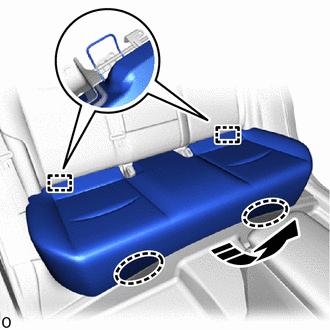
|
|
Place Hand Here |
|
|
Remove in this Direction |
Place your hand in the position shown in the illustration and pull in the removal direction to detach the hook on the rear end of bench type rear seat cushion assembly.
Remove the bench type rear seat cushion assembly.
- NOTICE:
-
Be careful not to damage the bench type rear seat cushion assembly, body exterior or interior parts.
for HV Model:
Place your hand in the position beside the hook as shown in the illustration and lift the front end of bench type rear seat cushion assembly in the removal direction to detach the cushion wire on the front of bench type rear seat cushion assembly from the rear seat cushion lock hook.
- NOTICE:
- ·
Be sure to detach the hook on the front of bench type rear seat cushion assembly one at a time.
·If the hook on the front of bench type rear seat cushion assembly is detached, replace the rear seat cushion lock hook with a new one.
·Be sure to hold the parts of the bench type rear seat cushion assembly directly next to the bench type rear seat cushion frame hooks when lifting it. Lifting a different part of the cushion may deform the rear seat cushion frame.
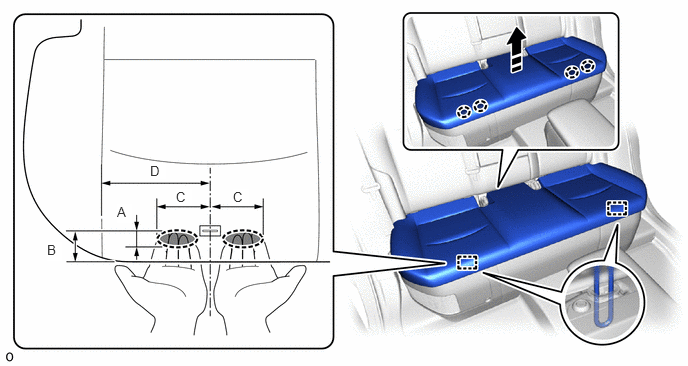
|
|
Place Hand Here |
|
Remove in this Direction |
- Dimensions:
Area Measurement Area Measurement A 30 mm (1.18 in.) B 60 mm (2.36 in.) C 80 mm (3.15 in.) D 160 mm (6.30 in.)
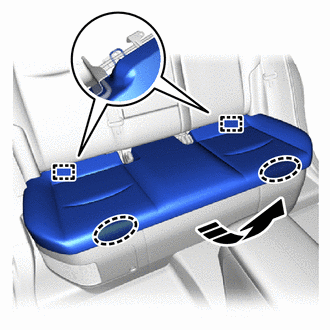
|
|
Place Hand Here |
|
|
Remove in this Direction |
Place your hand in the position shown in the illustration and pull in the removal direction to detach the cushion wire on the rear end of bench type rear seat cushion assembly.
Remove the bench type rear seat cushion assembly.
- NOTICE:
-
Be careful not to damage the bench type rear seat cushion assembly, body exterior or interior parts.
72693
8.REMOVE REAR SEAT CUSHION LOCK HOOK
- NOTICE:
- ·
If the hook on the front of the bench type rear seat cushion assembly is detached, replace the rear seat cushion lock hook with a new one.
·Do not reuse the removed rear seat cushion lock hook.
- HINT:
-
Use the same procedure for the 2 parts.
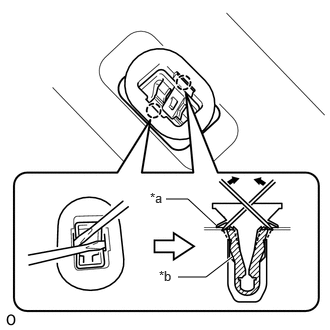
| *a | Body |
| *b | Sleeve |
Insert 2 thin-bladed screwdrivers between the rear seat cushion lock hook sleeve and body as shown in the illustration.
Pull up the 2 thin-bladed screwdrivers to detach the claw and remove the rear seat cushion lock hook.
9.REMOVE REAR SEATBACK ASSEMBLY LH
Fold the rear seatback assembly LH forward.
- NOTICE:
-
When folding down the rear seatback assembly LH make sure that the rear seatback assembly LH does not contact the body.
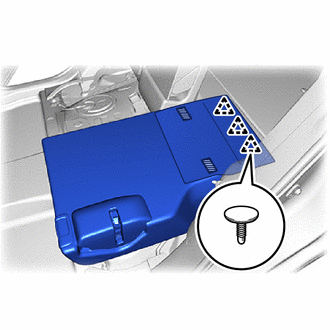

|
Fastening tape |
Detach the clip.
Detach the fastening tape.
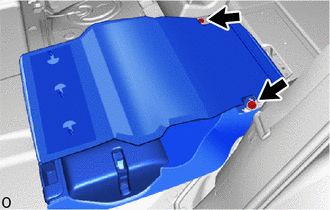
Remove the 2 bolts.
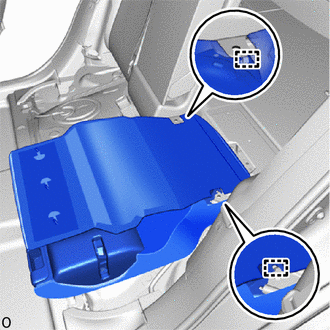
Detach the guide and remove the rear seatback assembly LH.
- NOTICE:
-
Be careful not to damage the rear seatback assembly LH, body exterior or interior parts.
73350C
10.REMOVE REAR CENTER SEAT OUTER BELT ASSEMBLY (FLOOR ANCHOR)
11.REMOVE REAR SEATBACK ASSEMBLY RH
Fold the rear seatback assembly RH forward.
- NOTICE:
-
When folding down the rear seatback assembly RH make sure that the rear seatback assembly RH does not contact the body.
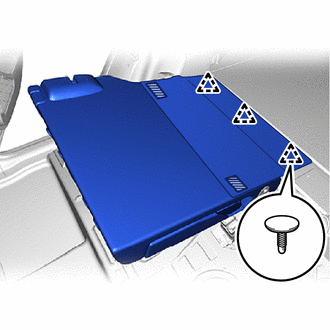
|
|
Fastening tape |
Detach the clip.
Detach the fastening tape.
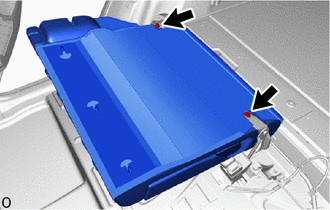
Remove the 2 bolts.
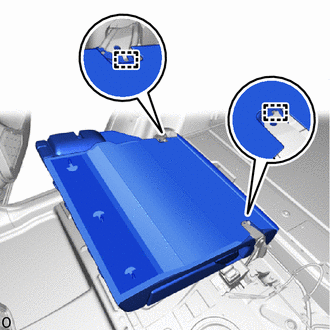
Detach the guide and remove the rear seatback assembly RH.
- NOTICE:
-
Be careful not to damage the rear seatback assembly RH, body exterior or interior parts.
71305A
12.REMOVE REAR CENTER SEATBACK HINGE SUB-ASSEMBLY
- HINT:
-
Perform this procedure when replacing the rear center seatback hinge sub-assembly.
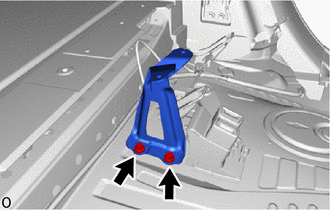
Remove the 2 bolts and rear center seatback hinge sub-assembly.
71304C
13.REMOVE REAR SEATBACK HINGE SUB-ASSEMBLY LH
- HINT:
-
Perform this procedure when replacing the rear seatback hinge sub-assembly LH.
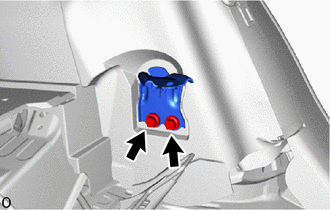
Remove the 2 bolts and rear seatback hinge sub-assembly LH.
71303C
14.REMOVE REAR SEATBACK HINGE SUB-ASSEMBLY RH
- HINT:
- ·
Perform this procedure when replacing the rear seatback hinge sub-assembly RH.
·Use the same procedure described for the LH side.
67918E
15.REMOVE REAR DOOR SCUFF PLATE LH
- HINT:
-
Perform this procedure when replacing the rear seat cushion leg sub-assembly.
67917C
16.REMOVE REAR DOOR SCUFF PLATE RH
- HINT:
- ·
Perform this procedure when replacing the rear seat cushion leg sub-assembly.
·Use the same procedure described for the LH side.
58467H
17.REMOVE NO. 3 BATTERY SERVICE COVER BOARD (for HV Model)
- HINT:
-
Perform this procedure when replacing the rear seat cushion leg sub-assembly.
58466J
18.REMOVE NO. 2 BATTERY SERVICE COVER BOARD (for HV Model)
- HINT:
-
Perform this procedure when replacing the rear seat cushion leg sub-assembly.
58464D
19.REMOVE BATTERY SERVICE COVER BOARD (for HV Model)
- HINT:
-
Perform this procedure when replacing the rear seat cushion leg sub-assembly.
71033
20.REMOVE REAR SEAT CUSHION LEG SUB-ASSEMBLY (for HV Model)
- HINT:
-
Perform this procedure when replacing the rear seat cushion leg sub-assembly.
|
|
Remove in this Direction |
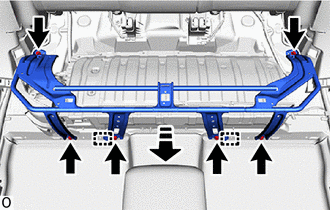
Remove the 6 bolts.
Detach the guide and remove the rear seat cushion leg sub-assembly.
58577E
21.REMOVE REAR NO. 1 FLOOR MAT SUPPORT SIDE PLATE
- HINT:
-
Perform this procedure when replacing the rear seatback lock striker sub-assembly LH and rear seatback lock striker sub-assembly RH.
62332C
22.REMOVE REAR DOOR OPENING TRIM WEATHERSTRIP LH
- HINT:
- ·
Perform this procedure when replacing the rear seatback lock striker sub-assembly LH.
·Pull back the rear door opening trim weatherstrip LH so that the deck trim side panel assembly LH can be removed.
62331C
23.REMOVE REAR DOOR OPENING TRIM WEATHERSTRIP RH
- HINT:
- ·
Perform this procedure when replacing the rear seatback lock striker sub-assembly RH.
·Use the same procedure described for the LH side.
·Pull back the rear door opening trim weatherstrip RH so that the deck trim side panel assembly RH can be removed.
62552F
24.REMOVE REAR SEAT SIDE GARNISH LH
- HINT:
-
Perform this procedure when replacing the rear seatback lock striker sub-assembly LH.
62551F
25.REMOVE REAR SEAT SIDE GARNISH RH
- HINT:
- ·
Perform this procedure when replacing the rear seatback lock striker sub-assembly RH.
·Use the same procedure described for the LH side.
73708A
26.REMOVE TETHER ANCHOR BRACKET SET
- HINT:
-
Perform this procedure when replacing the rear seatback lock striker sub-assembly LH and rear seatback lock striker sub-assembly RH.
58460D
27.REMOVE LUGGAGE HOLD BELT STRIKER ASSEMBLY
- HINT:
-
Perform this procedure when replacing the rear seatback lock striker sub-assembly LH and rear seatback lock striker sub-assembly RH.
64740E
28.REMOVE DECK TRIM SIDE PANEL ASSEMBLY LH
- HINT:
-
Perform this procedure when replacing the rear seatback lock striker sub-assembly LH.
64730J
29.REMOVE DECK TRIM SIDE PANEL ASSEMBLY RH
- HINT:
-
Perform this procedure when replacing the rear seatback lock striker sub-assembly RH.
72602A
30.REMOVE REAR SEATBACK LOCK STRIKER SUB-ASSEMBLY LH
- HINT:
-
Perform this procedure when replacing the rear seatback lock striker sub-assembly LH.
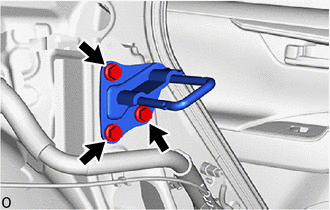
Remove the 3 bolts and rear seatback lock striker sub-assembly LH.
72601A
31.REMOVE REAR SEATBACK LOOK STRIKER SUB-ASSEMBLY RH
- HINT:
- ·
Perform this procedure when replacing the rear seatback lock striker sub-assembly RH.
·Use the same procedure described for the LH side.