AXLE AND DIFFERENTIAL REAR DIFFERENTIAL SIDE GEAR SHAFT OIL SEAL(for Torque Vectoring Differential) REPLACEMENT
CAUTION / NOTICE / HINT
- HINT:
- ·
Use the same procedure for the RH and LH side.
·The following procedure is for the LH side.
PROCEDURE

 42330
1.REMOVE REAR DRIVE SHAFT ASSEMBLY LH
42330
1.REMOVE REAR DRIVE SHAFT ASSEMBLY LH
41330M
2.REMOVE TRANSMISSION COUPLING DUST SEAL
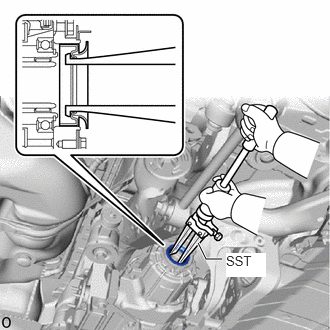
Using SST, tap out the transmission coupling dust seal.
- SST
- 09308-00010
- NOTICE:
-
Be careful not to damage the electro magnetic control coupling sub-assembly.
3.REMOVE TORQUE VECTORING DIFFERENTIAL CARRIER ASSEMBLY
31364D
4.REMOVE CLUTCH CONTROL SOLENOID WIRE
5.REMOVE WIRE HARNESS CLAMP BRACKET
41173
6.REMOVE DIFFERENTIAL DISCONNECT COVER
41173A
7.REMOVE NO. 2 DIFFERENTIAL DISCONNECT COVER
8.REMOVE ELECTRO MAGNETIC CONTROL COUPLING SUB-ASSEMBLY (for LH Side)
9.REMOVE ELECTRO MAGNETIC CONTROL COUPLING SUB-ASSEMBLY (for RH Side)
- HINT:
-
Perform the same procedure as for the LH side.
10.SECURE TORQUE VECTORING DIFFERENTIAL CARRIER ASSEMBLY
41201C
11.REMOVE REAR DIFFERENTIAL CARRIER OIL SEAL (for LH Side)
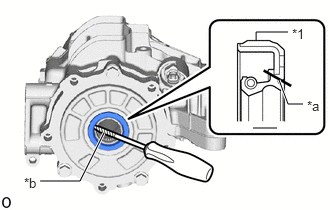
| *1 | Rear Differential Carrier Oil Seal |
| *a | Cut Position |
| *b | Protective Tape |
Using a knife, cut off the lip of the rear differential carrier oil seal.
Using a screwdriver with its tip wrapped with protective tape, pry out the rear differential carrier oil seal.
- NOTICE:
-
Be careful not to damage the rear differential carrier assembly.
41201C
12.REMOVE REAR DIFFERENTIAL CARRIER OIL SEAL (for RH Side)
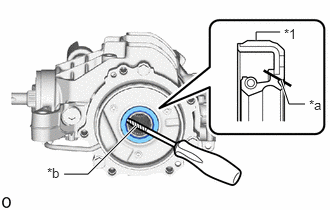
| *1 | Rear Differential Carrier Oil Seal |
| *a | Cut Position |
| *b | Protective Tape |
Using a knife, cut off the lip of the rear differential carrier oil seal.
Using a screwdriver with its tip wrapped with protective tape, pry out the rear differential carrier oil seal.
- NOTICE:
-
Be careful not to damage the rear differential carrier assembly.
41201C
13.INSTALL REAR DIFFERENTIAL CARRIER OIL SEAL (for LH Side)
Coat the lip of a new rear differential carrier oil seal with MP grease.
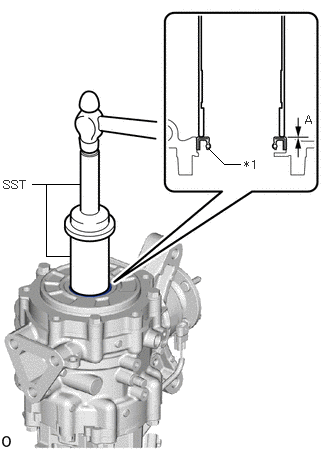
| *1 | Rear Differential Carrier Oil Seal |
Using SST and a hammer, install the rear differential carrier oil seal.
- SST
- 09523-36010
09223-46011
- Standard Distance (A):
-0.5 to 0.5 mm (-0.0197 to 0.0197 in.)
- NOTICE:
- ·
Install the rear differential carrier oil seal uniformly.
·Press fit the rear differential carrier oil seal straight.
·Do not damage the rear differential carrier oil seal.
·Do not excessively press in the rear differential carrier oil seal.
·Make sure to install the rear differential carrier oil seal as specified, otherwise a malfunction such as an oil leak may occur.
41201C
14.INSTALL REAR DIFFERENTIAL CARRIER OIL SEAL (for RH Side)
Coat the lip of a new rear differential carrier oil seal with MP grease.
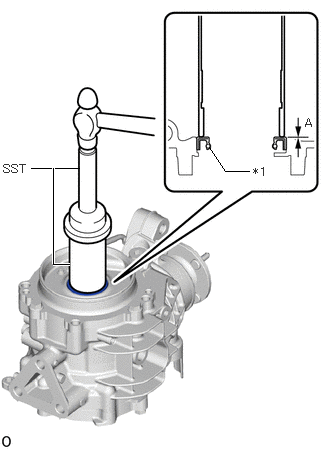
| *1 | Rear Differential Carrier Oil Seal |
Using SST and a hammer, install the rear differential carrier oil seal.
- SST
- 09523-36010
09223-46011
- Standard Distance (A):
-0.5 to 0.5 mm (-0.0197 to 0.0197 in.)
- NOTICE:
- ·
Install the rear differential carrier oil seal uniformly.
·Press fit the rear differential carrier oil seal straight.
·Do not damage the rear differential carrier oil seal.
·Do not excessively press in the rear differential carrier oil seal.
·Make sure to install the rear differential carrier oil seal as specified, otherwise a malfunction such as an oil leak may occur.
15.INSTALL ELECTRO MAGNETIC CONTROL COUPLING SUB-ASSEMBLY (for LH Side)
16.INSTALL ELECTRO MAGNETIC CONTROL COUPLING SUB-ASSEMBLY (for RH Side)
- HINT:
-
Perform the same procedure as for the LH side.
41173A
17.INSTALL NO. 2 DIFFERENTIAL DISCONNECT COVER
41173
18.INSTALL DIFFERENTIAL DISCONNECT COVER
19.INSTALL WIRE HARNESS CLAMP BRACKET
31364D
20.INSTALL CLUTCH CONTROL SOLENOID WIRE
21.INSTALL TORQUE VECTORING DIFFERENTIAL CARRIER ASSEMBLY
41330M
22.INSTALL TRANSMISSION COUPLING DUST SEAL
Coat the lip of a new transmission coupling dust seal with MP grease.
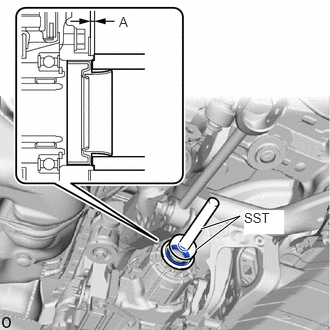
Using SST and a hammer, install the transmission coupling dust seal to the electro magnetic control coupling sub-assembly.
- SST
- 09316-10010
09950-70010 (09951-07150)
- Standard Distance (A):
2.0 to 2.8 mm (0.0788 to 0.1102 in.)
- NOTICE:
- ·
Install the transmission coupling dust seal uniformly.
·Press fit the transmission coupling dust seal straight.
·Do not damage the transmission coupling dust seal.
·Do not excessively press in the transmission coupling dust seal.
·Make sure to install the transmission coupling dust seal as specified, otherwise a malfunction such as an oil leak may occur.
42330
23.INSTALL REAR DRIVE SHAFT ASSEMBLY LH