M20D-FKS EMISSION CONTROL CANISTER REMOVAL
CAUTION / NOTICE / HINT
The necessary procedures (adjustment, calibration, initialization or registration) that must be performed after parts are removed and installed, or replaced during canister (charcoal canister assembly) removal/installation are shown below.
| Replaced Part or Performed Procedure | Necessary Procedure | Effect/Inoperative Function when Necessary Procedure not Performed | Link |
|---|---|---|---|
| Gas leak from exhaust system is repaired | Inspection After Repair | ·
Poor idle, etc. ·
Engine start function, etc. |
( 201910,202304,_51,_083058,_0401834,RM100000001JDW3,202304,202409,_51,_083058,_0401834,RM1000000029C6V,202409,999999,_51,_083058,_0401834,RM100000002NA8M,) 201910,202304,_51,_083058,_0401834,RM100000001JDW3,202304,202409,_51,_083058,_0401834,RM1000000029C6V,202409,999999,_51,_083058,_0401834,RM100000002NA8M,)
|
PROCEDURE

 58166A
1.REMOVE FRONT FLOOR COVER LH
58166A
1.REMOVE FRONT FLOOR COVER LH
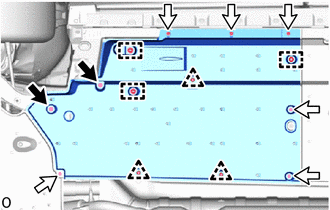

|
Bolt |

|
Screw |
Remove the 2 bolts, 6 screws and 3 clips.
Detach the 3 clamps and remove the front floor cover LH.
77740
2.REMOVE CANISTER (CHARCOAL CANISTER ASSEMBLY)
Detach the clamp and disconnect the fuel tank vent hose from the canister (charcoal canister assembly).
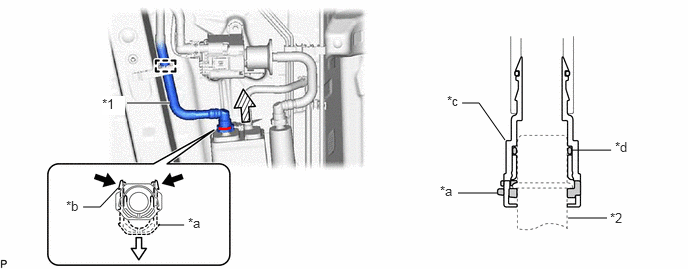
| *1 | Fuel Tank Vent Hose | *2 | Pipe (Canister (Charcoal Canister Assembly)) |
| *a | Retainer | *b | Tab |
| *c | Tube Connector | *d | O-ring |
|
|
Pinch |
|
Pull |

|
Pull off | - | - |
- NOTICE:
- ·
Remove any dirt or foreign matter on the tube connector before performing this work.
·Do not allow any scratches or foreign matter to get on the parts when disconnecting them as the tube connector has an O-ring that seals the pipe (canister (charcoal canister assembly)).
·Perform this work by hand. Do not use any tools.
·Do not forcibly bend, twist or turn the fuel tank vent hose.
·Protect the disconnected parts by covering them with plastic bags after disconnecting the fuel tank vent hose.
·If the tube connector and pipe (canister (charcoal canister assembly)) are stuck, push and pull to release them.
- HINT:
-
Do not remove the retainer.
Pinch the tabs of the retainer to disengage the lock claws and pull it down.
Pull off the fuel tank vent hose.
Disconnect the vent line hose from the canister (charcoal canister assembly).
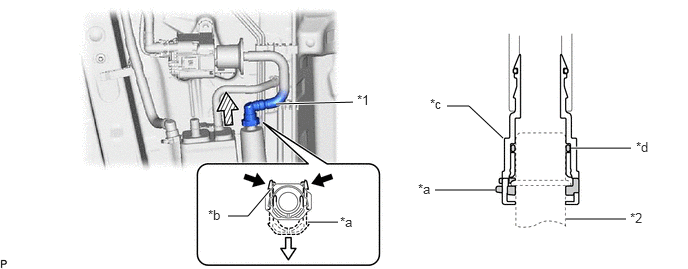
| *1 | Vent Line Hose | *2 | Pipe (Canister (Charcoal Canister Assembly)) |
| *a | Retainer | *b | Tab |
| *c | Tube Connector | *d | O-ring |
|
|
Pinch |
|
Pull |
|
|
Pull off | - | - |
- NOTICE:
- ·
Remove any dirt or foreign matter on the tube connector before performing this work.
·Do not allow any scratches or foreign matter to get on the parts when disconnecting them as the tube connector has an O-ring that seals the pipe (canister (charcoal canister assembly)).
·Perform this work by hand. Do not use any tools.
·Do not forcibly bend, twist or turn the vent line hose.
·Protect the disconnected parts by covering them with plastic bags after disconnecting the vent line hose.
·If the tube connector and pipe (canister (charcoal canister assembly)) are stuck, push and pull to release them.
- HINT:
-
Do not remove the retainer.
Pinch the tabs of the retainer to disengage the lock claws and pull it down.
Pull off the vent line hose.
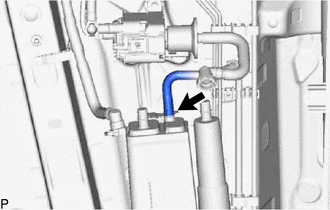
Slide the clip and disconnect the purge line hose from the canister (charcoal canister assembly).
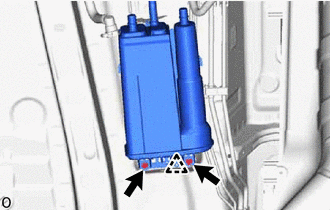
Remove the 2 bolts.
Disengage the clip from the canister (charcoal canister assembly).
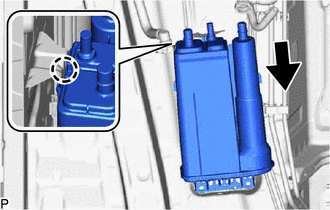
Disengage the claw and remove the canister (charcoal canister assembly) from vehicle body as shown in the illustration.
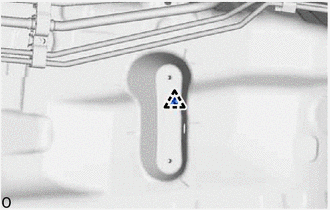
Remove the clip from the vehicle body.
77750
3.REMOVE NO. 2 CHARCOAL CANISTER SUB-ASSEMBLY
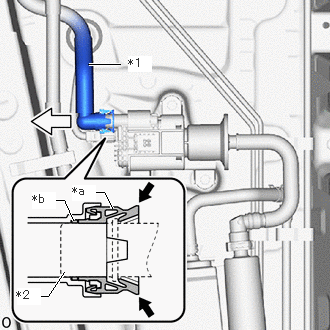
| *1 | Air Line Tube |
| *2 | Pipe (Leak Detection Pump Sub-assembly) |
| *a | Tube Connector |
| *b | O-ring |
|
|
Pinch |
|
|
Pull off |
Disconnect the air line tube from the leak detection pump sub-assembly.
- NOTICE:
- ·
Remove any dirt or foreign matter on the tube connector before performing this work.
·Perform this work by hand. Do not use any tools.
·Do not forcibly bend, twist or turn the air line tube.
·Protect the disconnected parts by covering them with plastic bags after disconnecting the air line tube.
·If the tube connector and pipe (leak detection pump sub-assembly) are stuck, push and pull to release them.
Push the air line tube firmly toward the leak detection pump sub-assembly.
Pinch the tube connector as shown in the illustration.
Pull off the air line tube from the pipe (leak detection pump sub-assembly).
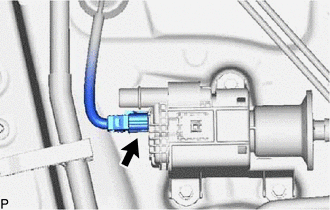
Disconnect the leak detection pump sub-assembly connector.
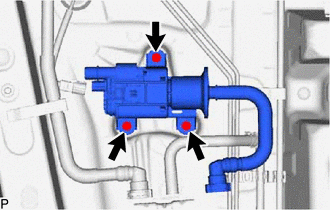
Remove the 3 bolts and No. 2 charcoal canister sub-assembly from the vehicle body.