WINDOW / GLASS WINDOW DEFOGGER WIRE ON-VEHICLE INSPECTION
PROCEDURE

 1.CHECK REAR WINDOW DEFOGGER OPERATION
When the ignition switch is on (IG) and the rear window defogger switch is pressed, check that the window defogger system operates.
68131
2.INSPECT BACK DOOR GLASS
- NOTICE:
- ·
When cleaning the glass, wipe the glass along the wire using a soft dry cloth. Take care not to damage the wire.
·Do not use detergents or glass cleaners that have abrasive ingredients.
·When measuring voltage, wrap a piece of tin foil around the tip of the negative tester probe and press the foil against the wire with your finger as shown in the illustration.
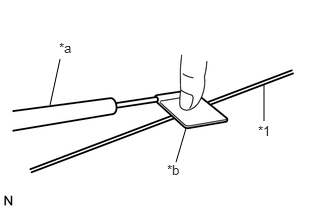
| *1 | Rear Window Defogger Wire |
| *a | Tester Probe |
| *b | Tin Foil |
Turn the ignition switch to ON.
Turn the rear window defogger switch on.

| *a | Foil Strip |
| *b | At Center |
Measure the voltage at the center of each rear window defogger wire to check the wire as shown in the illustration.
- Result:
Voltage Criteria 4 to 6 V Wire is not broken 11 to 14 V Wire is broken between the center and ground side end Below 1 V Wire is broken between the center and battery side end
- HINT:
-
If the voltage is 11 to 14 V, the wire may be broken between the center of the wire and the wire end on the ground side. If the voltage is below 1 V, the wire may be broken between the center of the wire and the wire end on the battery side.
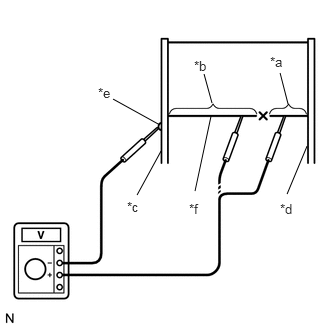
| *a | 11 to 14 V |
| *b | Below 1 V |
| *c | Ground Side |
| *d | Battery Side |
| *e | Foil Strip |
| *f | Broken Wire |
Place the positive (+) lead of the voltmeter against the rear window defogger wire on the battery side.
Place the negative (-) lead of the voltmeter with the foil strip against the wire on the ground side.
Slide the positive (+) lead from the battery side to the ground side. The point where the voltage drops to below 1 V from 11 to 14 V is the place where the rear window defogger wire is broken.
- HINT:
-
If the rear window defogger wire is not broken, the voltmeter should indicate 11 to 14 V at the battery side. As the positive (+) lead is moved to the ground side, the voltage gradually decreases to below 1 V.