EXTERIOR PANELS / TRIM FRONT PILLAR UPPER COVER INSTALLATION
CAUTION / NOTICE / HINT
- HINT:
- ·
Use the same procedure for the RH and LH sides.
·The procedure listed below is for the LH side.
PROCEDURE

 60117
1.INSTALL FRONT PILLAR UPPER COVER SUB-ASSEMBLY LH
60117
1.INSTALL FRONT PILLAR UPPER COVER SUB-ASSEMBLY LH
- HINT:
-
When installing the front pillar upper cover sub-assembly LH, heat the vehicle body and front pillar upper cover sub-assembly LH using a heat light.
- Standard:
Item Temperature Vehicle Body 40 to 60°C (104 to 140°F) Front Pillar Upper Cover Sub-assembly LH 20 to 30°C (68 to 86°F)
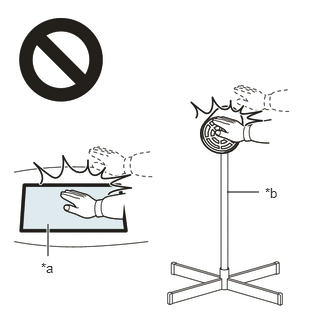
- CAUTION:
-
 2.365,2 2.698,2 false 0.5,2.333 0.5,2.667 true 0.427,2.708 0.74,2.865 0.313,0.156 10 false *a 2.76,1.927 3.073,2.083 0.313,0.156 10 false *b
*a Heated Part *b Heat Light
- ·
Do not touch the heat light and heated parts.
·Touching the heat light may result in burns.
·Touching heated parts for a long time may result in burns.
Clean the vehicle body surface.
Using a heat light, heat the vehicle body surface.
Remove any remaining double-sided tape from the vehicle body.
Wipe off any tape adhesive residue with cleaner.
- NOTICE:
- ·
Installing the front pillar upper cover sub-assembly LH with any double-sided tape remaining may cause poor adhesion. Perform this procedure until the tape is sufficiently removed.
·Make sure to use a cloth when removing. Using a screwdriver, etc., may cause damage and poor adhesion.
Remove the peeling paper of a new front pillar upper cover sub-assembly LH trying not to touch the adhesional surface.
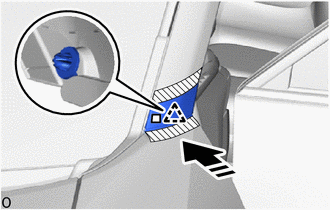
| *a | Double-sided Tape |

|
Install in this Direction |
Attach the clip and double-sided tape to install the front pillar upper cover sub-assembly LH as shown in the illustration.
- HINT:
-
Press the front pillar upper cover sub-assembly LH firmly to install it.
Remove the protective tape.