EXTERIOR PANELS / TRIM ROOF DRIP SIDE FINISH MOULDING INSTALLATION
CAUTION / NOTICE / HINT
- HINT:
- ·
Use the same procedure for the RH side and LH side.
·The procedure listed below is for the LH side.
PROCEDURE

 75561A
1.INSTALL ROOF DRIP SIDE FINISH MOULDING CLIP (w/o Roof Garnish)
75561A
1.INSTALL ROOF DRIP SIDE FINISH MOULDING CLIP (w/o Roof Garnish)
- NOTICE:
- ·
It is only necessary to perform this procedure when replacing a roof drip side finish moulding clip with a new one.
·If installing new roof drip side finish moulding clips, remove the adhesive remaining where the roof drip side finish moulding clips will be installed on the vehicle body and clean the vehicle body with a non-residue solvent.
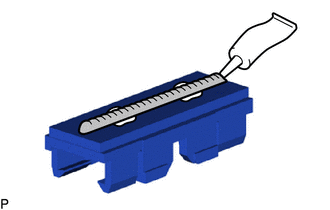
| *a | Adhesive |
| *b | 2 to 3 mm (0.0787 to 0.118 in.) Bead of Adhesive |
Apply a 2 to 3 mm (0.0787 to 0.118 in.) bead of adhesive (3M DP-105 or equivalent) to each new roof drip side finish moulding clip.
- HINT:
-
Adhesive strength (tensile strength): 13.7 MPa (140.0 kgf/cm2, 1987 psi) or more (when the temperature is 23°C (73°F).)
Install the roof drip side finish moulding clips to the positions on the roof panel shown in the illustration. Determine the locations and firmly press and install the roof drip side finish moulding clips.
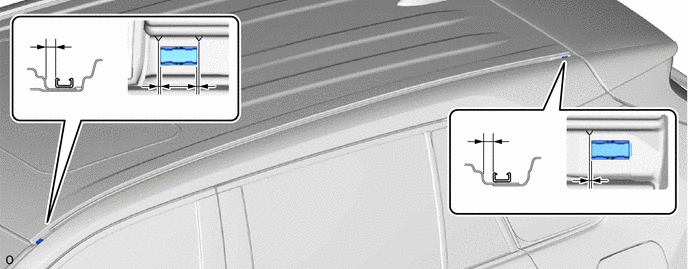
- Standard Measurement:
Area Measurement Area Measurement A 6.3 mm (0.248 in.) B 1.0 mm (0.0394 in.) C 1.0 mm (0.0394 in.) D 5.9 mm (0.232 in.) E 1.0 mm (0.0394 in.) - -
Install the roof drip side finish moulding when 40 minutes or more have elapsed since the roof drip side finish moulding clips were installed.
- HINT:
- ·
Initial hardening time: 40 minutes
·Complete hardening time: 24 hours
75561A
2.INSTALL ROOF DRIP SIDE FINISH MOULDING CLIP (w/ Roof Garnish)
- NOTICE:
- ·
It is only necessary to perform this procedure when replacing a roof drip side finish moulding clip with a new one.
·If installing new roof drip side finish moulding clips, remove the adhesive remaining where the roof drip side finish moulding clips will be installed on the vehicle body and clean the vehicle body with a non-residue solvent.
| *a | Adhesive |
| *b | 2 to 3 mm (0.0787 to 0.118 in.) Bead of Adhesive |
Apply a 2 to 3 mm (0.0787 to 0.118 in.) bead of adhesive (3M DP-105 or equivalent) to each new roof drip side finish moulding clip.
- HINT:
-
Adhesive strength (tensile strength): 13.7 MPa (140.0 kgf/cm2, 1987 psi) or more (when the temperature is 23°C (73°F).)
Install the roof drip side finish moulding clip to the positions on the roof panel shown in the illustration. Determine the locations and firmly press and install the roof drip side finish moulding clips.
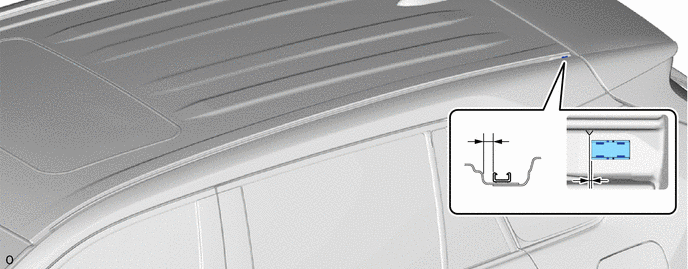
- Standard Measurement:
Area Measurement Area Measurement A 5.9 mm (0.232 in.) B 1.0 mm (0.0394 in.)
Install the roof drip side finish moulding when 40 minutes or more have elapsed since the roof drip side finish moulding clips were installed.
- HINT:
- ·
Initial hardening time: 40 minutes
·Complete hardening time: 24 hours
75552
3.INSTALL ROOF DRIP SIDE FINISH MOULDING LH (w/o Roof Garnish)
- HINT:
-
When installing the roof drip side finish moulding LH, heat the vehicle body and roof drip side finish moulding LH using a heat light.
- Standard:
Item Temperature Vehicle Body 40 to 60°C (104 to 140°F) Roof Drip Side Finish Moulding LH 20 to 30°C (68 to 86°F)
- CAUTION:
-
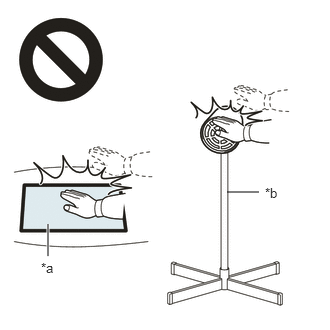 2.365,2 2.698,2 false 0.5,2.333 0.5,2.667 true 0.427,2.708 0.74,2.865 0.313,0.156 10 false *a 2.76,1.927 3.073,2.083 0.313,0.156 10 false *b
*a Heated Part *b Heat Light
- ·
Do not touch the heat light and heated parts.
·Touching the heat light may result in burns.
·Touching heated parts for a long time may result in burns.
- NOTICE:
-
Do not heat the vehicle body and roof drip side finish moulding LH excessively.
Clean the vehicle body surface.
Using a heat light, heat the vehicle body surface.
Remove any remaining double-sided tape from the vehicle body.
Wipe off any tape adhesive residue with cleaner.
- NOTICE:
- ·
Installing the roof drip side finish moulding LH with any double-sided tape remaining may cause poor adhesion. Perform this procedure until the tape is sufficiently removed.
·Make sure to use a cloth when removing. Using a screwdriver, etc., may cause damage and poor adhesion.
Remove the release paper of a new roof drip side finish moulding LH trying not to touch the adhesional surface.
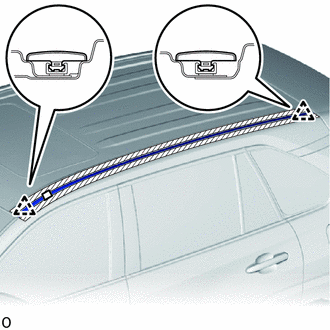
| *a | Double-sided Tape |
Attach the clip and double-sided tape and install a new roof drip side finish moulding LH.
Remove the protective tape.
75554A
4.INSTALL REAR ROOF DRIP SIDE FINISH MOULDING LH (w/ Roof Garnish)
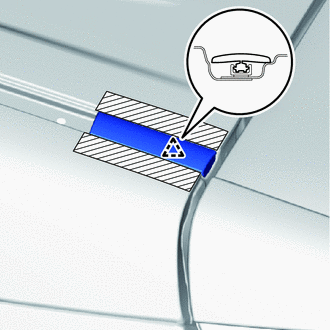
Attach the clip and install the roof drip side finish moulding LH.
Remove the protective tape.
5.INSTALL ROOF SIDE RAIL GARNISH SUB-ASSEMBLY LH (w/ Roof Garnish)