AUDIO / VIDEO FRONT DOOR SPEAKER REMOVAL
CAUTION / NOTICE / HINT
- HINT:
- ·
Use the same procedure for the RH and LH sides.
·The procedure listed below is for the LH side.
PROCEDURE

 69278B
1.REMOVE FRONT DOOR INSIDE HANDLE BEZEL LH
69278B
1.REMOVE FRONT DOOR INSIDE HANDLE BEZEL LH
74640C
2.REMOVE DOOR ASSIST GRIP ASSEMBLY LH
3.REMOVE MULTIPLEX NETWORK MASTER SWITCH ASSEMBLY WITH FRONT DOOR ARMREST BASE PANEL (for Driver Side)
4.REMOVE POWER WINDOW REGULATOR SWITCH ASSEMBLY WITH FRONT DOOR ARMREST BASE PANEL (for Front Passenger Side)
67602
5.REMOVE FRONT DOOR TRIM BOARD SUB-ASSEMBLY LH
86160
6.REMOVE FRONT NO. 1 SPEAKER ASSEMBLY
- NOTICE:
-
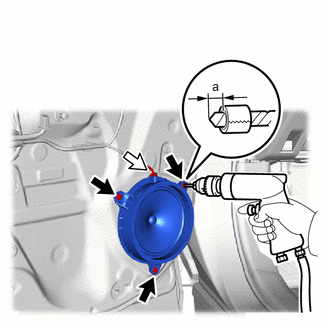
Do not touch the cone part of the speaker.

|
Rivet |

|
Connector |
Disconnect the connector.
Put a 5 mm (0.197 in.) drill bit into a drill.
Wind tape around the drill bit approximately 4 mm (0.157 in.) from the tip of the drill as shown in the illustration.
- NOTICE:
-
Tape the 5 mm (0.197 in.) drill bit to prevent the drill bit from going too deep.
- Standard:
Area Specified Condition a 4 mm (0.157 in.)
Lightly press the drill against the 3 rivets, drill off the flanges of the 3 rivets and remove the front No. 1 speaker assembly.
- CAUTION:
-
Be careful of the drilled rivet as it may become hot.
- NOTICE:
- ·
Pressing the drill too firmly will cause the rivet to turn and result in the rivet not being drilled through.
·Do not pry the rivet with the drill because this may cause damage to the installation holes of the rivet or the drill bit.
Continue drilling and push out the remaining rivet fragments.
Using a vacuum cleaner, remove the rivet fragments and shavings from the inside of the door.