HEATING / AIR CONDITIONING FRONT EVAPORATOR TEMPERATURE SENSOR(for Gasoline Model) INSTALLATION
PROCEDURE

 88625
1.INSTALL NO. 1 COOLER THERMISTOR
88625
1.INSTALL NO. 1 COOLER THERMISTOR
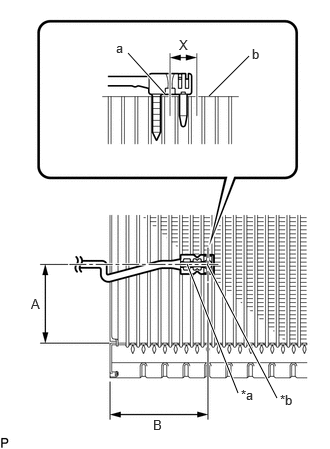
| *a | Securing Part |
| *b | Sensor Part |
Install the No. 1 cooler thermistor as shown in the illustration.
- Installation Position:
Part Length A 50.0 mm (1.97 in.) B 61.1 mm (2.41 in.)
- NOTICE:
- ·
Be sure to insert the No. 1 cooler thermistor only once because reinserting it into the same position will not allow it to be firmly secured.
·When reusing the No. 1 cooler evaporator sub-assembly, insert the No. 1 cooler thermistor one row next to the one that has been used previously (X in the illustration).
·After inserting the No. 1 cooler thermistor, do not apply excessive force to the wire.
·Directly insert the No. 1 cooler thermistor until the edge of the plastic case "a" comes into contact with the No. 1 cooler evaporator sub-assembly "b".
88501
2.INSTALL NO. 1 COOLER EVAPORATOR SUB-ASSEMBLY
88515
3.INSTALL COOLER EXPANSION VALVE
88899L
4.INSTALL COOLING UNIT PARTS
87107A
5.INSTALL HEATER RADIATOR UNIT SUB-ASSEMBLY
87124B
6.INSTALL HEATER CLAMP
87128
7.INSTALL HEATER GROMMET
87050E
8.INSTALL NO. 3 AIR CONDITIONING RADIATOR DAMPER SERVO SUB-ASSEMBLY (for Automatic Air Conditioning System)
87050C
9.INSTALL NO. 1 AIR CONDITIONING RADIATOR DAMPER SERVO SUB-ASSEMBLY (for Automatic Air Conditioning System)
82210K
10.INSTALL AIR CONDITIONING HARNESS ASSEMBLY
87130D
11.INSTALL BLOWER ASSEMBLY