HEATING / AIR CONDITIONING AIR CONDITIONING PANEL REMOVAL
PROCEDURE

 55405B
1.REMOVE CENTER INSTRUMENT CLUSTER FINISH PANEL SUB-ASSEMBLY (except 10.25 Inch Display)
55405B
1.REMOVE CENTER INSTRUMENT CLUSTER FINISH PANEL SUB-ASSEMBLY (except 10.25 Inch Display)
55405B
2.REMOVE CENTER INSTRUMENT CLUSTER FINISH PANEL SUB-ASSEMBLY (for 10.25 Inch Display)
55900
3.REMOVE AIR CONDITIONING CONTROL ASSEMBLY (for Electrical Control Type)
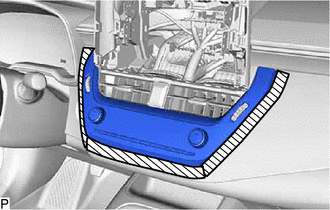

|
Protective Tape |
Apply protective tape to the area shown in the illustration.
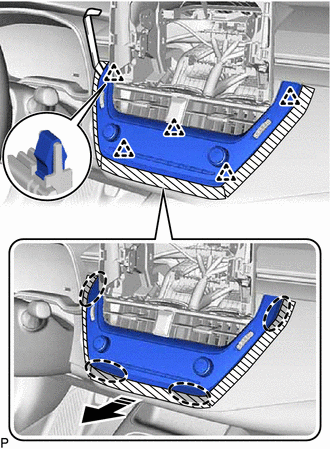

|
Insert Moulding Remover Here |

|
Remove in this Direction |
Using a moulding remover, disengage the 5 clips as shown in the illustration.
Disconnect the connector to remove the air conditioning control assembly.
4.REMOVE LOWER CENTER INSTRUMENT CLUSTER FINISH PANEL SUB-ASSEMBLY (for Mechanical Control Type)
55318F
5.REMOVE NO. 2 INSTRUMENT SIDE PANEL (for Mechanical Control Type)
55470
6.REMOVE INSTRUMENT CLUSTER FINISH PANEL GARNISH ASSEMBLY (for Mechanical Control Type)
55670A
7.REMOVE CENTER INSTRUMENT PANEL REGISTER ASSEMBLY (for Mechanical Control Type)
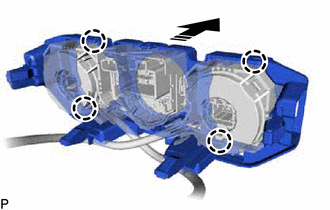
8.REMOVE CENTER INSTRUMENT PANEL SAFETY PAD RETAINER WITH HEATER CONTROL (for Mechanical Control Type)
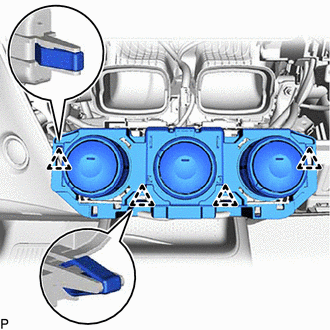
Disengage the 4 clips.
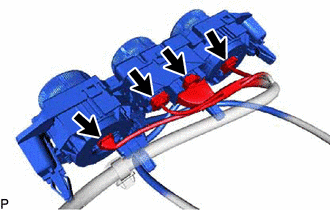
Disconnect the 4 connectors.
|
|
Remove in this Direction |
Disengage the 4 claws to remove the center instrument panel safety pad retainer with heater control as shown in the illustration.
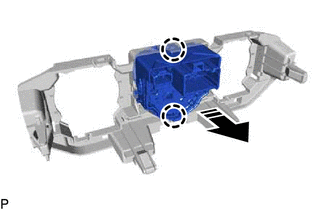
9.REMOVE NO. 2 HEATER CONTROL SUB-ASSEMBLY (for Mechanical Control Type)
|
|
Remove in this Direction |
Disengage the 2 claws to remove the No. 2 heater control sub-assembly from the center instrument panel safety pad retainer as shown in the illustration.
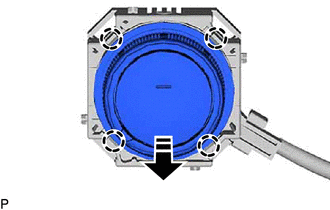
10.REMOVE NO. 3 HEATER CONTROL SUB-ASSEMBLY (for Mechanical Control Type)
|
|
Remove in this Direction |
Disengage the 4 claws and remove the No. 3 heater control sub-assembly from the air mix damper control cable sub-assembly as shown in the illustration.
- HINT:
-
Before removing the No. 3 heater control sub-assembly, make sure to set it to MAX COLD.
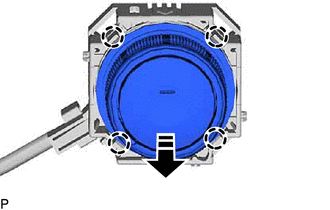
11.REMOVE NO. 1 HEATER CONTROL SUB-ASSEMBLY (for Mechanical Control Type)
|
|
Remove in this Direction |
Disengage the 4 claws and remove the No. 1 heater control sub-assembly from the heater control cable sub-assembly shown in the illustration.
- HINT:
-
Before removing the No. 1 heater control sub-assembly, make sure to set the mode switch to FACE.