HEATING / AIR CONDITIONING REFRIGERANT REPLACEMENT
PROCEDURE

 1. RECOVER REFRIGERANT FROM REFRIGERATION SYSTEM
for Gasoline Model:
Start the engine.
for HV Model:
Turn the power switch on (READY).
Operate the compressor under the following conditions:
| Item | Condition |
|---|---|
| Operating time | 3 minutes or more |
| Temperature setting | Max cold |
| Blower speed | High |
| Engine (for Gasoline Model) | Idling |
| Power switch (for HV Model) | On (READY) |
| A/C switch | On |
This causes most of the compressor oil from the various components of the A/C system to collect in the compressor.
- HINT:
-
It is not necessary to operate the compressor if the A/C does not operate because of compressor lock, etc.
for Gasoline Model:
Stop the engine.
for HV Model:
Turn the power switch off.
Recover the refrigerant from the A/C system using a refrigerant recovery unit.
- HINT:
-
Use the refrigerant recovery unit in accordance with the manufacturer's instruction manual.
2. CHARGE AIR CONDITIONING SYSTEM WITH REFRIGERANT
Perform vacuum purging using a vacuum pump or appropriate equipment.
Charge the air conditioning system with refrigerant.
- Refrigerant Type:
HFC-134a (R134a)
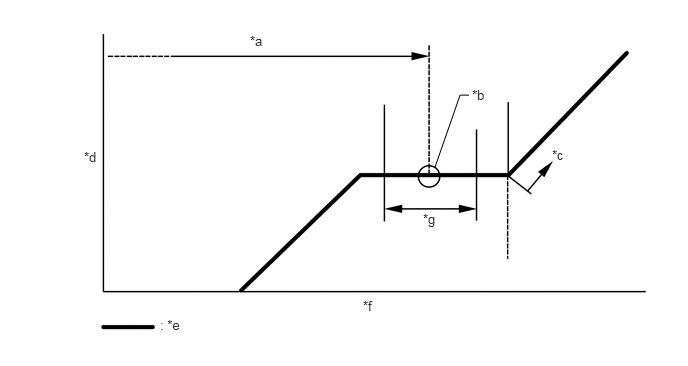
| *a | Standard Charge Amount | *b | Mean Value in Proper Range |
| *c | Overcharged | *d | High Pressure |
| *e | Sub-cool System | *f | Refrigerant Amount |
| *g | +/-30 g (+/-1.05 oz) | - | - |
- Standard Charge Amount:
for HV Model 440 to 500 g (15.6 to 17.6 oz) for M15B-FKS, M15C-FKS 390 to 450 g (13.8 to 15.9 oz) for M20A-FKS, M20C-FKS, M20E-FKS 440 to 500 g (15.5 to 17.6 oz) for NR Series Engine 440 to 500 g (15.5 to 17.6 oz)
- SST
- 09985-20010 (09985-02010, 09985-02050, 09985-02060, 09985-02070, 09985-02080, 09985-02090, 09985-02110, 09985-02130, 09985-02140, 09985-02150)
- NOTICE:
- ·
Do not turn the A/C switch on before charging the air conditioning system with refrigerant. Doing so may cause the compressor to operate without refrigerant, resulting in overheating of the compressor.
·The refrigerant amount should be checked by quantity (weight).
·The graph above is shown for reference only.
- HINT:
-
Ensure that sufficient refrigerant is available to recharge the system when using a refrigerant recovery unit. Refrigerant recovery units are not always able to recover 100% of the refrigerant from an air conditioning system.
3.WARM UP ENGINE (for Gasoline Model)
Keep the A/C switch on for at least 2 minutes to warm up the compressor.
- NOTICE:
-
To prevent damage to the compressor, be sure to warm up the compressor when turning the air conditioning on after removing and installing any air conditioning system lines (including the compressor).
4.WARM UP COMPRESSOR (for HV Model)
Keep the A/C switch on for at least 2 minutes to warm up the compressor.
- NOTICE:
-
To prevent damage to the compressor, be sure to warm up the compressor when turning the air conditioning on after removing and installing any air conditioning system lines (including the compressor).
5.INSPECT FOR REFRIGERANT LEAK
After recharging the air conditioning system with refrigerant, inspect for refrigerant leaks using a gas leak detector.
Carry out the test under the following conditions:
Turn the ignition switch off.
Ensure good ventilation (the gas leak detector may react to volatile gases which are not refrigerant, such as gasoline vapor and exhaust gas).
Repeat the inspection 2 or 3 times.
Measure the pressure to make sure that there is some refrigerant remaining in the air conditioning system.
Pressure when the compressor is off: approximately 392 to 588 kPa (3.9 to 5.9 kgf/cm2, 57 to 85 psi)
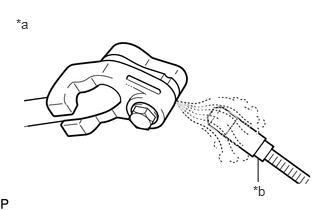
| *a | Inspect for Leak |
| *b | Gas Leak Detector |
Using a gas leak detector, inspect for refrigerant leaks from the air conditioning system.
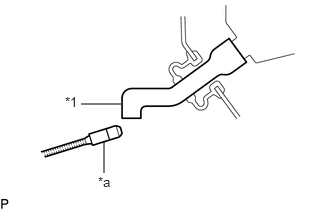
| *1 | Drain Cooler Hose |
| *a | Gas Leak Detector |
Bring the gas leak detector close to the drain cooler hose with the detector power off, and then turn the detector on.
- HINT:
- ·
After the blower motor has stopped, leave the cooling unit for more than 15 minutes.
·Bring the gas leak detector sensor under the drain cooler hose.
·When bringing the gas leak detector close to the drain cooler hose, make sure that the gas leak detector does not react to volatile gases. If it is not possible to avoid interference from volatile gases, the vehicle should be lifted up to allow checking for leaks.
If a refrigerant leak is not detected from the drain cooler hose, remove the blower motor control from the cooling unit. Insert the gas leak detector sensor into the unit and check for leaks.
Disconnect the pressure sensor connector and leave it for approximately 20 minutes. Bring the gas leak detector close to the pressure sensor and check for leaks.
- HINT:
-
When checking for leaks, the presence of oily dirt at a joint can indicate a leak.