EXTERIOR PANELS / TRIM FRONT BUMPER(for GTMC Made) REASSEMBLY
PROCEDURE

 52134G
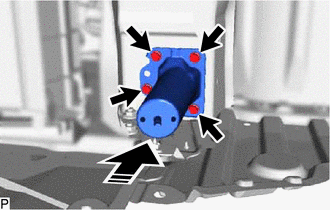
1.INSTALL FRONT BUMPER BRACKET LH
52134G
1.INSTALL FRONT BUMPER BRACKET LH

|
Install in this Direction |
Install the front bumper bracket LH with the 4 bolts as shown in the illustration.
- Torque:
- 12 N*m (122 kgf*cm, 9 ft.*lbf)
52133F
2.INSTALL FRONT BUMPER BRACKET RH
- HINT:
-
Use the same procedure as for the LH side.
52132A
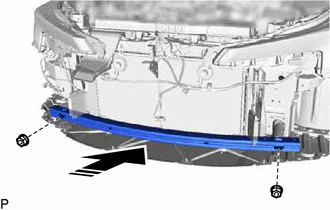
3.INSTALL NO. 2 FRONT BUMPER REINFORCEMENT
|
|
Install in this Direction |
Install the No. 2 front bumper reinforcement with the 2 nuts as shown in the illustration.
- Torque:
- 30 N*m (306 kgf*cm, 22 ft.*lbf)
52618
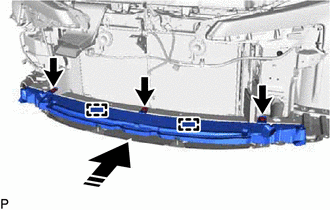
4.INSTALL LOWER FRONT BUMPER ABSORBER (except Sport Package)
|
|
Install in this Direction |
Engage the 2 guides as shown in the illustration.
Install the lower front bumper absorber with the 3 clips.
52618
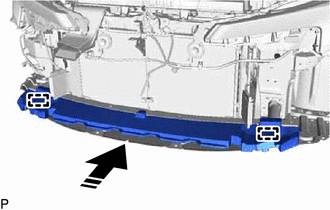
5.INSTALL LOWER FRONT BUMPER ABSORBER (for Sport Package)
|
|
Install in this Direction |
Engage the 2 guides to install the lower front bumper absorber as shown in the illustration.
57013C
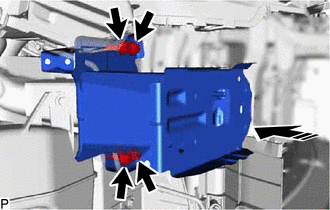
6.INSTALL FRONT SIDE MEMBER BRACKET SUB-ASSEMBLY RH
|
|
Install in this Direction |
Install the front side member bracket sub-assembly RH with the 4 bolts as shown in the illustration.
- Torque:
- 50 N*m (510 kgf*cm, 37 ft.*lbf)
57014A
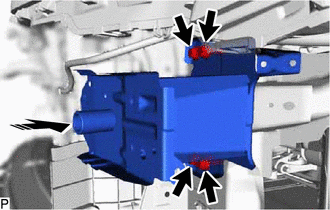
7.INSTALL FRONT SIDE MEMBER BRACKET SUB-ASSEMBLY LH
|
|
Install in this Direction |
Install the front side member bracket sub-assembly LH with the 4 bolts as shown in the illustration.
- Torque:
- 50 N*m (510 kgf*cm, 37 ft.*lbf)
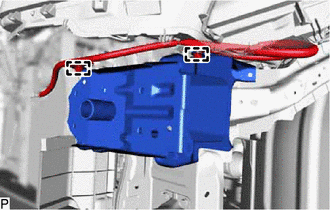
Engage the 2 clamps.
52131A
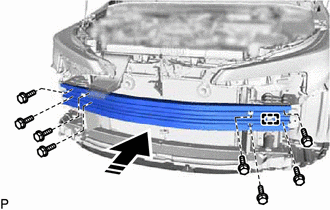
8.INSTALL FRONT BUMPER REINFORCEMENT
|
|
Install in this Direction |
Engage the guide as shown in the illustration.
Install the front bumper reinforcement with the 8 bolts.
- Torque:
- 50 N*m (510 kgf*cm, 37 ft.*lbf)
w/ clip:
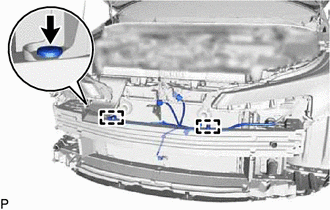
Install the clip.
Engage each clamp.
52611
9.INSTALL FRONT BUMPER ENERGY ABSORBER (except Sport Package)
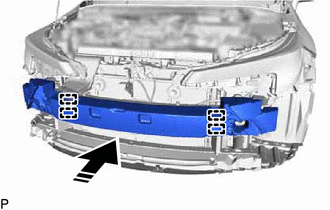
|
|
Install in this Direction |
Engage the 4 guides as shown in the illustration to install the front bumper energy absorber.
52611
10.INSTALL FRONT BUMPER ENERGY ABSORBER (for Sport Package)
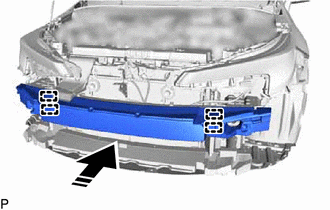
|
|
Install in this Direction |
Engage the 4 guides as shown in the illustration to install the front bumper energy absorber.
52527C
11.INSTALL NO. 2 LOWER FRONT BUMPER RETAINER
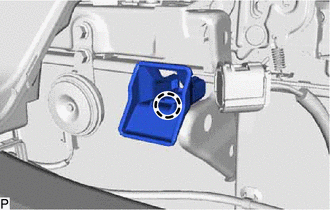
Engage the claw to install the No. 2 lower front bumper retainer.
52116A
12.INSTALL FRONT BUMPER SIDE SUPPORT LH
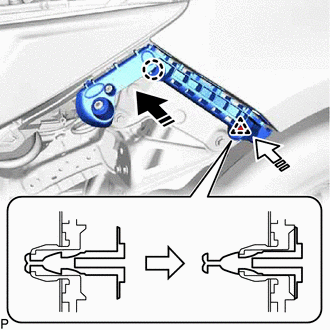
|
|
Install in this Direction (1) |

|
Install in this Direction (2) |
Engage the claw and clip as shown in the illustration.
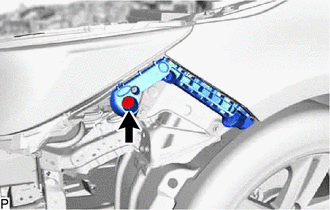
Install the front bumper side support LH with the bolt.
- Torque:
- 8.0 N*m (82 kgf*cm, 71 in.*lbf)
52115A
13.INSTALL FRONT BUMPER SIDE SUPPORT RH
- HINT:
-
Use the same procedure as for the LH side.
53879H
14.INSTALL FRONT FENDER LINER RETAINER
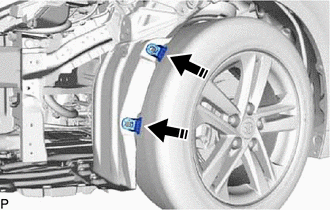
|
|
Install in this Direction |
Install the 2 front fender liner retainers as shown in the illustration.
- HINT:
-
Use the same procedure for the RH side and LH side.
47749F
15.INSTALL PIN HOLD CLIP
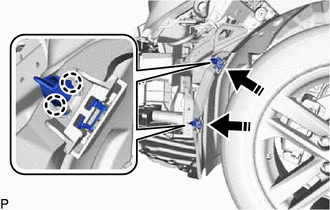
|
|
Install in this Direction |
Engage the 4 claws as shown in the illustration to install the 2 pin hold clips.
- HINT:
-
Use the same procedure for the RH side and LH side.
81482C
16.INSTALL FOG LIGHT COVER LH (except Sport Package)
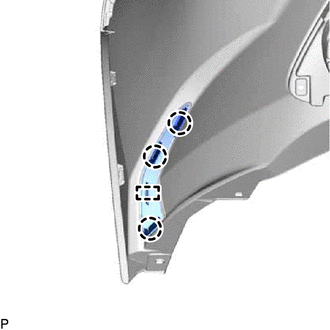
Engage the guide and 3 claws.
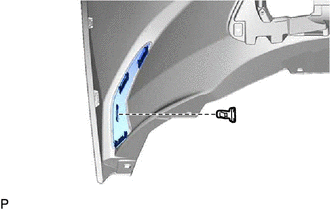
Install the fog light cover LH with the clip.
81481E
17.INSTALL FOG LIGHT COVER RH (except Sport Package)
- HINT:
-
Use the same procedure as for the LH side.
52113D
18.INSTALL FRONT BUMPER EXTENSION LH (for Sport Package)
for LEVIN:
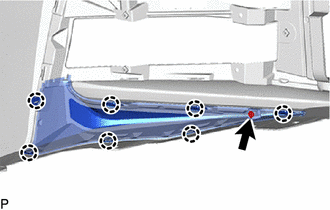
Engage the 7 claws.
Install the front bumper extension LH with the screw.
52112D
19.INSTALL FRONT BUMPER EXTENSION RH (for Sport Package)
for LEVIN:
- HINT:
-
Use the same procedure as for the LH side.
20.INSTALL FRONT BUMPER HOLE COVER LH (for Sport Package)
for LEVIN NR Series Engine:
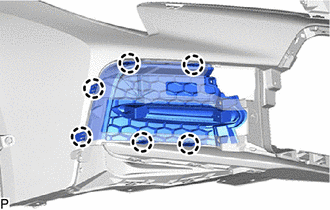
Engage the 6 claws to install the front bumper hole cover LH.
21.INSTALL FRONT BUMPER HOLE COVER RH (for Sport Package)
for LEVIN NR Series Engine:
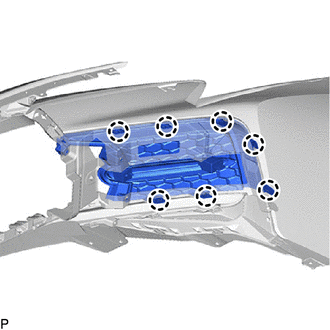
Engage the 7 claws to install the front bumper hole cover RH.
52742
22.INSTALL NO. 2 FRONT BUMPER BAR GARNISH (for Sport Package)
for LEVIN GT:
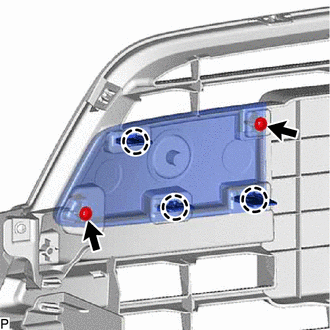
Engage the 3 claws.
Install the No. 2 front bumper bar garnish with the 2 screws.
52741
23.INSTALL NO. 1 FRONT BUMPER BAR GARNISH (for Sport Package)
for LEVIN GT:
- HINT:
-
Use the same procedure as for the LH side.
52713A
24.INSTALL FRONT BUMPER SIDE MOULDING LH (for Sport Package)
for LEVIN GT:
Engage the 3 claws.
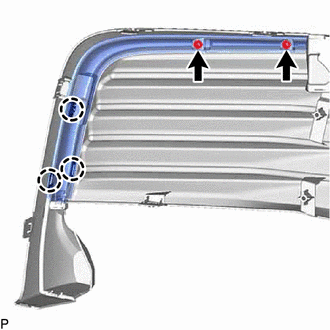
Install the front bumper side moulding LH with the 2 screws.
52712
25.INSTALL FRONT BUMPER SIDE MOULDING RH (for Sport Package)
for LEVIN GT:
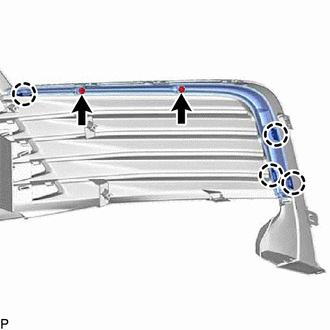
Engage the 4 claws.
Install the front bumper side moulding LH with the 2 screws.
52711C
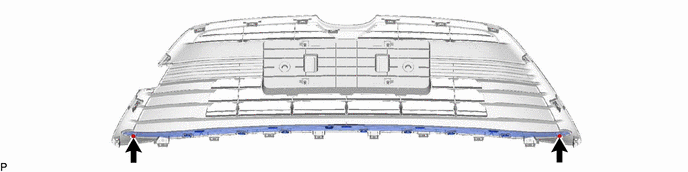
26.INSTALL FRONT BUMPER MOULDING (except Sport Package)
for NR Series Engine:
Engage the 12 claws.
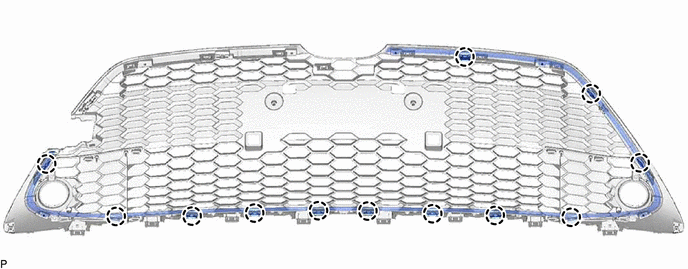
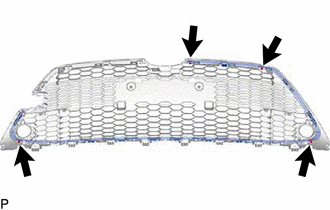
Install the front bumper moulding with the 4 screws.
except NR Series Engine:
Engage the 5 guides and 8 claws.
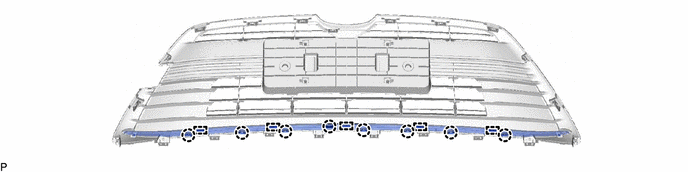
Install the front bumper moulding with the 2 screws.
27.INSTALL NO. 2 FRONT BUMPER MOULDING (except Sport Package)
for NR Series Engine:
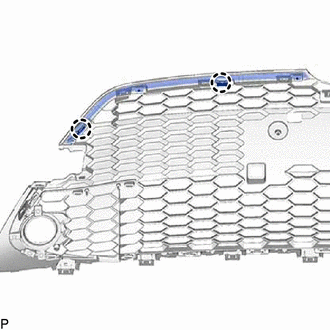
Engage the 2 claws.
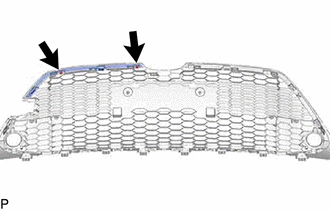
Install the No. 2 front bumper moulding with the 2 screws.
53102A
28.INSTALL LOWER RADIATOR GRILLE SUB-ASSEMBLY (for Sport Package)
for LEVIN GT:
Engage the 23 claws.
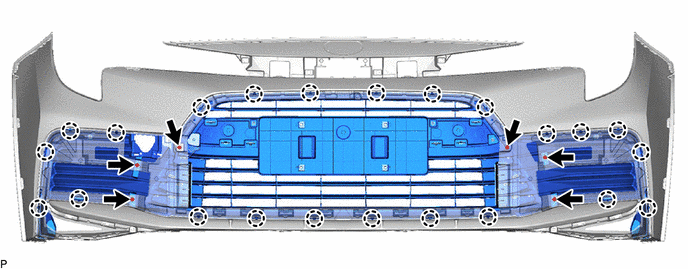
Install the lower radiator grille sub-assembly with the 6 screws.
52113D
29.INSTALL FRONT BUMPER EXTENSION LH (for Sport Package)
for LEVIN GT:
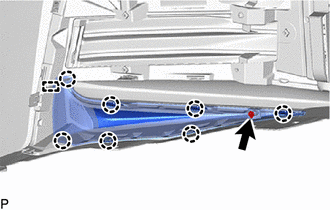
Engage the guide and 7 claws.
Install the front bumper extension LH with the screw.
52112D
30.INSTALL FRONT BUMPER EXTENSION RH (for Sport Package)
for LEVIN GT:
- HINT:
-
Use the same procedure as for the LH side.
52040
31.INSTALL FRONT BUMPER HOLE COVER ASSEMBLY LH (for Sport Package)
for LEVIN GT:
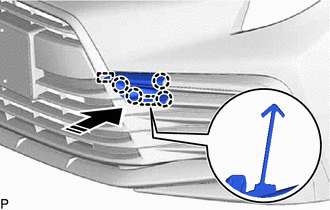
| *a | Hook |
|
|
Install in this Direction |
Engage the hook.
Engage the 2 guides and 4 claws to install the front bumper hole cover assembly LH.
53112A
32.INSTALL LOWER RADIATOR GRILLE (for Sport Package)
for LEVIN NR Series Engine:
Engage the 12 claws.
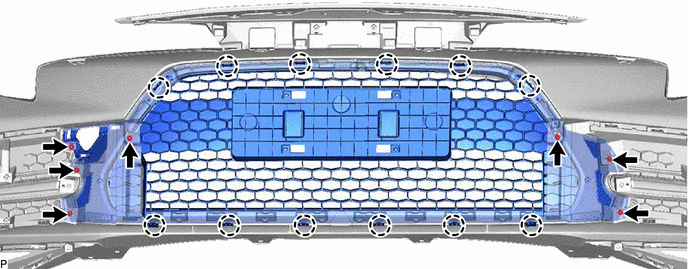
Install the lower radiator grille with the 7 screws.
for LEVIN except NR Series Engine:
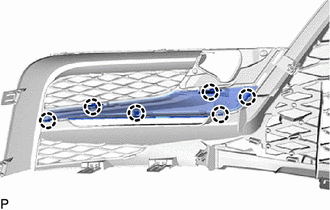
Engage the 6 claws to install the fog light cover LH.
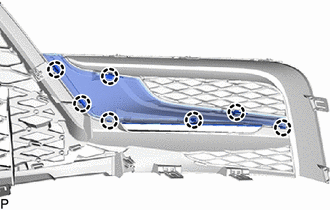
Engage the 7 claws to install the fog light cover RH.
Engage the 25 claws.
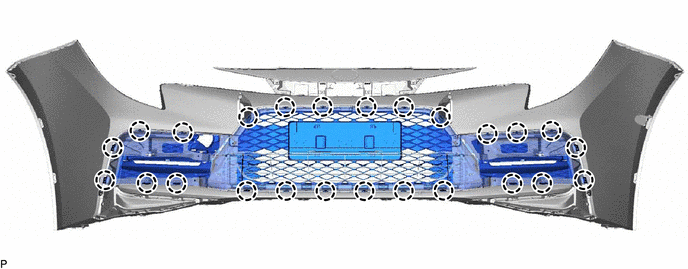
Install the lower radiator grille with the 4 screws.
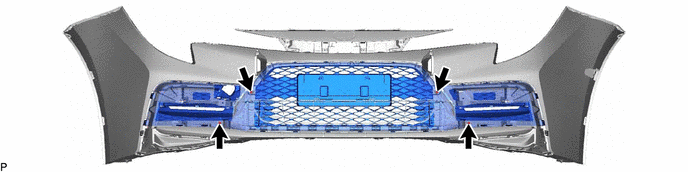
53124D
33.INSTALL LOWER RADIATOR GRILLE MOULDING LH (for Sport Package)
for LEVIN except NR Series Engine:
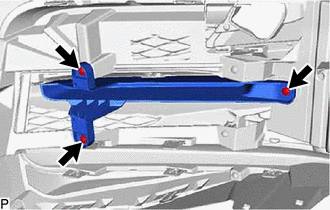
Install the lower radiator grille moulding LH with the 3 screws.
53123C
34.INSTALL LOWER RADIATOR GRILLE MOULDING RH (for Sport Package)
for LEVIN except NR Series Engine:
- HINT:
-
Use the same procedure as for the LH side.
53128G
35.INSTALL LOWER SIDE RADIATOR GRILLE LH (for Sport Package)
for LEVIN NR Series Engine:
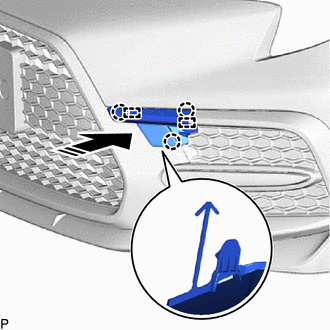
| *a | Hook |
|
|
Install in this Direction |
Engage the hook.
Engage the 2 guides and 3 claws to install the front bumper hole cover LH.
for LEVIN except NR Series Engine:
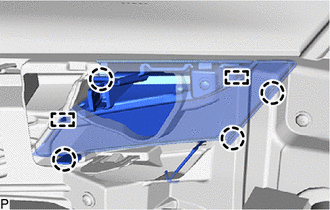
| *a | Hook |
Engage the hook.
Engage the 2 guides and 4 claws to install the front bumper hole cover LH.
75311
36.INSTALL RADIATOR GRILLE EMBLEM ASSEMBLY (except Sport Package)
w/ Pre-collision System:
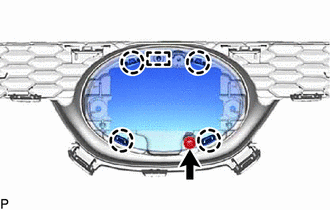
Engage the guide and 4 claws.
Install the radiator grille emblem assembly with the screw.
75311
37.INSTALL RADIATOR GRILLE EMBLEM ASSEMBLY (except Sport Package)
w/o Pre-collision System:
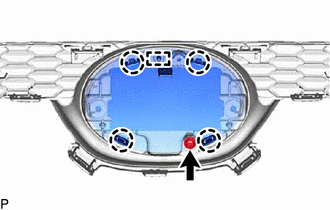
Engage the guide and 4 claws.
Install the radiator grille emblem assembly with the screw.
75311
38.INSTALL RADIATOR GRILLE (OR FRONT PANEL) EMBLEM (for Sport Package)
- HINT:
-
When installing the radiator grille (or front panel) emblem, heat the front bumper cover and radiator grille (or front panel) emblem using a heat light.
| Item | Temperature |
|---|---|
| Front Bumper Cover | 20 to 30°C (68 to 86°F) |
| Radiator Grille (or Front Panel) Emblem |
- CAUTION:
-
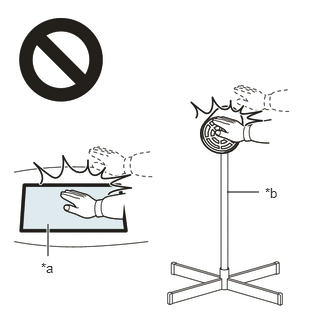 2.365,2 2.698,2 false 0.5,2.333 0.5,2.667 true 0.427,2.708 0.74,2.865 0.313,0.156 10 false *a 2.76,1.927 3.073,2.083 0.313,0.156 10 false *b
*a Heated Part *b Heat Light
- ·
Do not touch the heat light and heated parts, touching the heat light may result in burns.
·Touching heated parts for a long time may result in burns.
- NOTICE:
-
Do not heat the front bumper cover or radiator grille (or front panel) emblem excessively.
Clean the front bumper cover surface.
Using a heat light, heat the front bumper cover surface.
Remove any remaining double-sided tape from the front bumper cover.
Wipe off any tape adhesive residue with cleaner.
Using a heat light, heat the front bumper cover and a new radiator grille (or front panel) emblem.
Remove the release paper from the radiator grille (or front panel) emblem.
- HINT:
-
After removing the release paper, keep the exposed adhesive free from foreign matter.
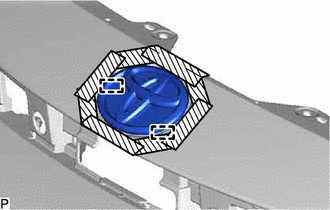
Engage the 2 pins and install the radiator grille (or front panel) emblem as shown in the illustration.
53111
39.INSTALL RADIATOR GRILLE (except Sport Package)
Engage the 10 claws to install the radiator grille.
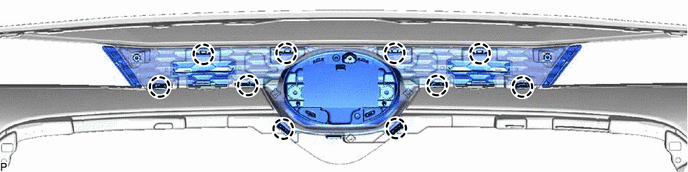
40.INSTALL RADIATOR GRILLE GARNISH (for Sport Package)
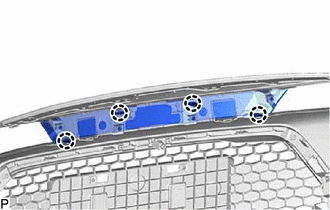
Engage the 4 claws to install the radiator grille garnish as shown in the illustration.
41.INSTALL FRONT BUMPER INNER BRACKET (for Sport Package)
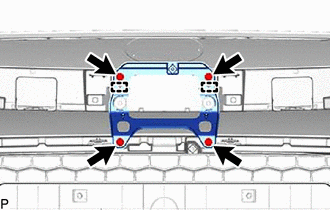
Engage the 2 guides.
Install the front bumper inner bracket with the 4 screws.
53112A
42.INSTALL LOWER RADIATOR GRILLE SUB-ASSEMBLY (except Sport Package)
for NR Series Engine:
Engage the 17 claws.
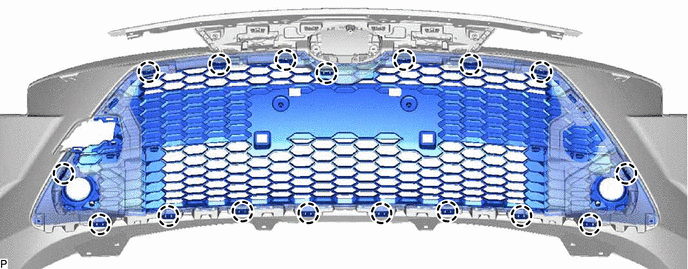
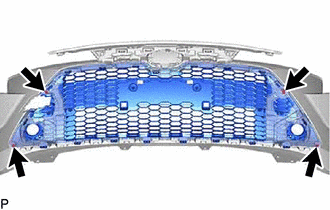
Install the lower radiator grille sub-assembly with the 4 screws.
except NR Series Engine:
Engage the 17 claws.
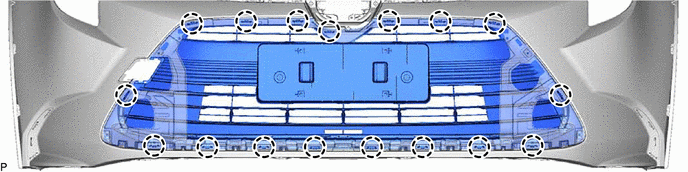
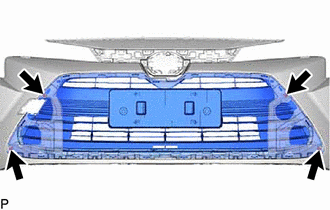
Install the lower radiator grille sub-assembly with the 4 screws.
52128B
43.INSTALL FRONT BUMPER HOLE COVER LH (except Sport Package)
for NR Series Engine:
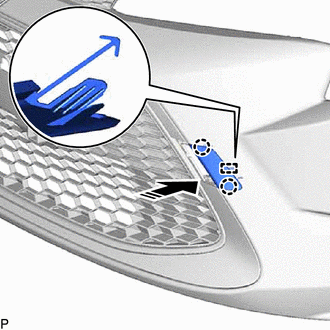
| *a | Hook |
|
|
Install in this Direction |
Engage the hook.
Engage the guide and 2 claws to install the front bumper hole cover LH.
except NR Series Engine:
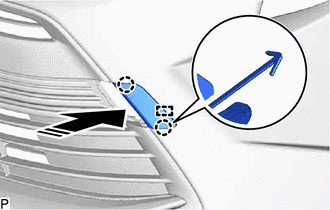
| *a | Hook |
|
|
Install in this Direction |
Engage the hook.
Engage the guide and 2 claws to install the front bumper hole cover LH.
53128G
44.INSTALL LOWER SIDE RADIATOR GRILLE LH (except Sport Package)
for NR Series Engine:
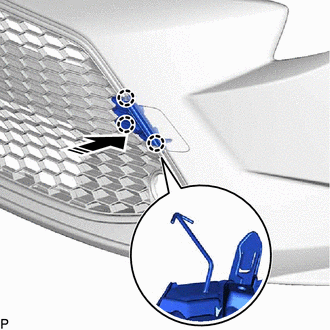
| *a | Hook |
|
|
Install in this Direction |
Engage the hook.
Engage the 3 claws to install the lower side radiator grille LH.
except NR Series Engine:
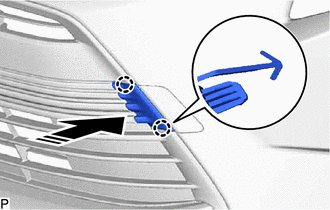
| *a | Hook |
|
|
Install in this Direction |
Engage the hook.
Engage the 2 claws to install the lower side radiator grille LH.
52421A
45.INSTALL FRONT BUMPER PAD (except Sport Package)
- HINT:
-
When installing the front bumper pad, heat the front bumper cover using a heat light.
| Item | Temperature |
|---|---|
| Front Bumper Cover | 20 to 30°C (68 to 86°F) |
- CAUTION:
-
2.365,2 2.698,2 false 0.5,2.333 0.5,2.667 true 0.427,2.708 0.74,2.865 0.313,0.156 10 false *a 2.76,1.927 3.073,2.083 0.313,0.156 10 false *b
*a Heated Part *b Heat Light
- ·
Do not touch the heat light and heated parts, touching the heat light may result in burns.
·Touching heated parts for a long time may result in burns.
- NOTICE:
-
Do not heat the front bumper cover excessively.
Clean the front bumper cover surface.
Using a heat light, heat the front bumper cover surface.
Remove any remaining double-sided tape from the front bumper cover.
Wipe off any tape adhesive residue with cleaner.
Remove the release paper from a new front bumper pad.
- HINT:
-
After removing the release paper, keep the exposed adhesive free from foreign matter.
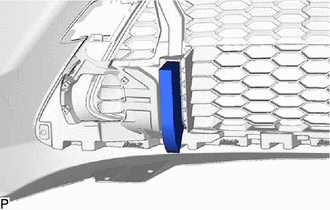
Install the front bumper pad.
- HINT:
-
Use the same procedure for the RH side and LH side.
52421A
46.INSTALL FRONT BUMPER PAD (for Sport Package)
- HINT:
-
When installing the front bumper pad, heat the front bumper cover using a heat light.
| Item | Temperature |
|---|---|
| Front Bumper Cover | 20 to 30°C (68 to 86°F) |
- CAUTION:
-
2.365,2 2.698,2 false 0.5,2.333 0.5,2.667 true 0.427,2.708 0.74,2.865 0.313,0.156 10 false *a 2.76,1.927 3.073,2.083 0.313,0.156 10 false *b
*a Heated Part *b Heat Light
- ·
Do not touch the heat light and heated parts, touching the heat light may result in burns.
·Touching heated parts for a long time may result in burns.
- NOTICE:
-
Do not heat the front bumper cover excessively.
Clean the front bumper cover surface.
Using a heat light, heat the front bumper cover surface.
Remove any remaining double-sided tape from the front bumper cover.
Wipe off any tape adhesive residue with cleaner.
Remove the release paper from a new front bumper pad.
- HINT:
-
After removing the release paper, keep the exposed adhesive free from foreign matter.
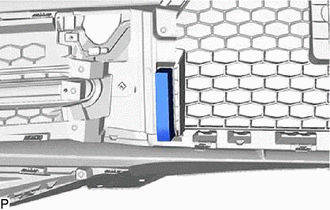
Install the front bumper pad.
- HINT:
-
Use the same procedure for the RH side and LH side.
88211B
47.INSTALL MILLIMETER WAVE RADAR SENSOR ASSEMBLY (w/ Pre-collision System)
for NR Series Engine: Click hereADAS / AD>ADVANCED DRIVER ASSISTANCE SYSTEM>MILLIMETER WAVE RADAR SENSOR (for NR Series Engine)>INSTALLATION202304,999999,_95,_139716,_0584842,RM1000000029I3F_01_0035,
except NR Series Engine: Click hereADAS / AD>ADVANCED DRIVER ASSISTANCE SYSTEM>MILLIMETER WAVE RADAR SENSOR (except NR Series Engine)>INSTALLATION202304,999999,_95,_139716,_0584197,RM1000000029F5S_01_0045,
53395E
48.INSTALL HOOD TO FRONT END PANEL SEAL
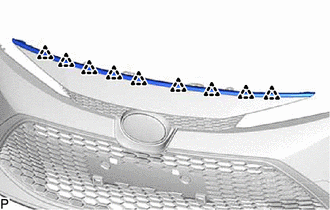
Engage the 9 clips to install the hood to front end panel seal.
53114A
49.INSTALL INNER RADIATOR GRILLE (except Sport Package)
Engage the 11 claws.
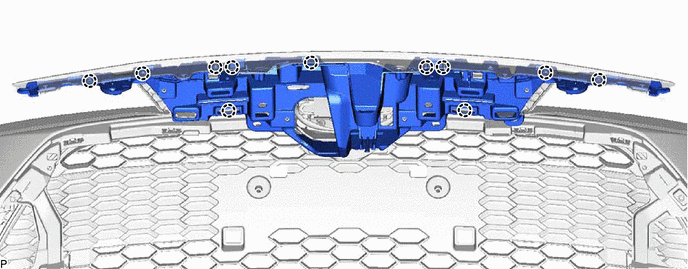
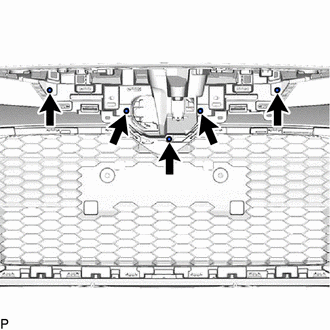
Install the 5 screws.
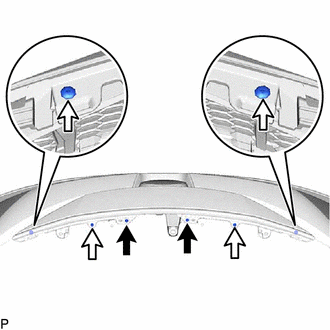

|
Screw |

|
Clip |
Install the inner radiator grille with the 2 screws and 4 clips.
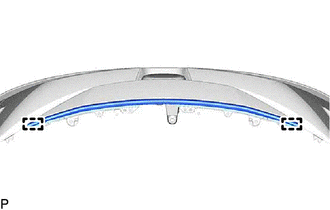
Engage the 2 guides.
53114A
50.INSTALL INNER RADIATOR GRILLE (for Sport Package)
for LEVIN:
Engage the 2 guides and 2 claws.
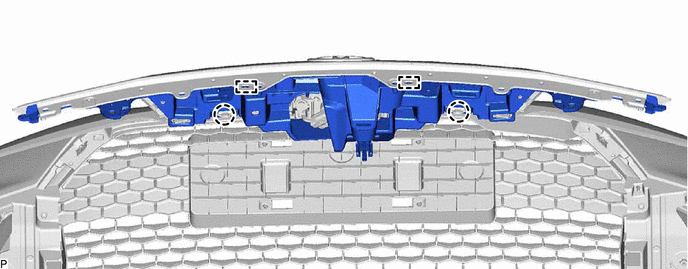
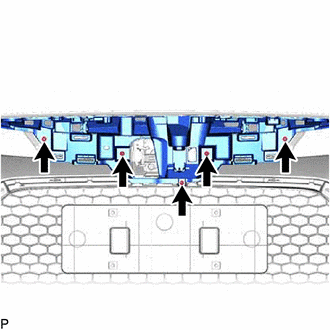
Install the 5 screws.
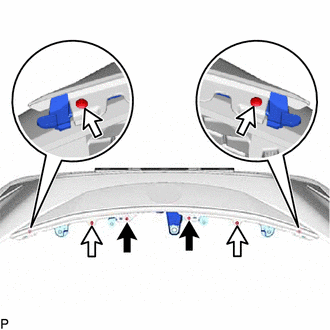
|
|
Screw |
|
|
Clip |
Install the inner radiator grille with the 2 screws and 4 clips.
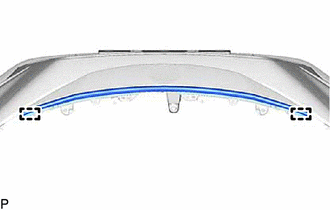
Engage the 2 guides.
for LEVIN GT:
Engage the 2 guides and 2 claws.
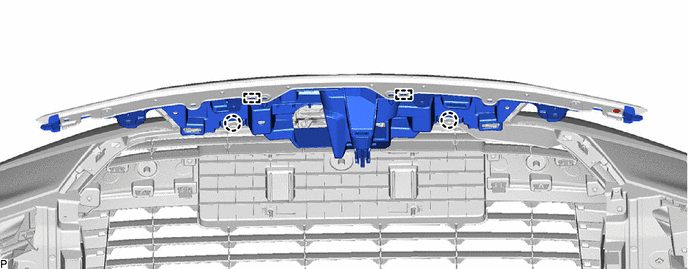
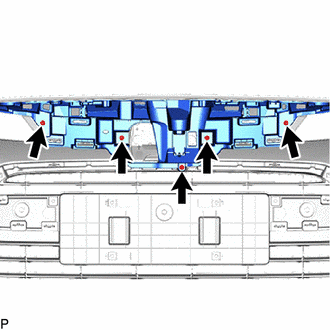
Install the 5 screws.
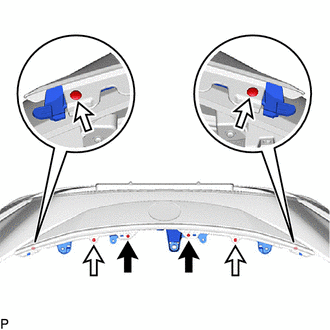
|
|
Screw |
|
|
Clip |
Install the inner radiator grille with the 2 screws and 4 clips.
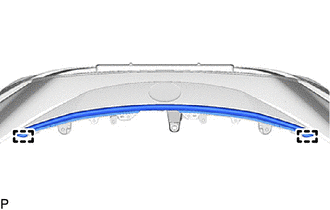
Engage the 2 guides.
16563C
51.INSTALL NO. 3 RADIATOR TO SUPPORT SEAL (except Sport Package)
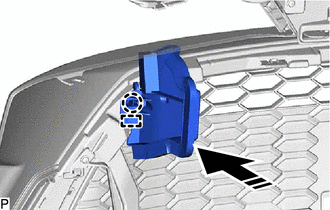
|
|
Install in this Direction |
Engage the guide and claw to install the No. 3 radiator to support seal as shown in the illustration.
16563C
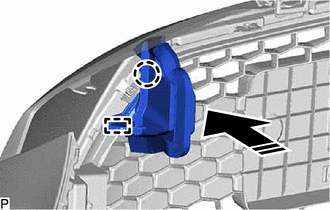
52.INSTALL NO. 3 RADIATOR TO SUPPORT SEAL (for Sport Package)
|
|
Install in this Direction |
Engage the guide and claw to install the No. 3 radiator to support seal as shown in the illustration.
16562K
53.INSTALL NO. 2 RADIATOR TO SUPPORT SEAL (except Sport Package)
- HINT:
-
Use the same procedure as for the No. 3 radiator to support seal.
16562K
54.INSTALL NO. 2 RADIATOR TO SUPPORT SEAL (for Sport Package)
- HINT:
-
Use the same procedure as for the No. 3 radiator to support seal.
52114B
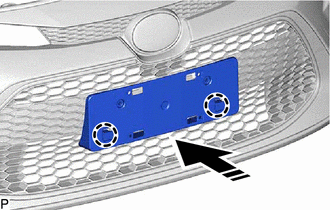
55.INSTALL FRONT BUMPER EXTENSION MOUNTING BRACKET (except Sport Package)
for NR Series Engine:
|
|
Install in this Direction |
Engage the 2 claws as shown in the illustration.

Install the front bumper extension mounting bracket with the 2 screws.