REAR SUSPENSION REAR COIL SPRING(for Torsion Beam Type Suspension) REMOVAL
CAUTION / NOTICE / HINT
The necessary procedures (adjustment, calibration, initialization, or registration) that must be performed after parts are removed and installed, or replaced during rear coil spring removal/ installation are shown below.
| Replaced Part or Performed Procedure | Necessary Procedure | Effect/Inoperative Function when Necessary Procedure not Performed | Link |
|---|---|---|---|
|
*: The vehicle height changes because of tire replacement. |
|||
| Rear wheel alignment adjustment | ·
Perform "Reset Memory" ·
Perform "Calibration" |
·
VSC is disabled or malfunctions ·
DTCs are output ·
Slip indicator light illuminates ·
ABS warning light illuminates |
( 202304,999999,_54,_080770,_0599811,RM100000002B9XU,) 202304,999999,_54,_080770,_0599811,RM100000002B9XU,)
|
·
Tires ·
Suspension parts |
Rear television camera assembly optical axis (Back camera position setting)* | Parking Assist Monitor System | (202304,999999,_56,_080754,_0596561,RM100000002AX0C,)
|
PROCEDURE

 1.REMOVE REAR WHEELS
2.DRAIN BRAKE FLUID
- NOTICE:
-
If brake fluid leaks onto any painted surface, immediately wash it off.
47319F
3.SEPARATE REAR FLEXIBLE HOSE LH
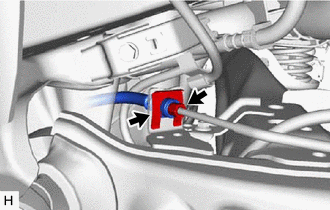
Using a union nut wrench, separate the rear flexible hose LH from the rear No. 4 brake tube while holding the rear flexible hose LH with a wrench.
- NOTICE:
- ·
Do not kink or damage the brake line.
·Do not allow any foreign matter such as dirt or dust to enter the brake line from the connecting parts.
Remove the clip and separate the rear flexible hose LH from the rear axle beam assembly.
47318F
4.SEPARATE REAR FLEXIBLE HOSE RH
- HINT:
-
Perform the same procedure as for the LH side.
890C0A
5.SEPARATE NO. 2 PARKING BRAKE WIRE ASSEMBLY
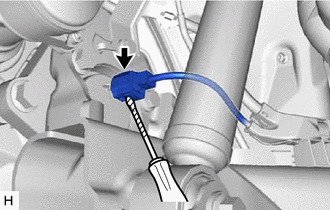
Using a screwdriver with its tip wrapped in protective tape, disconnect the No. 2 parking brake wire assembly connector from the rear axle hub and bearing assembly.
- NOTICE:
-
Be careful not to damage the rear axle hub and bearing assembly and connector cover.
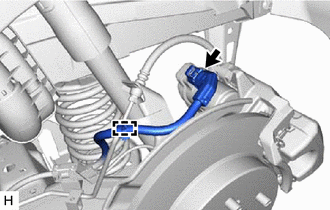
Disengage the clamp.
Disconnect the No. 2 parking brake wire assembly connector from the parking brake actuator assembly.
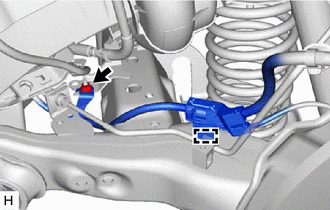
Remove the nut and disengage the clamp to separate the No. 2 parking brake wire assembly.
890C0
6.SEPARATE NO. 1 PARKING BRAKE WIRE ASSEMBLY
- HINT:
-
Perform the same procedure as for the No. 2 parking brake wire assembly.
7.REMOVE REAR COIL SPRING
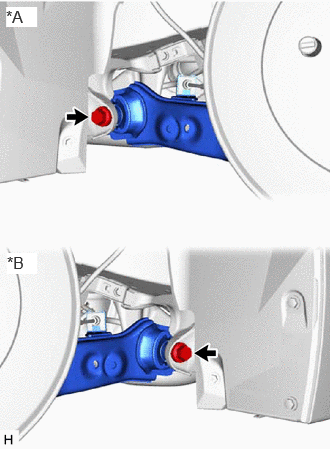
| *A | for LH Side |
| *B | for RH Side |
Loosen the 2 bolts.
- NOTICE:
-
Do not remove the bolts.
Support the spring seat of the rear axle beam assembly using 2 jacks and 2 wooden blocks.
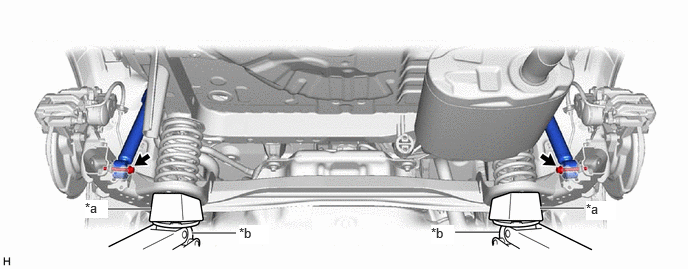
| *a | Wooden Block | *b | Jack |
- CAUTION:
-
Do not jack up the rear axle beam assembly too high as the vehicle may fall.
- NOTICE:
- ·
When jacking up the rear axle beam assembly, be sure to jack it up slowly.
·Make sure to perform this operation with the vehicle kept as low as possible.
·Keep supporting the rear axle beam assembly with a jack until the installation of the rear coil spring is completed.
Remove the 2 bolts and separate the rear axle beam assembly from the rear shock absorber assemblies LH and RH.
Slowly lower the rear axle beam assembly using 2 jacks and 2 wooden blocks, and remove the rear coil springs LH and RH.
Slowly jack up the rear axle beam assembly using 2 jacks and 2 wooden blocks, and temporarily install the rear axle beam assembly to the rear shock absorber assemblies LH and RH with the 2 bolts.
48259A
8.REMOVE REAR UPPER COIL SPRING INSULATOR LH
Remove the rear upper coil spring insulator LH.
48257C
9.REMOVE REAR UPPER COIL SPRING INSULATOR RH
- HINT:
-
Perform the same procedure as for the LH side.
48258C
10.REMOVE REAR LOWER COIL SPRING INSULATOR LH
Remove the rear lower coil spring insulator LH.
48258B
11.REMOVE REAR LOWER COIL SPRING INSULATOR RH
- HINT:
-
Perform the same procedure as for the LH side.
42011
12.REMOVE REAR SPRING SEAT SUB-ASSEMBLY (for LH Side)
- HINT:
-
Perform this procedure only when replacement of the rear spring seat sub-assembly is necessary.
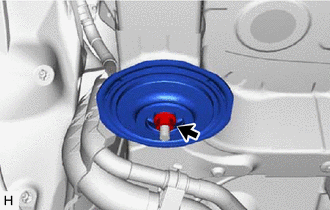
Remove the nut and rear spring seat sub-assembly from the vehicle body.
42011
13.REMOVE REAR SPRING SEAT SUB-ASSEMBLY (for RH Side)
- HINT:
- ·
Perform this procedure only when replacement of the rear spring seat sub-assembly is necessary.
·Perform the same procedure as for the LH side.