AUDIO / VIDEO RADIO RECEIVER INSTALLATION
PROCEDURE

 86140A
1.INSTALL RADIO AND DISPLAY RECEIVER ASSEMBLY
86140A
1.INSTALL RADIO AND DISPLAY RECEIVER ASSEMBLY
86212
2.INSTALL NO. 2 RADIO BRACKET
Install the No. 2 radio bracket with the 3 screws.
86211
3.INSTALL NO. 1 RADIO BRACKET
Install the No. 1 radio bracket with the 3 screws.
4.INSTALL RADIO AND DISPLAY RECEIVER ASSEMBLY WITH BRACKET
except 10.25 Inch Display:
Connect each connector.
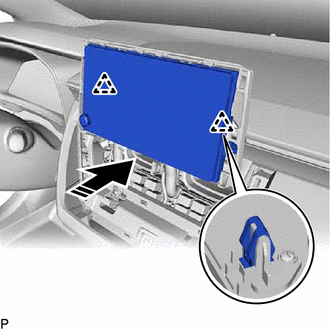

|
Install in this Direction |
Engage the 2 clips to temporarily install the radio and display receiver assembly with bracket as shown in the illustration.
Install the radio and display receiver assembly with bracket with the 4 bolts.
for 10.25 Inch Display:
Connect each connector.

|
|
Install in this Direction |
Engage the 4 clips to temporarily install the radio and display receiver assembly with bracket as shown in the illustration.
Install the radio and display receiver assembly with bracket with the 4 bolts.
55670A
5.INSTALL CENTER INSTRUMENT PANEL REGISTER ASSEMBLY (for TFTM Made)
55470
6.INSTALL INSTRUMENT CLUSTER FINISH PANEL GARNISH ASSEMBLY (for TFTM Made)
55318F
7.INSTALL NO. 2 INSTRUMENT SIDE PANEL (for TFTM Made)
55670A
8.INSTALL CENTER INSTRUMENT PANEL REGISTER ASSEMBLY (for GTMC Made)
9.INSTALL LOWER CENTER INSTRUMENT CLUSTER FINISH PANEL SUB-ASSEMBLY (for Mechanical Control Type)
55900
10.INSTALL AIR CONDITIONING CONTROL ASSEMBLY (for Electrical Control Type)
55405B
11.INSTALL CENTER INSTRUMENT CLUSTER FINISH PANEL SUB-ASSEMBLY (except 10.25 Inch Display)
55405B
12.INSTALL CENTER INSTRUMENT CLUSTER FINISH PANEL SUB-ASSEMBLY (for 10.25 Inch Display)