EXTERIOR PANELS / TRIM LUGGAGE COMPARTMENT DOOR OUTSIDE GARNISH(for GTMC Made) REASSEMBLY
PROCEDURE

 75446
1.INSTALL NO. 6 LUGGAGE COMPARTMENT DOOR NAME PLATE (for LEVIN GT)
75446
1.INSTALL NO. 6 LUGGAGE COMPARTMENT DOOR NAME PLATE (for LEVIN GT)
76825
2.INSTALL NO. 2 BACK DOOR OUTSIDE GARNISH PROTECTOR
- HINT:
-
When installing the No. 2 back door outside garnish protector, heat the luggage compartment door outside garnish using a heat light.
| Item | Temperature |
|---|---|
| Luggage Compartment Door Outside Garnish | 20 to 30°C (68 to 86°F) |
- CAUTION:
-
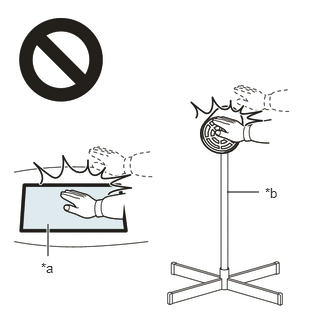 2.365,2 2.698,2 false 0.5,2.333 0.5,2.667 true 0.427,2.708 0.74,2.865 0.313,0.156 10 false *a 2.76,1.927 3.073,2.083 0.313,0.156 10 false *b
*a Heated Part *b Heat Light
- ·
Do not touch the heat light and heated parts, touching the heat light may result in burns.
·Touching heated parts for a long time may result in burns.
- NOTICE:
-
Do not heat the luggage compartment door outside garnish excessively.
Clean the luggage compartment door outside garnish.
Remove any remaining double-sided tape from the luggage compartment door outside garnish.
Wipe off any tape adhesive residue with cleaner.
Remove the release paper from a new No. 2 back door outside garnish protector.
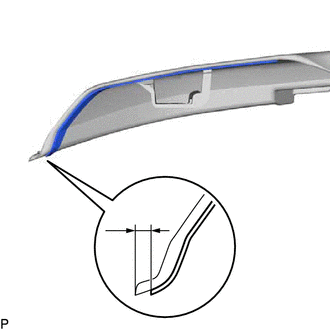
Attach the No. 2 back door outside garnish protector as shown in the illustration.
- Standard Measurement:
Area Measurement A 4.5 mm (0.177 in.)
- HINT:
- ·
Press the No. 2 back door outside garnish protector firmly to install it.
·Use the same procedure for the RH side and LH side.
76812A
3.INSTALL NO. 2 BACK DOOR OUTSIDE GARNISH
Engage the 3 guides and 3 claws as shown in the illustration.
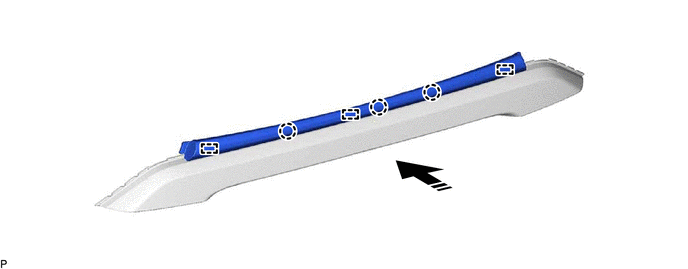

|
Install in this Direction | - | - |
Install the No. 2 back door outside garnish with the 2 clips.
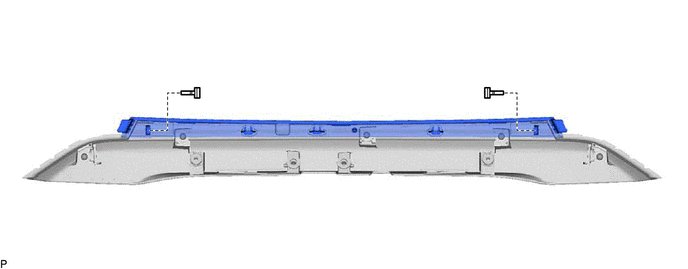
76821
4.INSTALL NO. 1 BACK DOOR OUTSIDE GARNISH PROTECTOR
- HINT:
-
When installing the No. 1 back door outside garnish protector, heat the luggage compartment door outside garnish using a heat light.
| Item | Temperature |
|---|---|
| Luggage Compartment Door Outside Garnish | 20 to 30°C (68 to 86°F) |
- CAUTION:
-
2.365,2 2.698,2 false 0.5,2.333 0.5,2.667 true 0.427,2.708 0.74,2.865 0.313,0.156 10 false *a 2.76,1.927 3.073,2.083 0.313,0.156 10 false *b
*a Heated Part *b Heat Light
- ·
Do not touch the heat light and heated parts, touching the heat light may result in burns.
·Touching heated parts for a long time may result in burns.
- NOTICE:
-
Do not heat the luggage compartment door outside garnish excessively.
Clean the luggage compartment door outside garnish.
Remove any remaining double-sided tape from the luggage compartment door outside garnish.
Wipe off any tape adhesive residue with cleaner.
Remove the release paper from a new No. 1 back door outside garnish protector.
Install the No. 1 back door outside garnish protector to the luggage compartment door outside garnish.
- HINT:
-
Press the No. 1 back door outside garnish protector firmly to install it.